One of the most exciting parts about online video is how fast technology is changing. While this blog often highlights the improvements in video software, there has also been a huge explosion over the past few years in the number of affordable video hardware solutions. Hardware such as the ATEM Mini line from Blackmagic Design, the Pearl line from Epiphan, and the Yolobox are all great examples of "prosumer" level video hardware with features that would have cost thousands of dollars just a few years ago.
For those not familiar with the ATEM Mini, it's a small video switcher that has 4 HDMI inputs, plus two additional 3.5mm audio inputs that can be configured as either mic inputs or line inputs. On the output side, it has an HDMI output as well as a USB-C port that can be used as a "webcam" output when connected to a computer. The "Pro" model of the switcher adds the ability to stream the output via RTMP and the ability to record the video output to a USB-C attached SSD. And, if four HDMI inputs aren't enough, Blackmagic recently released the ATEM Mini Extreme, which has eight HDMI inputs and two HDMI outputs.
The ATEM Mini switchers come with two utilities that run on both Windows and MacOS. The first, called ATEM Setup, is used to configure the IP address on your ATEM Mini Pro as well as update the firmware. The second, called ATEM Software Control, acts as a software controller for the switcher and lets you perform all the same actions that you would via the buttons on the switcher, plus many other things.
In this blog post, I'll walk you through setting up an ATEM Mini Pro for live streaming to Mux.
Initial Setup
In the interest of brevity, I won't go through the entire initial setup of the ATEM, as the setup is quite intuitive and there are plenty of other online resources that will help you with the initial setup. In particular, however, I'll walk you through the necessary steps to set up online streaming to Mux.
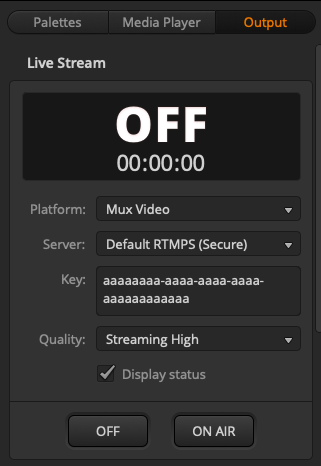
In the ATEM Software Control software, on the "Switcher" Panel, there's a set of tabs in the upper right-hand corner. If you click on the one titled "Output", you can see the details of the Live Stream configuration. Out of the box, the ATEM Mini is configured to stream to one of six different RTMP video services, including Facebook Live and Twitch. Unfortunately, it requires a small amount of work to add another service, such as Mux Video. We'll get to that shortly.
Before we leave the ATEM Software Control, please note that for each streaming service, you can choose the server, streaming quality, and enter a streaming key. You can also start and stop streaming with the "On Air" and "Off" buttons either in the control software or the buttons on the ATEM Mini itself.
💡 Please note that you'll want to update the firmware on your ATEM Mini Pro to the very latest version (8.6.1 as of the time this article was written) to properly support streaming over a secure RTMPS connection.
Adding Mux Video to the List of Providers
By default, the ATEM Mini Pro doesn't include Mux Video in the list of pre-configured streaming providers. Adding Mux Video to the list is quite easy. Simply create a new XML file with the contents below — I'll call the file mux-video.xml.
<streaming>
    <service>
        <name>Mux Video</name>
        <servers>
            <server>
                <name>Default RTMPS (Secure)</name>
                <url>rtmps://global-live.mux.com:443/app</url>
            </server>
            <server>
                <name>Default RTMP (Insecure)</name>
                <url>rtmp://global-live.mux.com:5222/app</url>
            </server>
        </servers>
        <profiles>
            <profile>
                <name>Streaming High</name>
                <config resolution="1080p" fps="60">
                    <bitrate>9000000</bitrate>
                    <audio-bitrate>128000</audio-bitrate>
                    <keyframe-interval>2</keyframe-interval>
                </config>
                <config resolution="1080p" fps="30">
                    <bitrate>6000000</bitrate>
                    <audio-bitrate>128000</audio-bitrate>
                    <keyframe-interval>2</keyframe-interval>
                </config>
            </profile>
            <profile>
                <name>Streaming Low</name>
                <config resolution="1080p" fps="60">
                    <bitrate>4500000</bitrate>
                    <audio-bitrate>128000</audio-bitrate>
                    <keyframe-interval>2</keyframe-interval>
                </config>
                <config resolution="1080p" fps="30">
                    <bitrate>3000000</bitrate>
                    <audio-bitrate>128000</audio-bitrate>
                    <keyframe-interval>2</keyframe-interval>
                </config>
            </profile>
        </profiles>
    </service>
</streaming>
Once you have that file created on your computer, open ATEM Software Control. Go to the Stream menu at the top of the screen, and select the option labeled Load Streaming Settings. Select the XML file created above.
To confirm that Mux Video is configured as an available streaming service, ensure the the "Switcher" panel is selected at the bottom of the ATEM Software Control, then select the "Output" tab in the upper right-hand corner of the Window. In the "Live Stream" section, you should be able to click on the "Platform" drop-down list and select the platform named Mux Video.
Obtaining a Streaming Key
Each time you want to send a live stream to Mux Video, you'll need to obtain a streaming key.
💡 The streaming key is used to authenticate to the platform, so you should keep your streaming keys secret. If someone else were to get your streaming key, they could stream their own content using your account.
If you're familiar with making REST API calls, you may use the Mux Video API to obtain a stream key by making a POST to https://api.mux.com/video/v1/live-streams with a POST body that looks something like the following:
{
  "playback_policy": ["public"],
  "new_asset_settings": {
    "playback_policy": ["public"]
  }
}
This will make both the playback of the live stream and the playback of the newly recorded assets set to public. Feel free to replace the word public with the word signed if you're requiring tokens to be able to view the live stream or the recorded assets, respectively. See Secure video playback for more details.
The response to your POST request should look something like the following:
{
  "stream_key": "aaaaaaaa-aaaa-aaaa-aaaa-aaaaaaaaaaaa",
  "status": "idle",
  "reconnect_window": 60,
  "playback_ids": [
    {
      "policy": "public",
      "id": "bbbbbbbbbbbbbbbbbbbbbbbbbbbbbbbbbbbbbbbbbbb"
    }
  ],
  "new_asset_settings": {
    "playback_policies": [
      "public"
    ]
  },
  "id": "ccccccccccccccccccccccccccccccccccccccccccccc",
  "created_at": "1620941034"
}
💡 For the sake of convenience, I've replaced the stream key with aaaaaaaa-aaaa-aaaa-aaaa-aaaaaaaaaaaa, the playback ID with bbbbbbbbbbbbbbbbbbbbbbbbbbbbbbbbbbbbbbbbbbb, and the livestream ID with ccccccccccccccccccccccccccccccccccccccccccccc. Your response will contain more interesting values.
Now, go back into the ATEM Software Control, and paste the stream key (the value shown as aaaaaaaa-aaaa-aaaa-aaaa-aaaaaaaaaaaa above) into the Key field. Make sure the Platform is set to "Mux Video", and then you should be able to press the "On Air" button on the ATEM Mini (or the "On Air" button in ATEM Software Control) to start the live stream.
Pressing the "OFF" button or key will stop the live stream.
That's all there is to it — you now know how to stream live video from the ATEM Mini Pro.
Further Reading
Of course, there's a lot more information on our documentation site related to live streaming, streaming keys, and the assets that are created from a live stream. You can even learn how to simulcast to other platforms at the same time. I encourage you to spend some time in the documentation to better understand the ins and outs of live streaming with Mux Video.