There’s only one thing better than building new features into your application, and that’s building new features into your application without writing a ton of code.
To that end, I’m super pumped to share what we’ve been working on with the public beta of <mux-uploader>, a drop-in web component that gives your application the ability to upload video files to a Mux account in no time. Let me show you how it works:
<mux-uploader></mux-uploader>That’s it. That’s the post.
…I should probably tell you a bit more about what’s going on here, so let’s dig in.
Historically, uploading videos directly to Mux would require some planning and UI work. The general flow might look something like this:
- Make a POST request to the Create Direct Upload endpoint to generate a signed upload URL and send it down to the client.
- Build a custom user interface that allows users to select a file, render upload progress, and handle retries, error messaging, network failures, etc.
- Use a JavaScript library like UpChunk to listen for file select events and submit the file to the signed upload URL.
- Decide on and implement a UI for successful uploads.
Couldn’t we make this an easier lift? This is a lot of tedious work for a relatively common feature, so we set off to bake up a better solution.
What is Mux Uploader?
Mux Uploader is a web component library that allows users to upload content directly to Mux. It is designed to be easily integrated into your application, providing a fully functional video upload UI with just a single line of code. Mux Uploader handles everything from rendering a file selector to applying drag-and-drop functionality, uploading your video file, displaying progress updates to the user, handling retries, and more.
Using Mux Uploader is as simple as installing it, importing it, and adding the HTML tag. Here's how you do it:
First, install it using npm:
npm i @mux/mux-uploader
Then, import it:
import '@mux/mux-uploader';
Finally, add the HTML tag:
<mux-uploader></mux-uploader>
The only attribute you have to set in order to upload your file is the endpoint attribute. This attribute provides Mux Uploader with a direct upload URL that will receive the video file you're uploading.
You can generate a signed direct upload URL by making a server-side API call to Mux’s Create Direct Upload endpoint. In a successful API response, you will receive a unique signed upload URL that can then be passed along to your client application and set as the endpoint property on a <mux-uploader> element.
// This example uses Next.js 12 and the Mux node sdk to
// create the Direct Upload URL.
// Then, it returns the `upload.id` and `upload.url` to
// the client via props.
export async function getServerSideProps() {
  const upload = await Video.Uploads.create({
    cors_origin: "*",
    new_asset_settings: {
      playback_policy: "public",
    },
  });

  return {
    props: { id: upload.id, url: upload.url },
  };
}
Boom! You now have a fully functional upload UI for sending videos to your Mux account.
Styling to match your application
The default UI might just work for your application, but it’s also possible that you’ll want to customize it to meet your own design criteria. Mux Uploader uses HTML slots, allowing you to replace default UI elements with your own styled HTML elements. It also exposes a handful of CSS variables that allow you to change the default styling of the baked-in uploader UI.
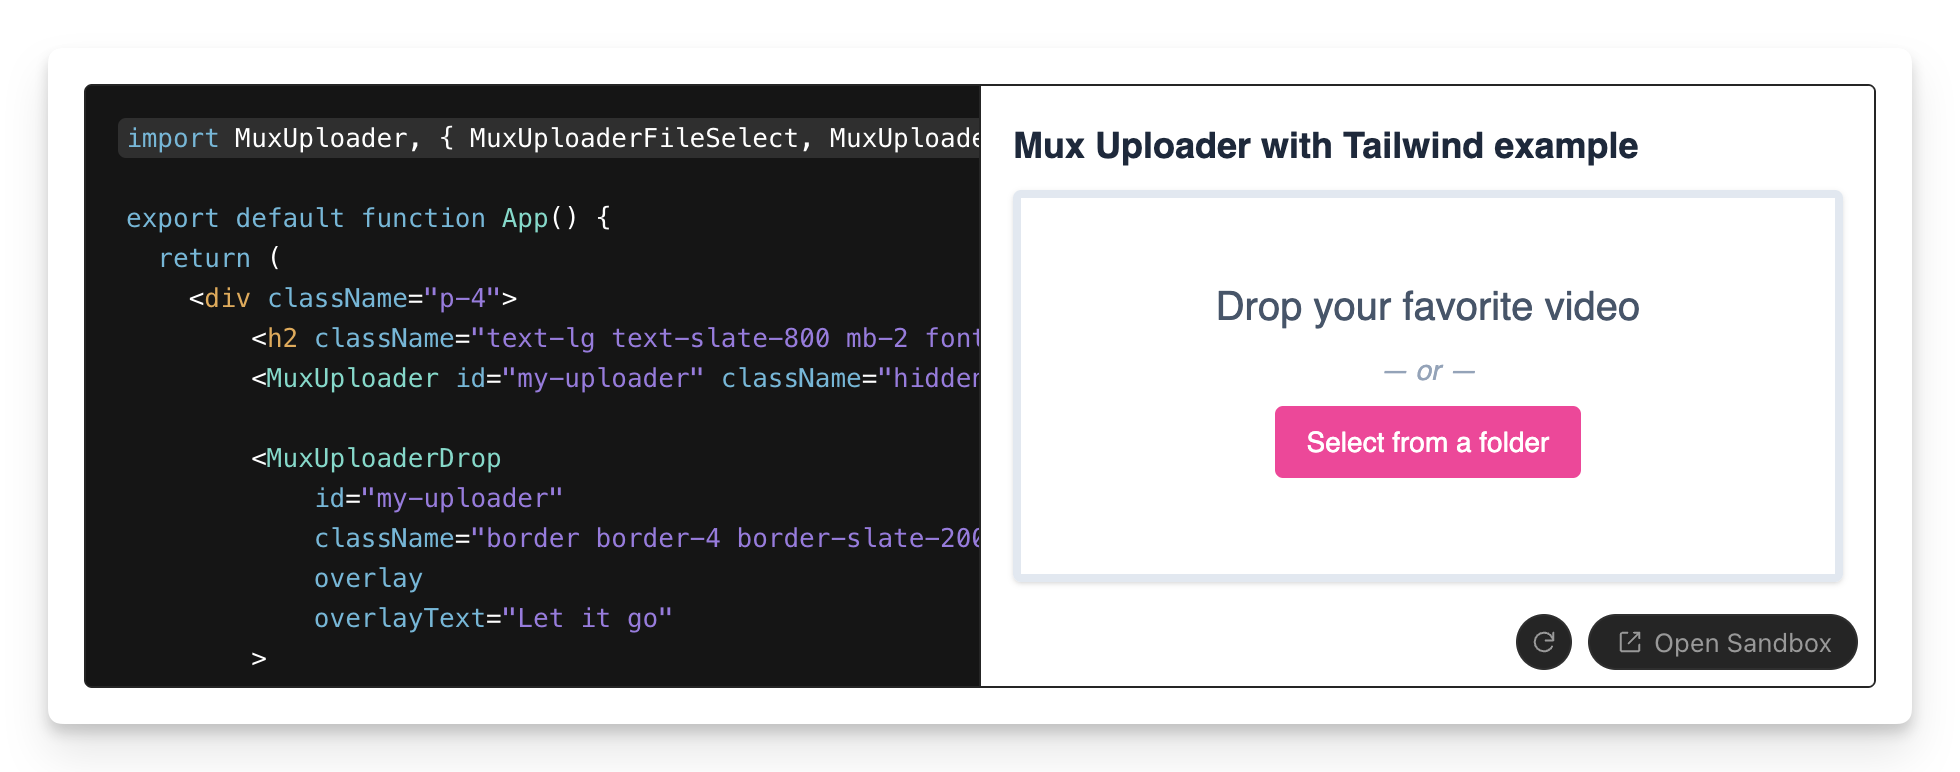
With these two approaches, you’re well equipped to tweak the uploader theme and make it match your existing application styling.
Customize further with an advanced UI
Building a custom UI for uploading videos in your application can be challenging. It requires a deep understanding of the upload process, error handling, progress tracking, and user interface design. Mux Uploader simplifies this process by providing individual web components that you can use to create a custom upload UI that perfectly fits your application’s needs. Each of these components can be used individually, giving you the flexibility to design and structure your upload UI as you see fit.
For example, the <mux-uploader-progress> component displays a progress indicator showing how much of your file has been uploaded, keeping users informed about the upload progress. The <mux-uploader-file-select> component, on the other hand, displays the system file-select dialog when clicked, enabling users to choose the video file they want to upload.
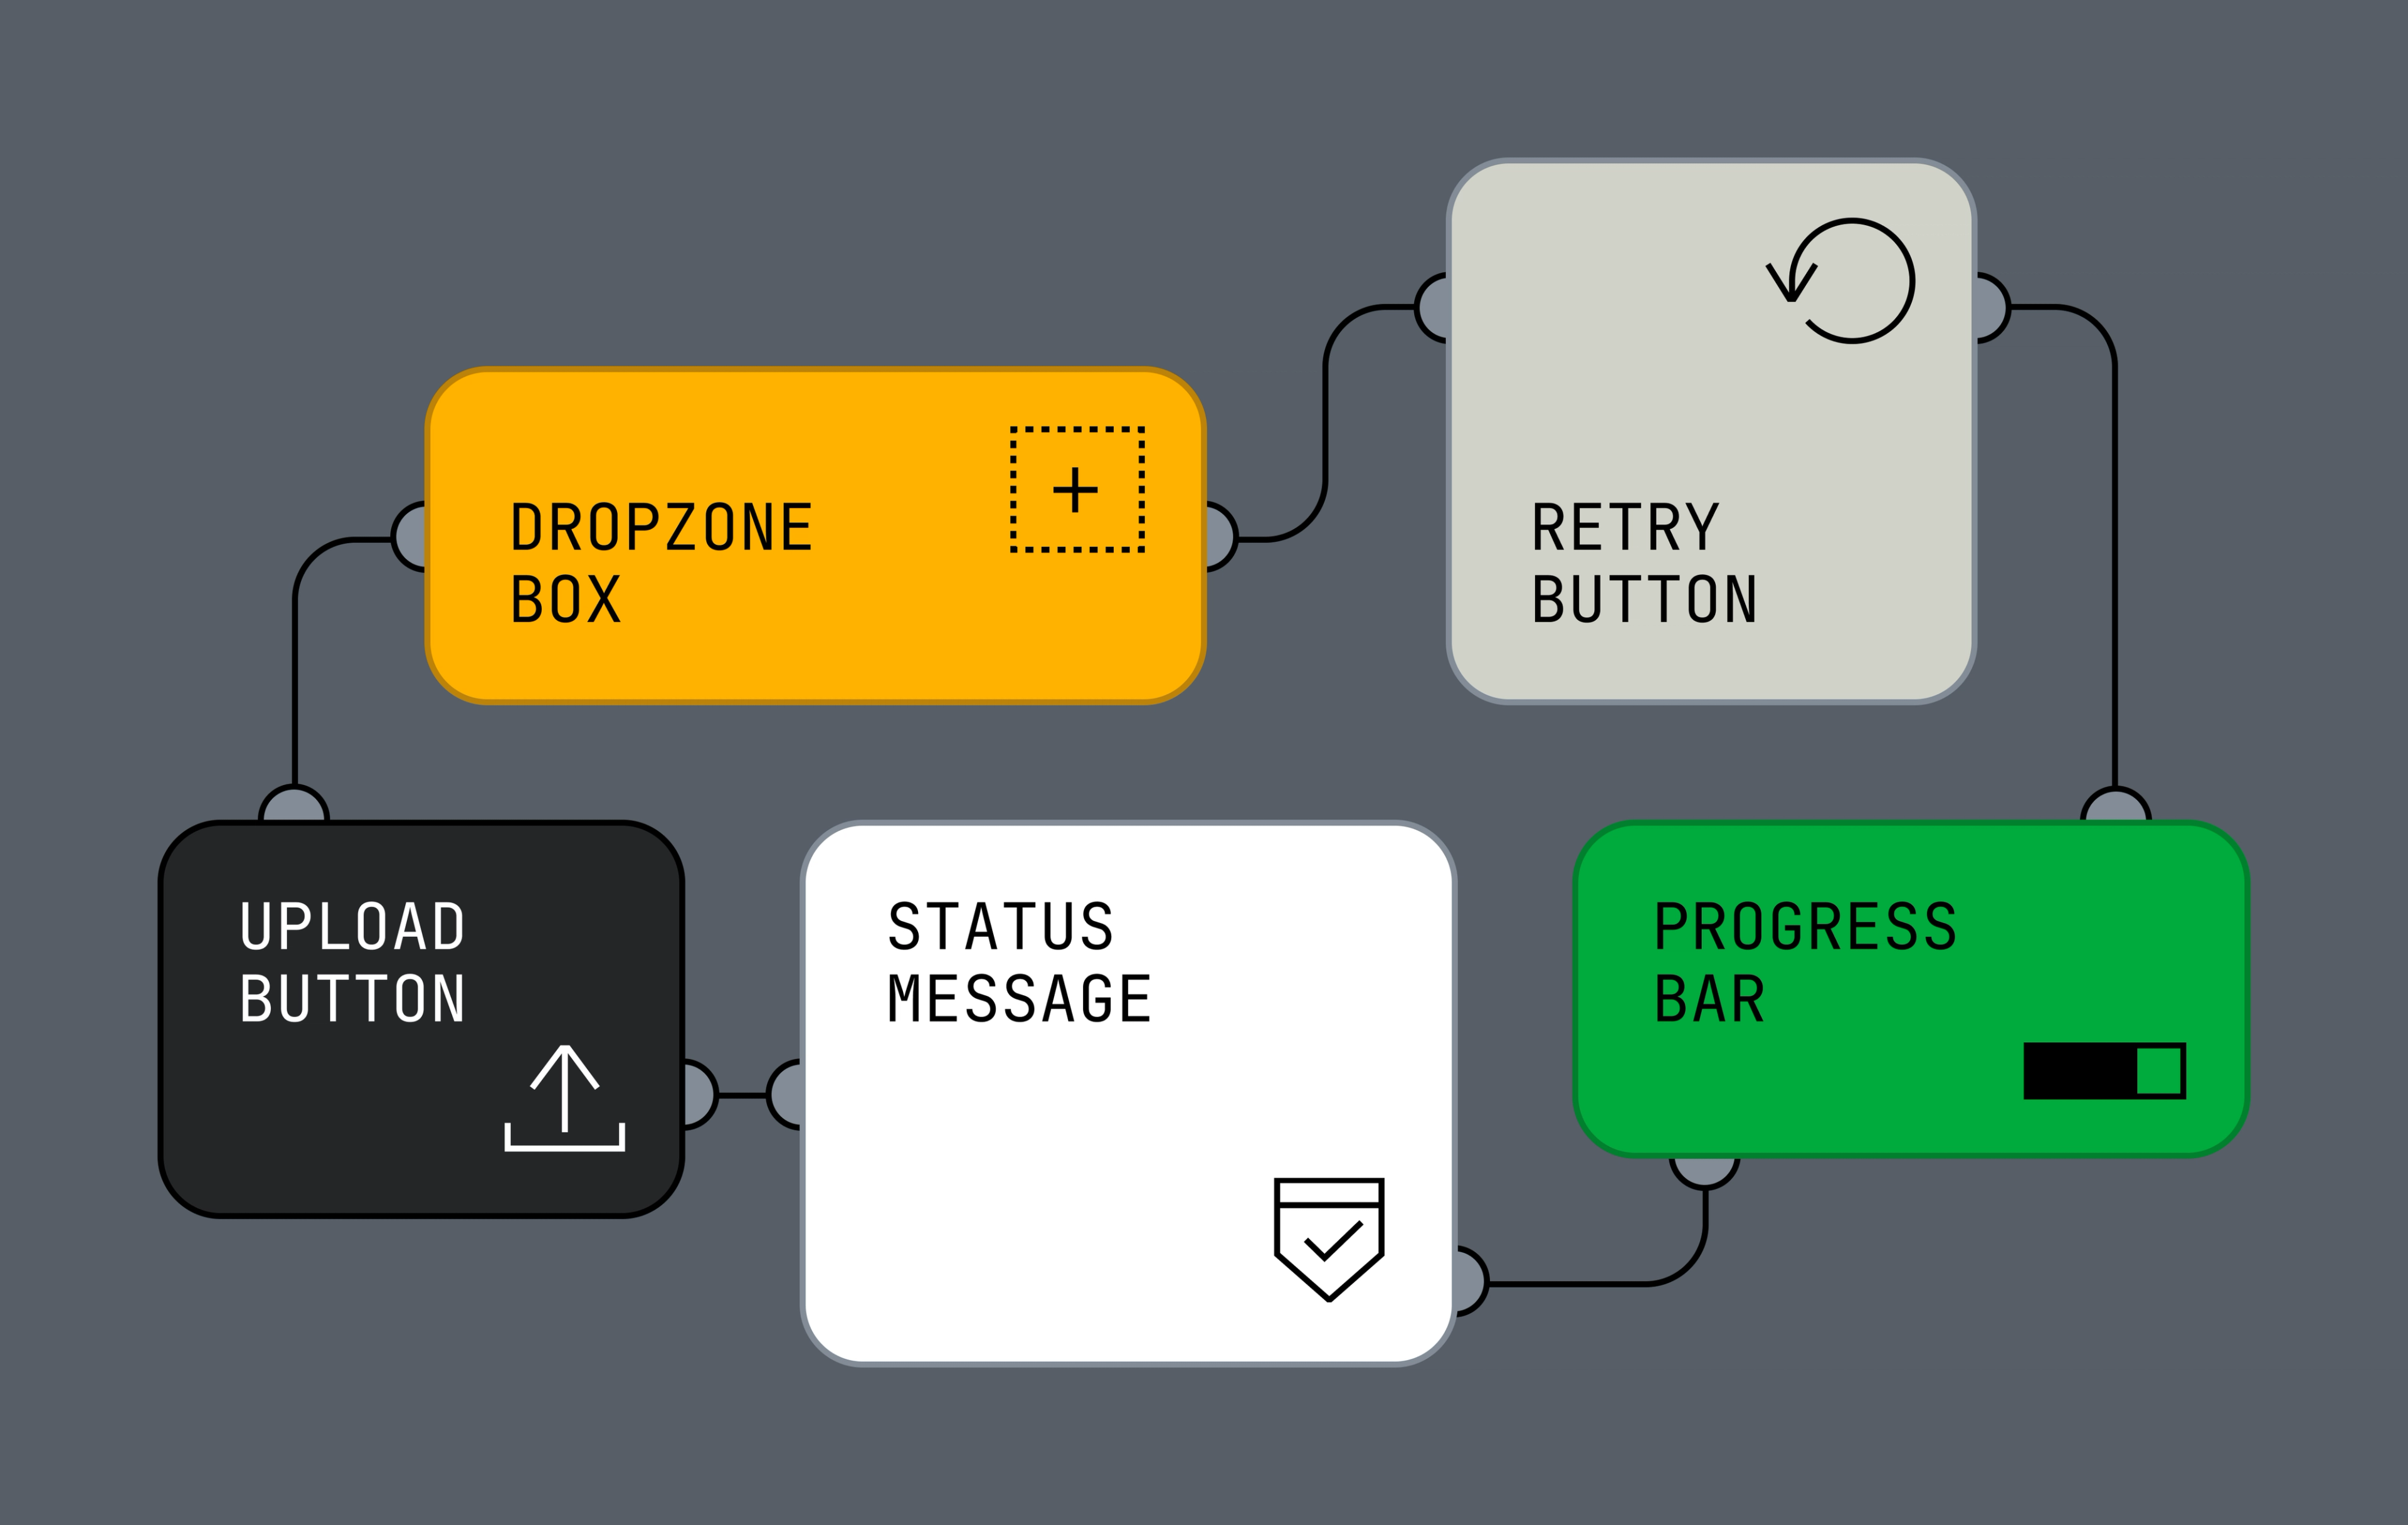
By using these components, you can create a custom upload UI that not only matches the look and feel of your application but also provides a seamless and intuitive user experience. By separating each of these tools into individual components, you can pick and choose which elements to use so you can build out the best user experience for your application.
Compatible with your web application, wherever you are
Because Mux Uploader was built using native web components, it’s compatible with every JavaScript framework. This means that whether you're using Vue, Angular, Svelte, or any other framework, you can easily integrate Mux Uploader into your application. And for those using React, there’s even a dedicated React library available, making it that much easier to use Mux Uploader in your React applications.
Our documentation goes into detail on how to make the most of your Mux Uploader integration. Give that a peep and explore all the possibilities that Mux Uploader offers. Hopefully we’ll save you time by streamlining the process of getting your videos uploaded to Mux, so you can focus more on creating what makes your app unique and less on the technicalities of video uploads.