

We on the partnerships team at Mux are on a mission to connect Mux customers to the platforms, agencies, and cloud infrastructure they need to get to market quickly, affordably, and with the capacity to scale. We were delighted to discover Paloma and collaborate with them on a video streaming project they were undertaking. No spoilers: We will let Daniel Gibson from Paloma show you what we built and how we built it. Take it away, Daniel!
About Paloma
Paloma is a full-service product and venture studio that specializes in creating, accelerating, and funding digital products and businesses. We work with startups, scale-ups, and enterprise clients across Australia, New Zealand, and the US.
Paloma is unique in that we work across the entire product gamut, from the earliest pre-seed stage when a founder has nothing more than an idea, to multibillion-dollar corporations with millions of monthly active users worldwide.
The team at Paloma are excited to be working with Mux because of the macro trends of the growth of video across all forms of content. We are always looking for technology that help lean, fast-moving startup teams handle large scale.
What we built and how we built it
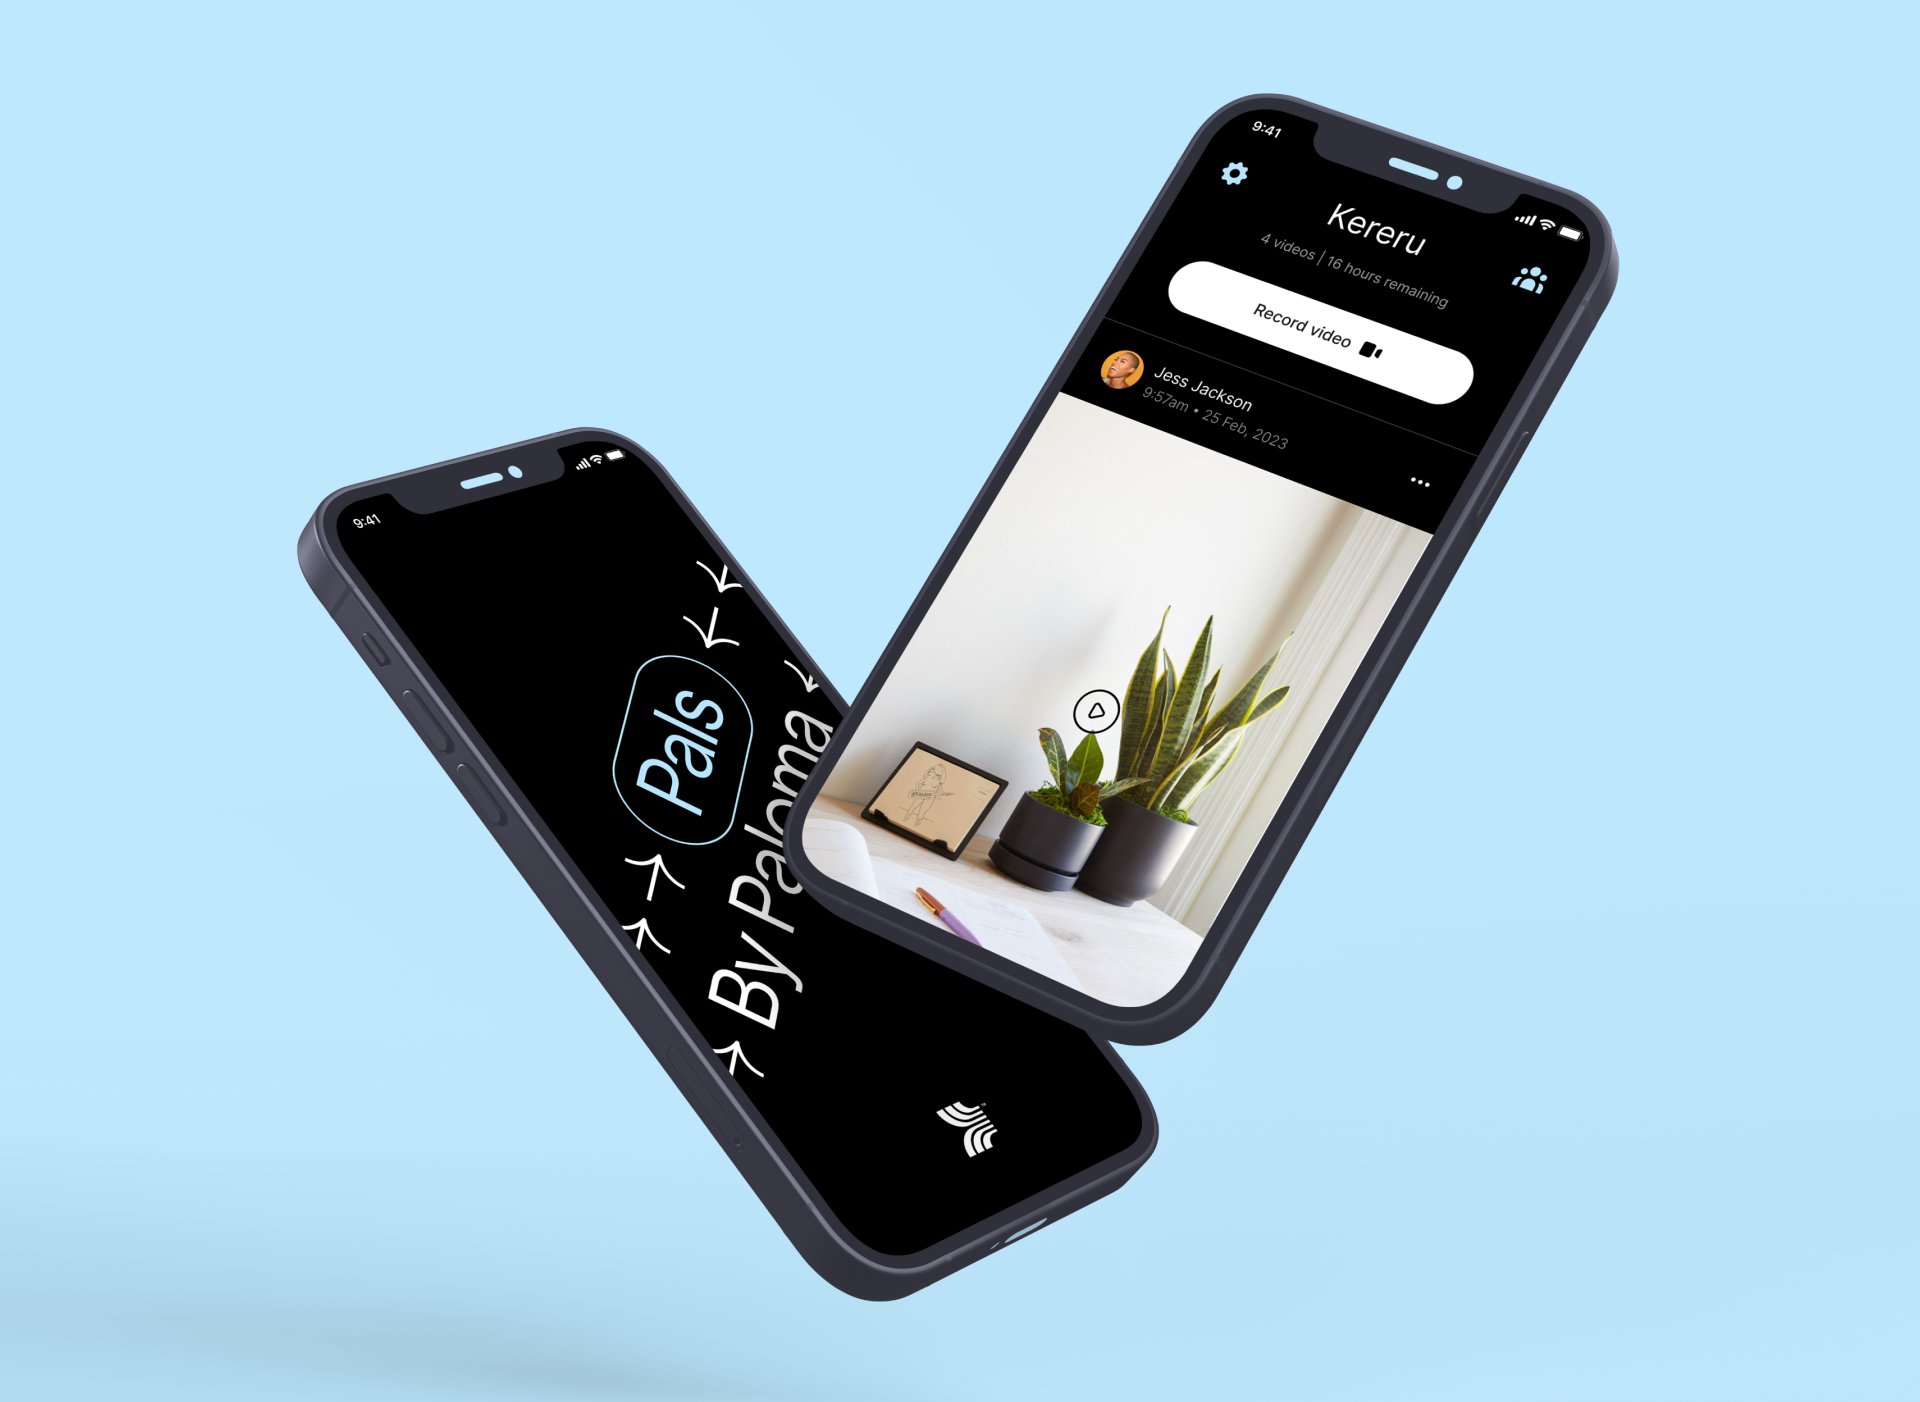
Are you looking to build a high-quality video streaming experience without the overhead, cost, and ongoing maintenance of complex infrastructure? If so, Mux is the tool for you. The team at Paloma chose Mux to handle the upload, streaming, playback, and analytics of video in a proof-of-concept app that we are building, called Pals by Paloma.
Pals is an Instagram-style video sharing app that focuses on connecting remote workplace teams through the recording and sharing of short-form video. User generated video content (UGC) is a great way for remote teams to share information, build community, and stay engaged. This blog post covers why we chose Mux, how we implemented it, what we learned, and some traps to avoid.
For this app, we decided to build with React Native using Expo, and Google Firebase as the back-end-as-a-service, which allowed us to get up and running fast but with confidence that the chosen technologies will scale. With Mux handling all of the complex video pieces for us, this is a stack that should serve us well once we go viral ;).
Getting started
Setup was straightforward as Expo have a great getting started guide. Once we got Expo up and running on both the iOS and Android emulators, we added Google Firebase to the project by following Expo’s Firebase guide. We used a few services from Firebase:
- Authentication allowed for simple sign-up using a Google account.
- Firestore provided a flexible NoSQL database, which we used to store metadata about the authenticated user, some information about the team, and video metadata (mostly fields sourced from the Mux API).
- Functions allowed us to write and run back end code, such as web requests or events triggered from the front end (useful for Webhooks, for instance), with ease. The setup of Firebase Functions was straightforward - just follow their getting started guide for a Node.js environment
Once we were happy with the development of the app and ready to share it with others, we used Expo Updates and their mobile app Expo Go, which provided a quick and easy way to get people using our app without the overhead of going through app stores.
Building the application
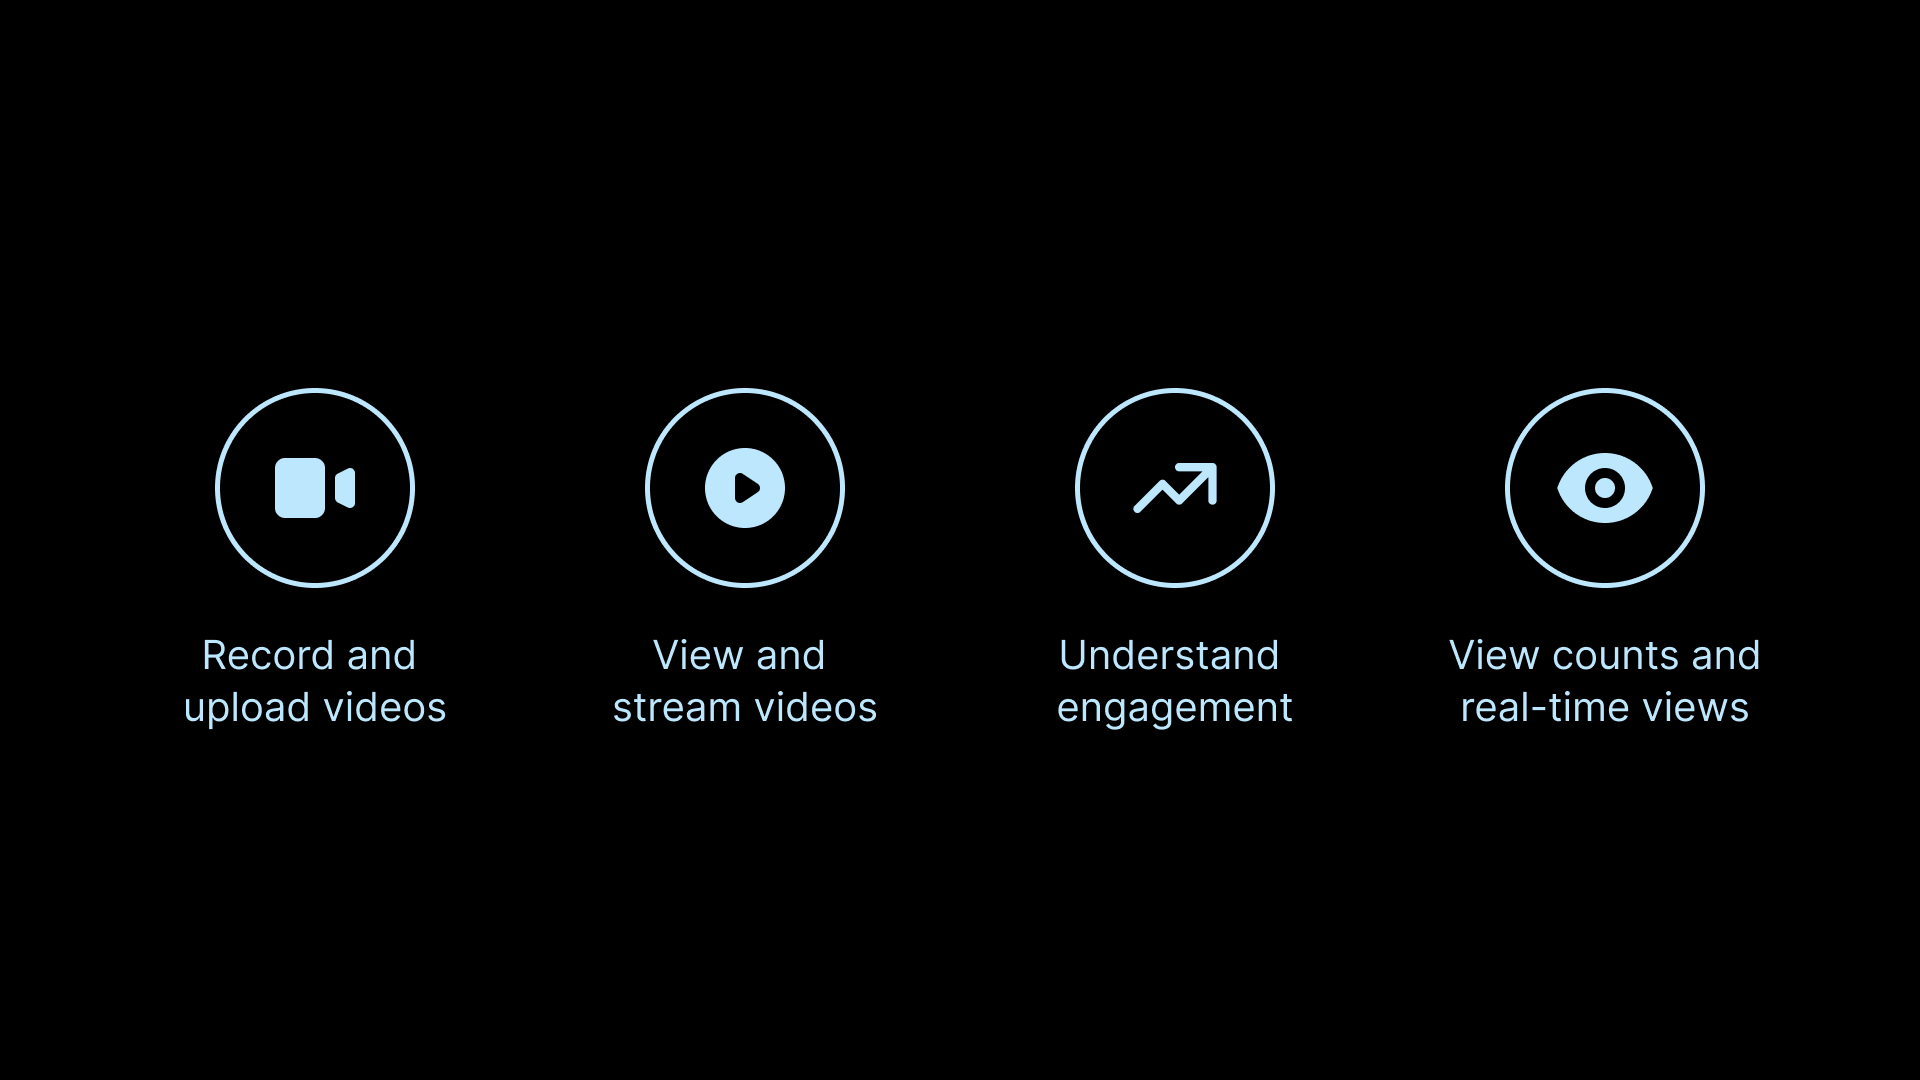
Let’s hit on the key components of our video sharing app:
- Allow a user to record and upload a video
- Stream high-quality videos
- Generate metrics to understand user engagement
- Display view counts and the number of real-time viewers
1. Allow a user to record a video with their phone and upload it to Mux
A quick overview of how this works:
- The user records a video on their device
- The back end sends a request to Mux to generate a signed URL, where we’ll send the video file
- Mux handles the upload of the video file without it touching our back end, which makes development (and scaling!) much easier
- The back end listens for the Mux Webhook for when the upload status changes to “ready”
- We update our database with the relevant metadata and display the video to the user
Mux has a Node.js SDK that streamlines this process nicely and which we highly recommend; there are heaps of other SDK languages available, too. This SDK is a lightweight wrapper that uses our Mux API credentials to make authenticated requests to Mux.
The Mux API is split into two parts: Video and Data. Video is used to handle uploading and fetching videos, and Data is used for fetching metrics on users who watched our videos.
For recording videos, we used Expo’s camera component (there are some great guides available to help set this up). Once a user has finished recording, we are given a file uri that points to the video file on the device. To upload this to Mux, we used Mux’s Upload Direct File service. Mux is also working on an even more streamlined service as an alternative to direct upload - keep your eyes peeled!
To start the direct upload, we created a Firebase Function in our back end that uses the Mux Node.js SDK to generate a signed URL and return it to the front end.
const Mux = require('@mux/mux-node');
const functions = require('firebase-functions');
const { defineSecret } = require('firebase-functions/params');

const muxTokenId = defineSecret('MUX_TOKEN_ID');
const muxTokenSecret = defineSecret('MUX_TOKEN_SECRET');
const firebaseFunctionMux = functions.runWith({ secrets: [muxTokenId, muxTokenSecret] }).https;

exports.generateSignedUrl = firebaseFunctionMux.onCall(async () => {
  const { Video } = new Mux(muxTokenId.value(), muxTokenSecret.value());
  try {
    const signedUploadUrl = await Video.Uploads.create({
      cors_origin: '*',
      new_asset_settings: {
        playback_policy: 'public',
      },
    });
    return signedUploadUrl;
  } catch (error) {
    functions.logger.error('failed to get generated URL -> ', error);
  }
});
On the front end, we call the generateSignedUrl function and then use Expo’s file system library to send the video file from our local device to the Mux signed URL using a PUT request.
import * as FileSystem from 'expo-file-system';
...
console.log('Upload started. Generating signed URL from Mux...');
const generateSignedUrl = httpsCallable(functions, 'generateSignedUrl');
const { data } = await generateSignedUrl();

console.log('Success. Uploading file to signed Mux URL...');
await FileSystem.uploadAsync(data.url, videoSourceUri, {httpMethod: 'PUT'});
If you’d prefer not to use the SDK, you might want to follow this guide, which describes how to upload the file in chunks to give a better user experience. Because our app is designed around short-form video, we’ve decided to instead upload the user’s video from their mobile device all in one go.
When we upload our file to the signed URL, we have access to some initial Mux video data, such as upload status and upload ID. At this point, Mux begins processing the video to prepare it for streaming on any device or player.
Our next step is to check when the video is ready to stream. We can do this using Mux’s Webhook, which will send us a notification about any status changes for our videos.
First, we deploy a Firebase function to generate a request URL, which is used to trigger the function; this can be found in the Firebase console. Second, we add Mux’s Webhook signing secret to the function; this can be generated through the Mux dashboard > Settings > Webhooks. This signing secret is used to verify that the requests we receive are from Mux. Further details on this verification can be found in the Mux Webhook guide.
We listen for the request body type to be a change in video status - we’re looking for “ready.” At that point, we’ll have access to more data, such as a Playback ID, which will be used for streaming the video stored in our Firestore database.
const functions = require('firebase-functions');
const { defineSecret } = require('firebase-functions/params');

const muxWebHookSigningSecret = defineSecret('MUX_WEBHOOK_SIGNING_SECRET');
const firebaseFunctionMuxWebHook = functions.runWith({ secrets: [muxWebHookSigningSecret] }).https;

exports.muxWebHook = firebaseFunctionMuxWebHook.onRequest((req, res) => {
  const body = req.body;
  if (body.type === 'video.asset.ready') {
    const { upload_id, duration, playback_ids, status, id } = body.data;

    // update database
    db.collection('videos').where('upload_id', '==', upload_id).get().then(
        (snapshot) => {
          	snapshot.docs[0].ref.update({
            duration,
            playback_id: playback_ids[0].id,
            upload_status: status,
            mux_id: id,
          }).then(() => {
            functions.logger.info('successfully updated video asset');
            res.status(200).end();
          });
        },
    );
  }
});
Next, it’s time to update our front end! We can listen to real-time updates of our videos collection from Firestore and, once a change occurs, we display that to the user. If the video is still processing in Mux, we show the user a “loading” indicator. If it’s all ready to go, we display the video!
const unsubscribeFromWatchingDocChanges = onSnapshot(customQuery, (querySnapshot) => {
  querySnapshot.docChanges().forEach((change) => {
    if (change.type === 'modified') {
      const updatedData = change.doc.data();
      if (updatedData.upload_status === 'ready') {
        // video has now finished processing in Mux. Return relevant data
	   ...
      }
    }
  });
});
return unsubscribeFromWatchingDocChanges;2. Stream videos from stream.mux.com
In case reading JSON is a bit dry, you can see an overview of the data that Mux has from our video in the Mux dashboard. Using the videos list, we can choose an upload and see the duration, resolution, and other useful info – we can even play the video back if we want. This will help us understand what is available for us to use and display on the front end via the Mux Video API. The key piece of data for us is the Playback ID, which is used for both the video source and thumbnail.
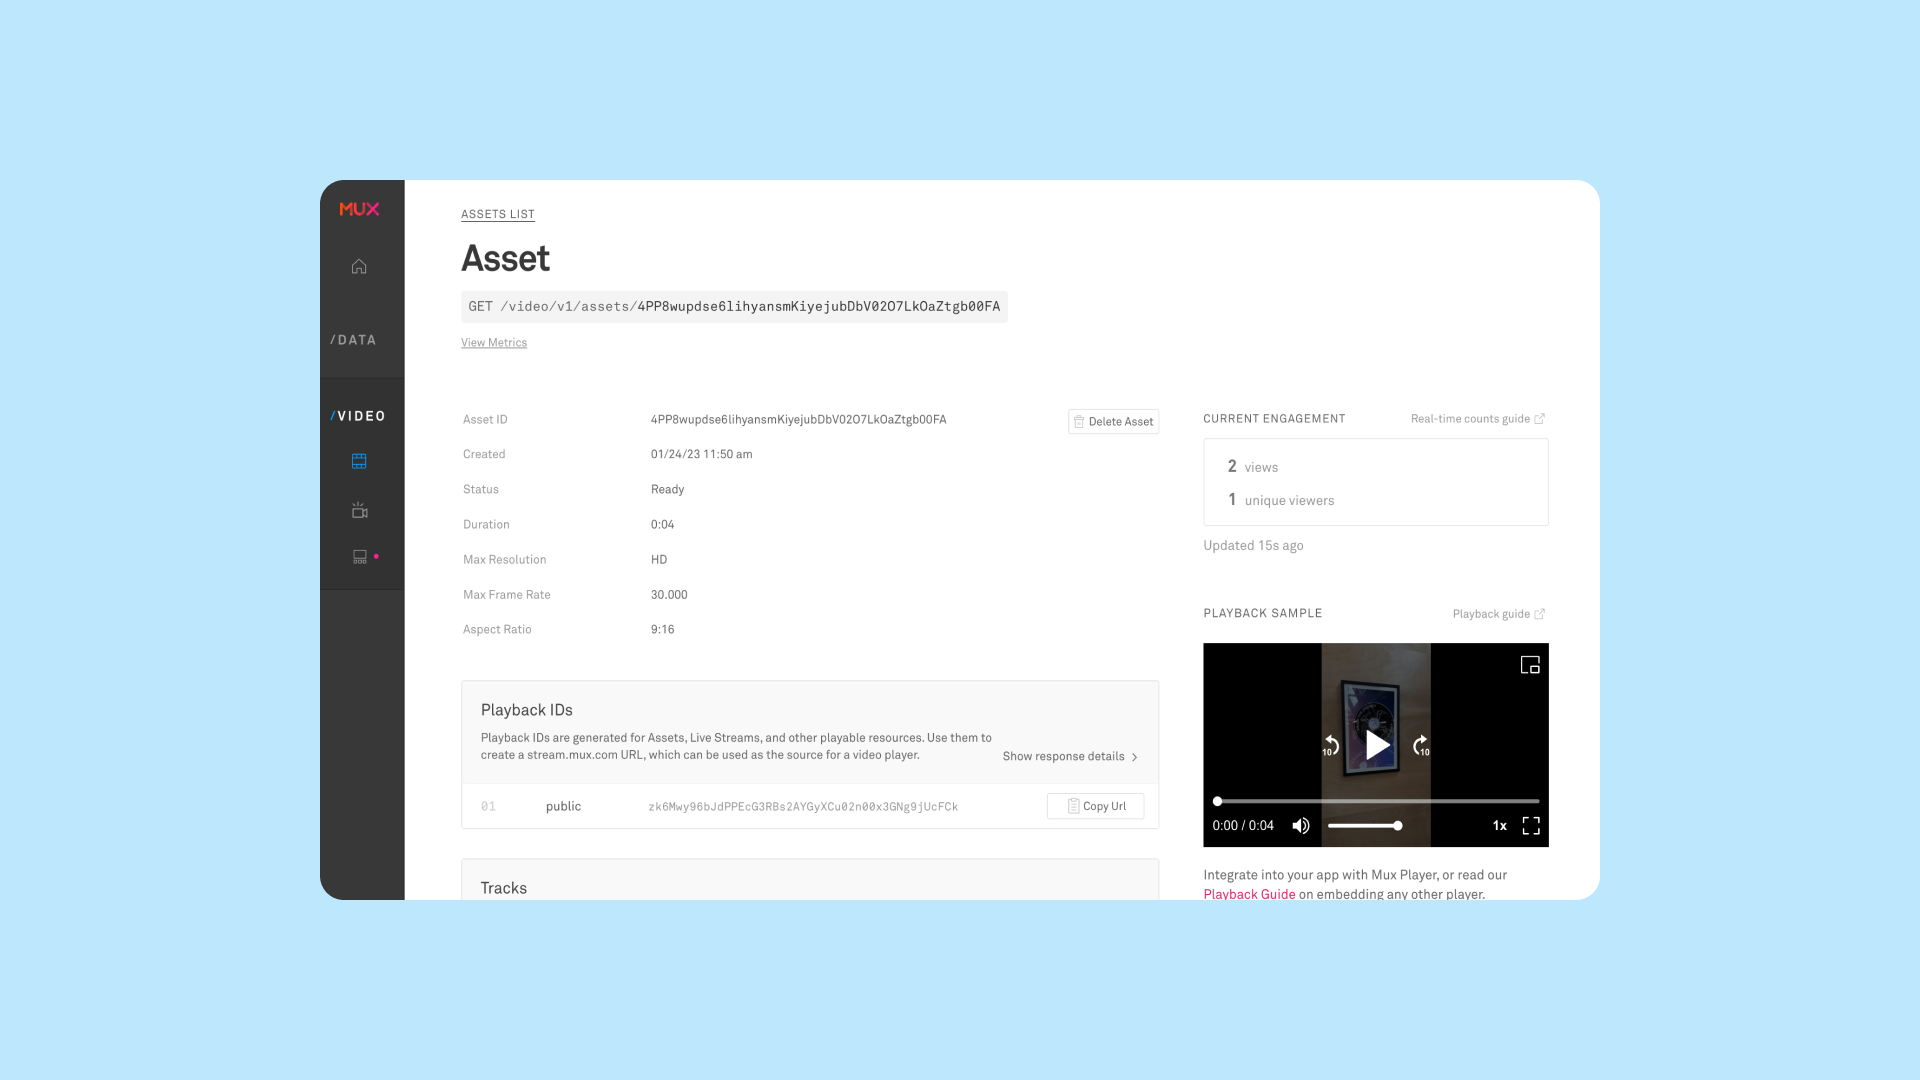
The video player that we used in Pals is Expo’s Video component, which takes in a source uri for the video itself and for a thumbnail, both of which Mux provides by adding our Playback ID to the stream.mux.com and image.mux.com URLs, respectively. Mux provides streaming video using HTTP Live Streaming (HLS) - the same format Apple uses to live-stream their keynotes! Mux has a great guide and further details on this.
Here’s how we integrated Mux with the Expo Video component:
<Video
  ref={video}
  style={{ width: '100%', aspectRatio: 9 / 16 }}
  resizeMode="contain"
  isLooping
  useNativeControls
  onPlaybackStatusUpdate={(statusUpdate) => setStatus(() => statusUpdate)}
  usePoster
  posterSource={{ uri: `https://image.mux.com/${videoInfo.playback_id}/thumbnail.png`,
  }}
  posterStyle={{ flex: 1, height: '100%', width: '100%', resizeMode: 'cover' }}
  source={{ uri: `https://stream.mux.com/${videoInfo.playback_id}.m3u8`,
  }}
/>
By choosing Mux for this demo, we know that video will be streamed in a format which the user’s device can play. Because Mux uses variable bitrate streaming, users can successfully watch video with minimal startup time and buffering since they don’t need to download the whole video before watching, even if they are on a slow 3G connection!
We are displaying the videos in a React Native FlatList component, which means the user needs to scroll and hit play on each video individually. If you wanted to make them autoplay on scroll, just like TikTok and other large social media apps, this blog post does a good job describing how to implement that.
3. Attach Mux Data to record metrics
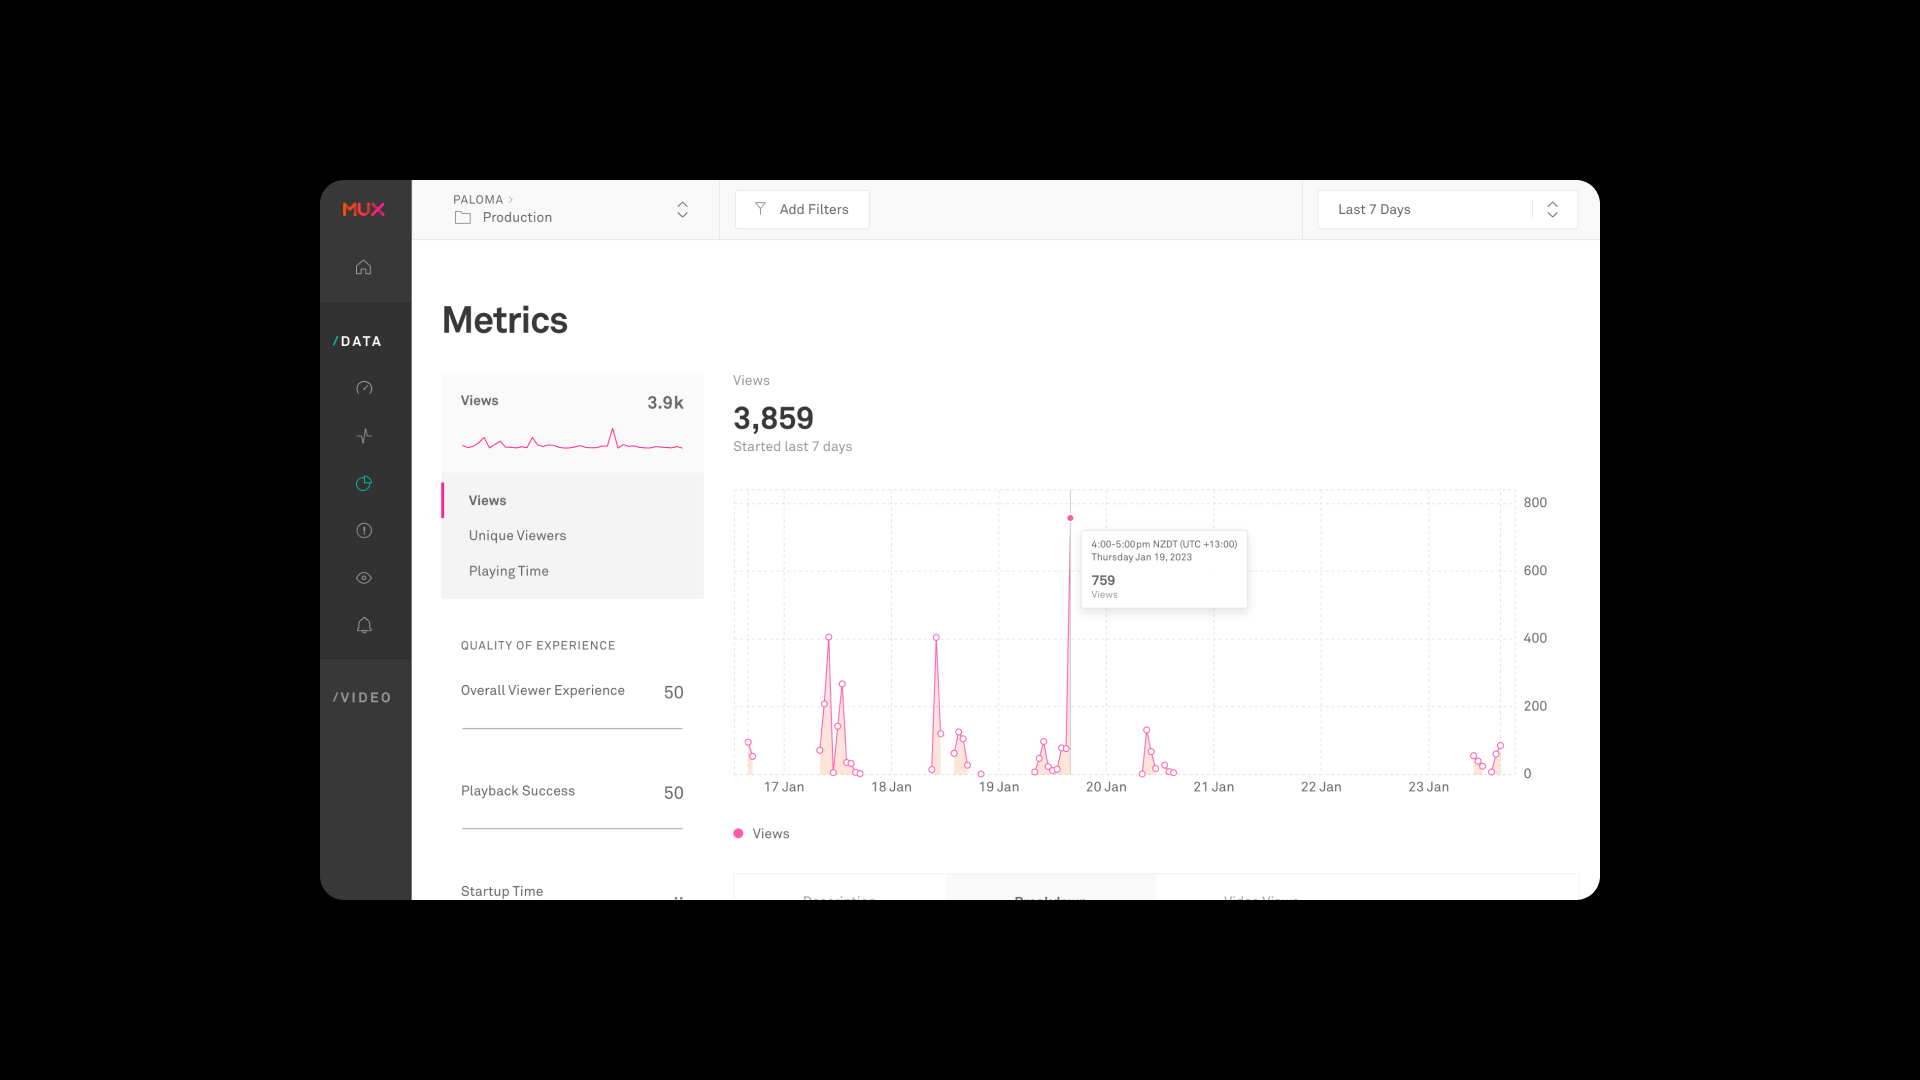
Metrics ensure you understand your user’s viewing behavior as well as the performance of your videos which in turn will point you to the right places to add improvements to the app, increase user engagement, and improve the quality of the viewing experience. Mux offers an out-of-the-box wrapper for most video players; all you need to do is specify a few options for Mux to automatically start tracking data. To create a Mux Data environment key, refer to this guide, which explains the process well.
"This was incredibly easy to set up, and the available metrics are both useful and deep" - Daniel Gibson
For our app, we were able to use the Mux Data wrapper for React Native video, which happens to work with Expo AV Video. However, Expo Video is currently not fully supported, and some metrics, such as Playing Time, will be missing. The Mux team are evaluating possible support for Expo Video and are interested to hear from those who would want this. The data options are straightforward, but since Pals doesn’t have video titles, we passed the database ID for video_title, which we can use later to filter view counts.
import { Video } from 'expo-av';
import muxReactNativeVideo from '@mux/mux-data-react-native-video';

const MuxVideo = muxReactNativeVideo(Video);

<MuxVideo
  ... (same fields from previous step)
  posterSource={{ uri: `https://image.mux.com/${videoInfo.playback_id}/thumbnail.png` }}
  source={{ uri: `https://stream.mux.com/${videoInfo.playback_id}.m3u8` }}
  muxOptions={{
    application_name: Platform.OS == 'ios' ? 'Pals iOS' : 'Pals Android',
    application_version: '1.0.0',
    data: {
      env_key: '<ENV KEY>',
      video_id: videoInfo.id,
      video_title: videoInfo.id,
      viewer_user_id: user.id,
      video_duration: videoInfo.duration,
      player_name: 'Expo AV Video Player - Mobile app',
    },
  }}
/>
Once Mux Data is instrumented, we can view performance metrics in our Mux Data dashboard. This was incredibly easy to set up, and the available metrics are both useful and deep. You can click through to an individual session and get heaps of details on the user’s video experience.
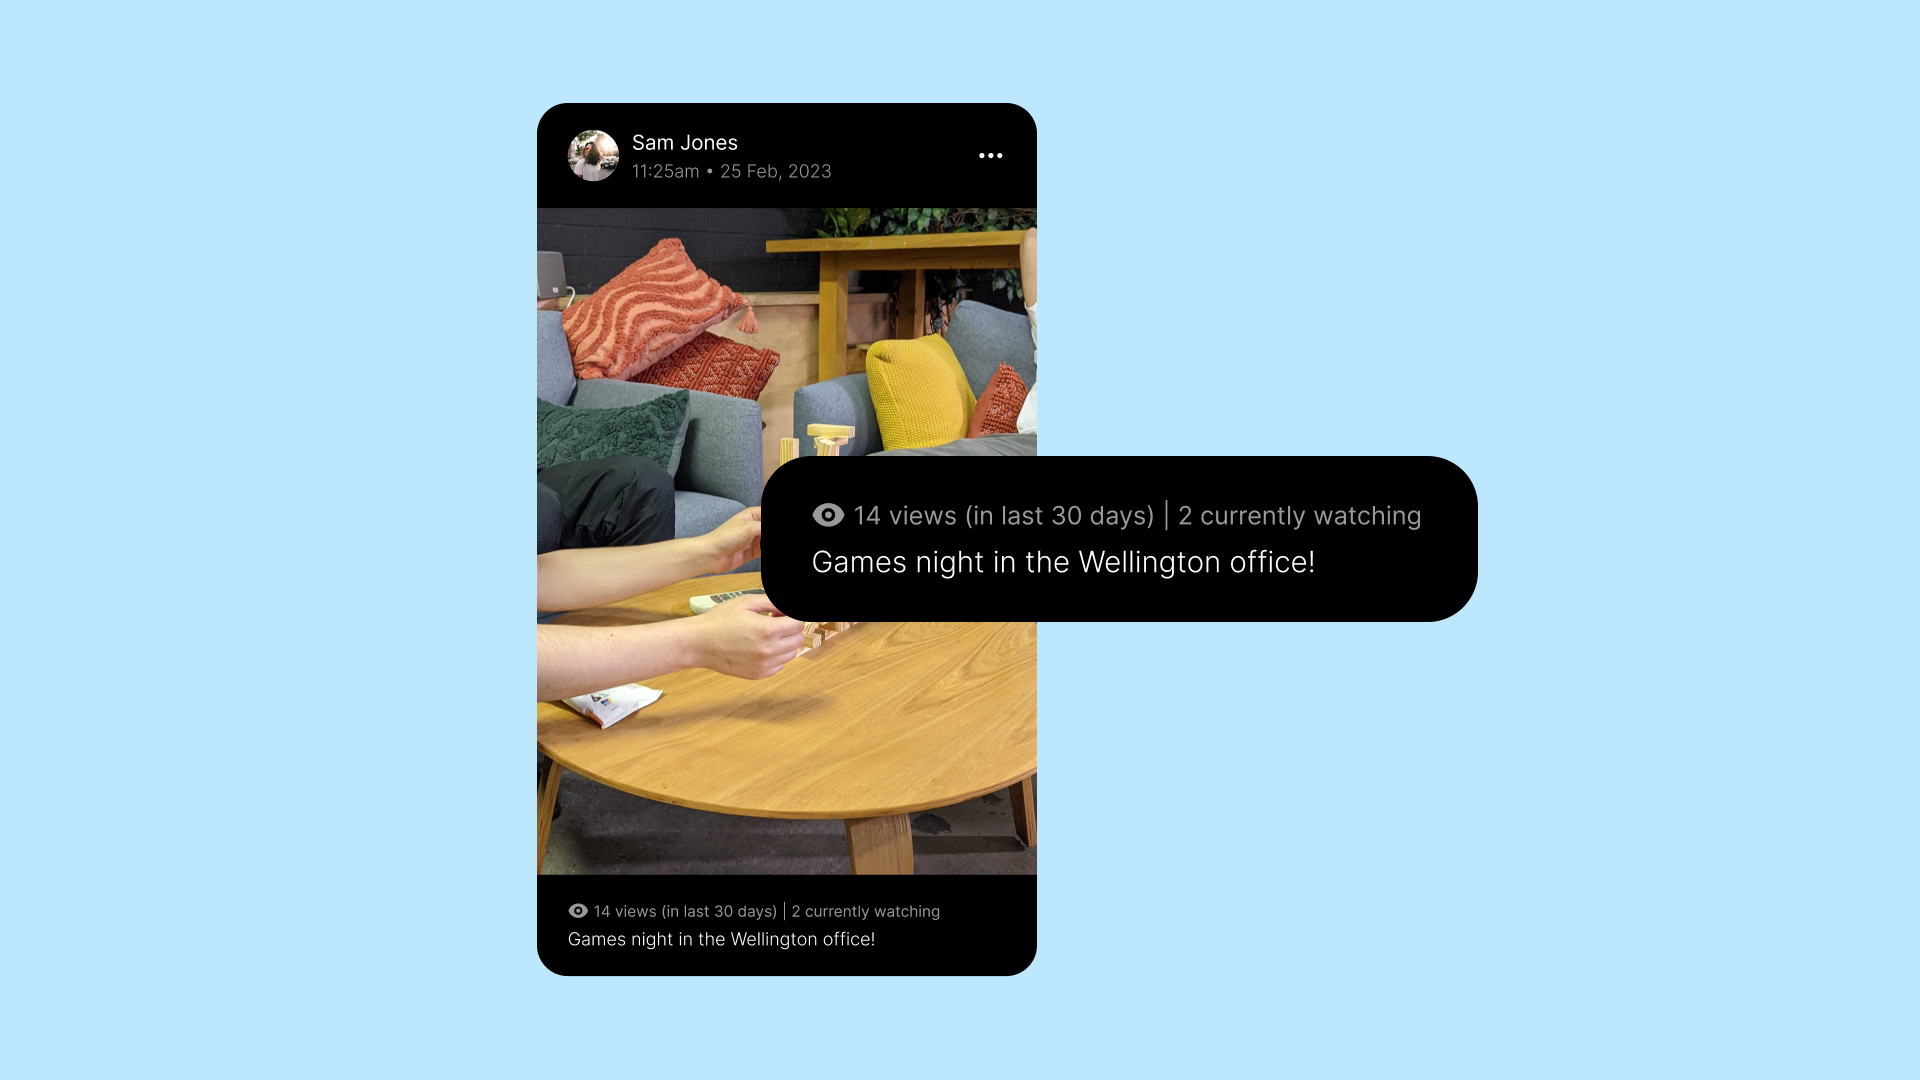
4. Display View Count and Real-time Views with Mux Data API
To make our app more compelling and lend the expected social feel, we display the overall view count as well as the number of people watching the video in real-time. We did this using the Mux Data API. A future iteration of the app could include a user dashboard showing personalized metrics of video engagement, which is all possible through the Data API.
A few caveats with the view count:
- Mux currently only stores the last 30 or 90 days of data (depending on your Mux Data tier). If you need to go further back, then Mux recommends streaming views exports in real time or regularly exporting the view count data as a .csv to your database and fetching it from there. Mux has a guide with suggestions on this.
- There is a rate limit of 5 requests per second on the view count endpoint. This is reasonably generous, and you can avoid hitting the limit by spacing out requests or caching them.
We used the Mux Node.js SDK once more and created a new Firebase Function in the back end that will be triggered from the front end every time we fetch a video. The front end will pass in the database ID of the video that we stored as the video title. We then filter the view counts and find the corresponding data for our video.
// Same imports and initial variables from step one
...
exports.getVideoViews = firebaseFunctionMux.onCall(async (data, context) => {
  // the data parameter is the argument passed in from the front end which we expect to be the database ID of the video
  if (!(typeof data.video_id === 'string') || data.video_id.length === 0) {
    throw new functions.https.HttpsError(
        'invalid-argument',
        'The function must be call with ' +
      'one argument "video_id" containing the database ID of the video',
    );
  }
  try {
    const videoId = data.video_id;
    const { Data } = new Mux(muxTokenId.value(), muxTokenSecret.value());
    const viewCount = await Data.VideoViews.list({filters: [`video_title:${videoId}`], timeframe: ['30:days']});
    return viewCount;
  } catch (error) {
    functions.logger.error('failed to fetch video views data -> ', error);
  }
});
On the front end, we call the getVideoViews function we just created and update our view count from the returned data’s total row count value. For a full list of what the response object looks like, you can refer to the Data API docs.
const [videoViews, setVideoViews] = useState(0);

useEffect(() => {
  if (videoInfo.id) {
    const fetchVideoViews = async () => {
      try {
        const videoViewsPromise = httpsCallable(functions, 'getVideoViews');
        const { data } = await videoViewsPromise({ video_id: videoInfo.id });
        setVideoViews(data.total_row_count ? data.total_row_count : 0);
      } catch (error) {
        console.error('Unable to fetch view count data -> ', error);
      }
    };
    fetchVideoViews();
  }
}, [videoInfo.id]);
Now for displaying the real-time views! Mux provides an Engagement Counts API at https://stats.mux.com/counts. This requires us to generate and sign a JSON Web Token to authenticate our requests. Mux has a useful guide that explains how to set this up. To generate the Mux Signing key and Private key, use the Mux Dashboard > Settings > Signing Keys page (make sure you select the Data product before clicking generate key).
As we’re writing this, the Mux team have just updated their Node.js SDK by adding a handy function called `signViewerCounts`, which does the work of generating and signing a JWT without us installing multiple libraries.
This is similar to how we fetch the overall View Count: The front end makes a call to a back end function to pass in the Playback ID of a video, and the function will return a data object with the real-time viewer count.
const Mux = require('@mux/mux-node');

const muxDataSigningKey = defineSecret('MUX_DATA_SIGNING_KEY');
const muxDataPrivateKey = defineSecret('MUX_DATA_PRIVATE_KEY');
const firebaseFunctionMuxData = functions.runWith({ secrets: [muxDataSigningKey, muxDataPrivateKey] }).https;

exports.getRealTimeViewCount = firebaseFunctionMuxData.onCall(async (data, context) => {
  if (!(typeof data.playbackId === 'string') || data.playbackId.length === 0) {
    throw new functions.https.HttpsError(
        'invalid-argument',
        'The function must be call with ' +
      'one argument "playbackId" containing the Mux Playback ID of the video',
    );
  }
  try {
    functions.logger.info('Generating JSON Web Token...');
    const keyId = muxDataSigningKey.value();
    const playbackId = data.playbackId;
    const keySecret = muxDataPrivateKey.value();

    const token = Mux.JWT.signViewerCounts(playbackId, { keyId, keySecret, type: 'video'});

    functions.logger.info('Success. Fetching real-time view count data...');
    const fetchRealTimeViewCount = await fetch(`https://stats.mux.com/counts?token=${token}`);
    const { data: realTimeViewCountData } = await fetchRealTimeViewCount.json();
    functions.logger.info('Success -> ', realTimeViewCountData);
    return realTimeViewCountData;
  } catch (error) {
    functions.logger.error('failed to fetch real-time view count -> ', error);
  }
});
Again, this is very similar to our overall view count code. The front end will send a fetch request to the above back end function for each video it renders. If you want to dynamically update the real-time views as a user is watching a video, you should poll this fetch request — but do note that requesting more than every 15 to 30 seconds is unlikely to return noticeably different results for short form videos.
...
const [realTimeViews, setRealTimeViews] = useState(0);

useEffect(() => {
  if (videoInfo.playback_id) {
    const fetchRealTimeViews = async () => {
      try {
        const realTimeViewsFunction = await httpsCallable(functions, 'getRealTimeViewCount');
        const { data } = await realTimeViewsFunction({ playbackId: videoInfo.playback_id });
        setRealTimeViews(data[0].views);
      } catch (error) {
        console.error('Unable to fetch real time views data -> ', error);
      }
    };
    fetchRealTimeViews();
  }
}, [videoInfo.playback_id]);Conclusion
Thanks to Mux’s Video and Data APIs, the Pals by Paloma video streaming app is officially up and running. By using Mux and the other technologies employed in this guide instead of stitching together various cloud components ourselves, we reduced delivery time from several months (or more) to under six weeks! Throughout this process, we’ve seen that Mux handles video uploads and streaming with ease while also providing us with high-quality performance metrics.
At Paloma, we love building digital experiences that people around the world cherish. We’ve created products for day-one startups as well as multiple tech unicorns. Platforms like Mux enable us to scale our impact and focus on what's most important: solving customers’ problems.
Drop us a note at hello@palomagroup.com or palomagroup.com/contact to talk about Pals or any other video streaming experience you would like to build.
Drop Paloma a note