Using data to drive decision-making can be one of the most impactful strategies for your business growth and trajectory. When aggregated and analyzed, data can help you identify trends, make informed conclusions, and revise your approach to product, development, marketing, and more.
You can gather a lot of data from video interaction in particular. By understanding how your viewers (or your customers’ viewers) are interacting with your videos, you’ll have greater insight into what content is working, which playback environments are most effective, and where you have room for improvement.
Mux Data provides a customer-facing data dashboard out of the box, allowing you to assess the performance of your video content without any additional work on your part. But what if you want to go further and bring your viewing data in-house, to a custom data lake, where the only limit for how you can use the data is your imagination.
Here at Mux, we’re happy to partner up with AWS to enable view data to be streamed to Amazon Kinesis Data Streams. In this post, you’ll learn how to configure your AWS account to process real-time view data from Mux viewing sessions, allowing you to take the next step toward providing and receiving insights for your application.
What is Kinesis Data Streams?
Amazon Kinesis Data Streams is a scalable and durable real-time data streaming service that can continuously capture gigabytes of data per second from hundreds of thousands of sources. Popular use cases for Kinesis Data Streams include streaming log and event data, running real-time analytics, and powering event-driven applications.
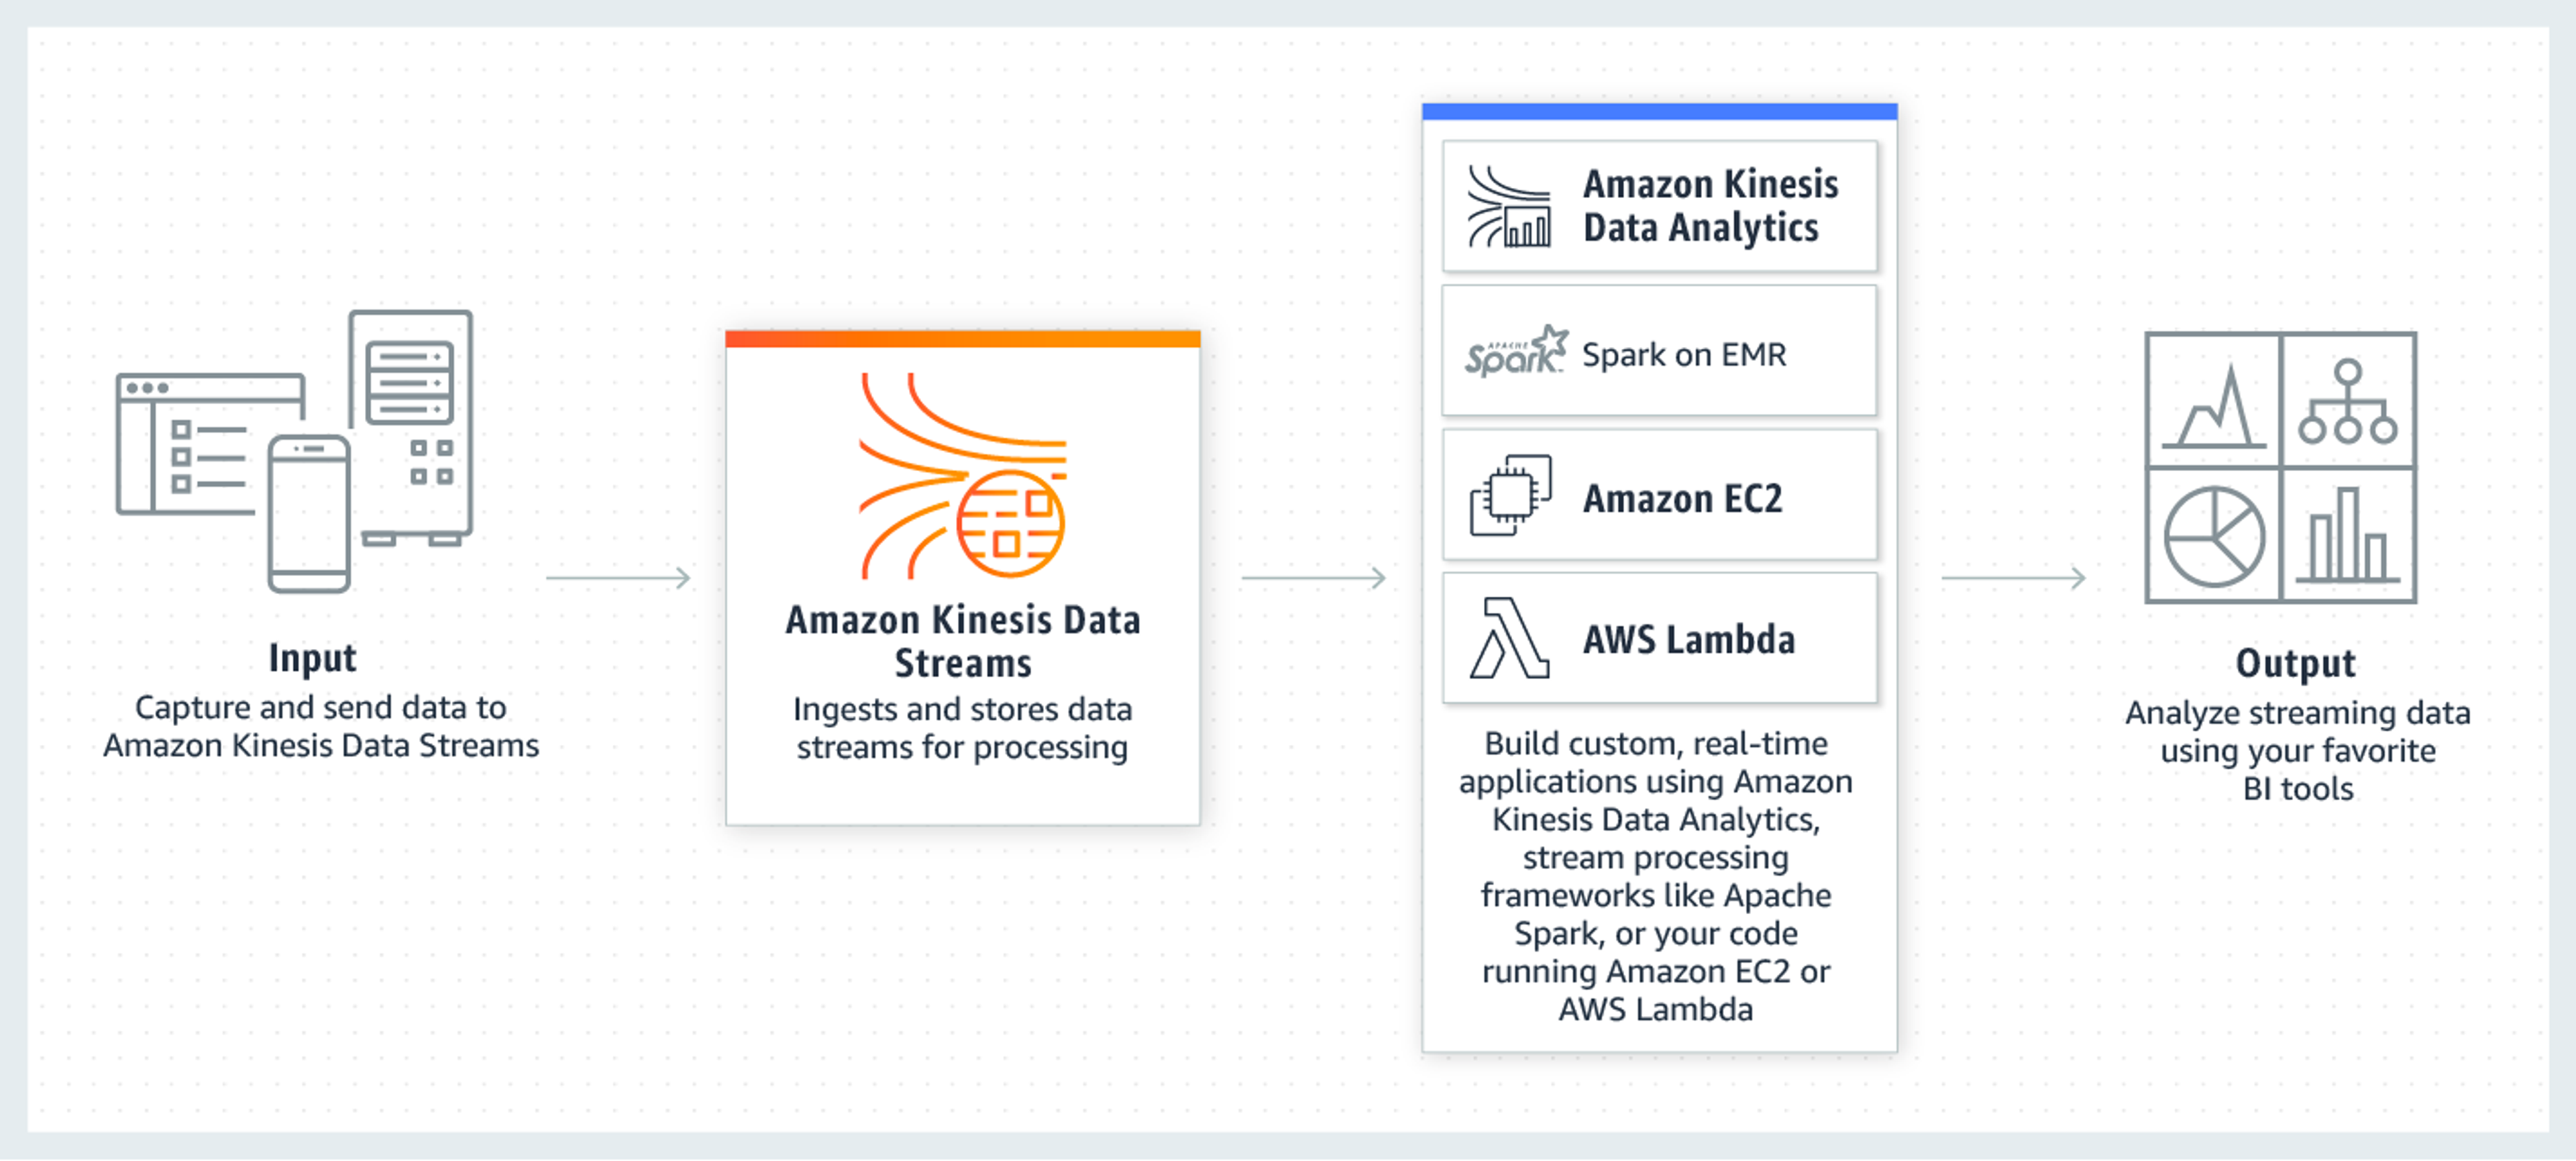
Here, Amazon Kinesis Data Streams will act as a handler for your Mux viewing data. You can then decide what the next step for your data is based on your needs. Examples of practical use cases include:
- Building a real-time analytics dashboard using tools like Cube or a custom solution
- Moving your Mux data into Amazon Redshift to combine with other business metrics
- Storing data long term in an Amazon S3 data lake to enable queries for historical insights
- Improving performance and reliability by conducting data-driven CDN switching
- Integrating with machine learning tools like TensorFlow to predict trends
These are just a few examples, but the possibilities for how you can leverage your data are endless.
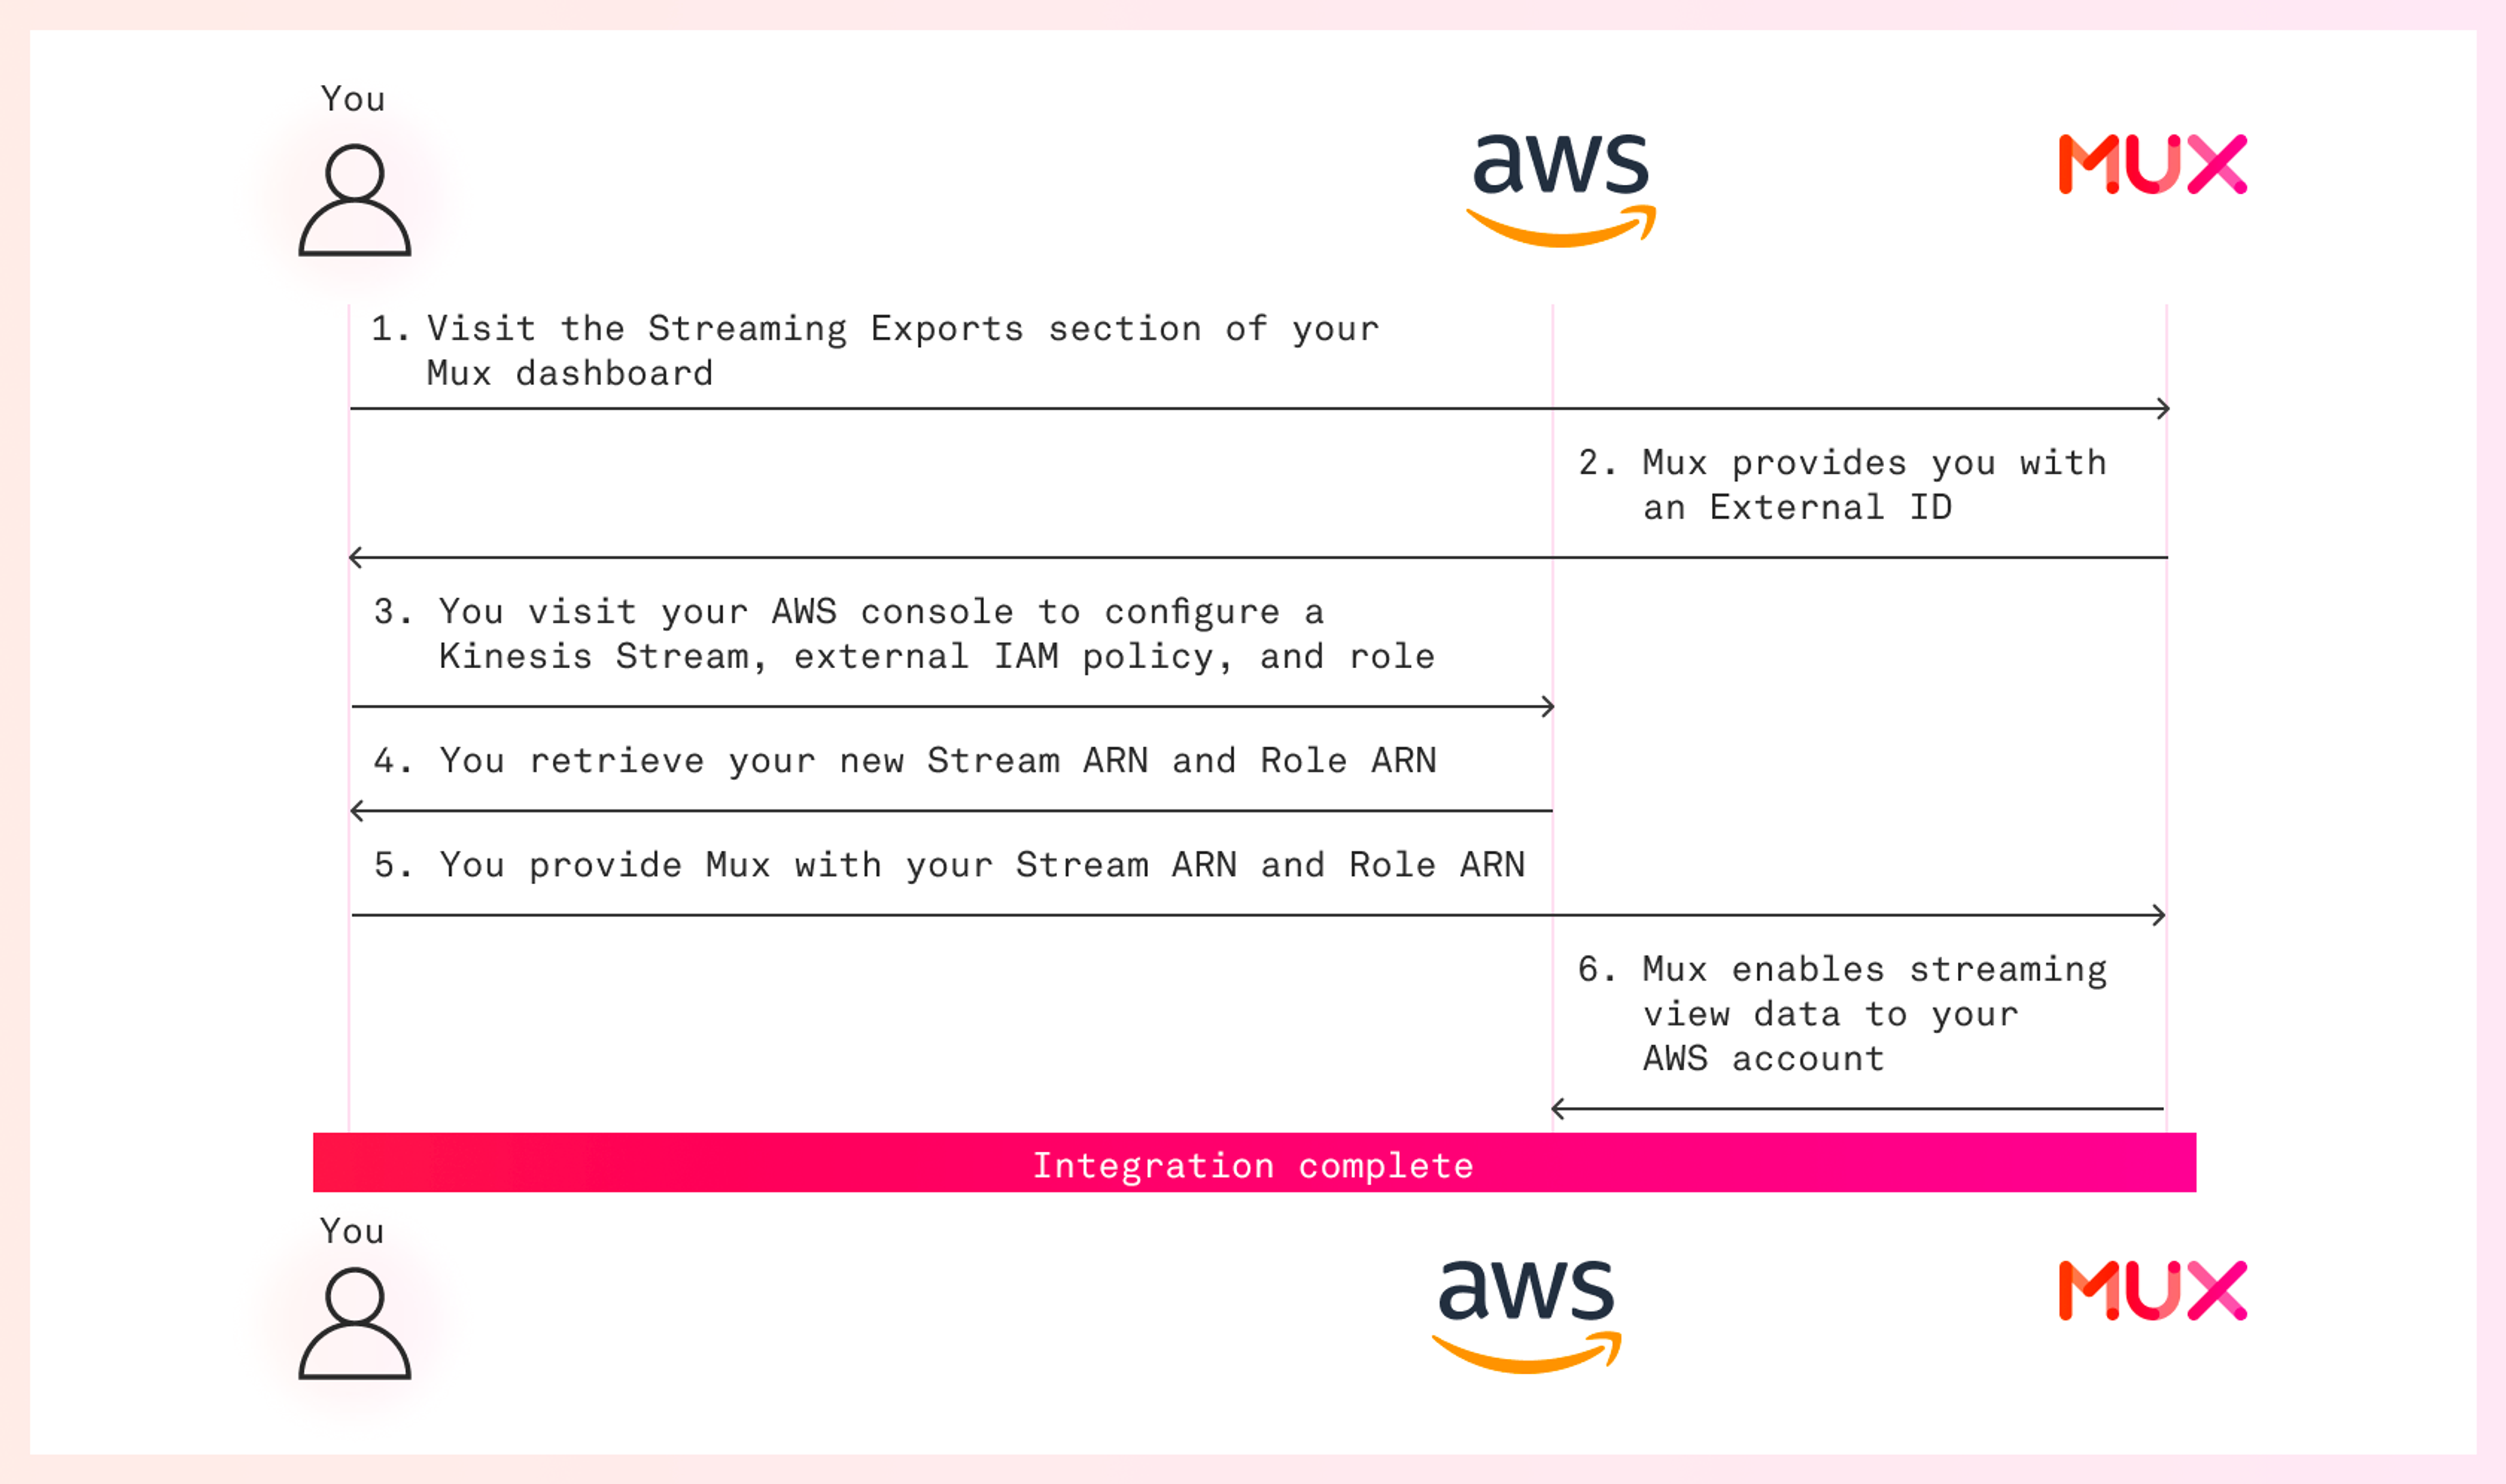
Mux + Amazon Kinesis: interaction overview
- Visit the Streaming Exports section of your Mux dashboard
- Mux provides you with an Account ID and External ID
- You visit your AWS console* to configure a Kinesis Stream, external IAM policy, and role
- You retrieve your new Stream ARN and Role ARN
- You provide Mux with your Stream ARN and Role ARN
- Mux enables streaming view data to your AWS account
Before you begin: here’s what you’ll need
- AWS account
- Mux account
- At this time, the Kinesis integration is only available to customers on the Mux Media plan.
Step 1: Create a new streaming export
To kick off this process, visit the Streaming Exports section of your Mux dashboard and click on New streaming export.
On this page, you’ll be presented with a few settings that you can use to configure your streaming exports integration:
- Under Environment, select the Mux Environment that you want to stream your data from
- Under Service, select Amazon Kinesis Data Streams
- Copy the unique External ID that is displayed on this page; we’ll be using that in the upcoming steps during AWS Role configuration.
Step 2: create a Kinesis data stream
Note: while you can create your Kinesis data stream in any AWS region, the data Mux sends originates in us-east-1. You might want to consider setting up your Kinesis data stream in us-east-1 to avoid incurring additional data transfer charges from AWS.
- Visit the Amazon Kinesis dashboard.
- Click the Create data stream button.
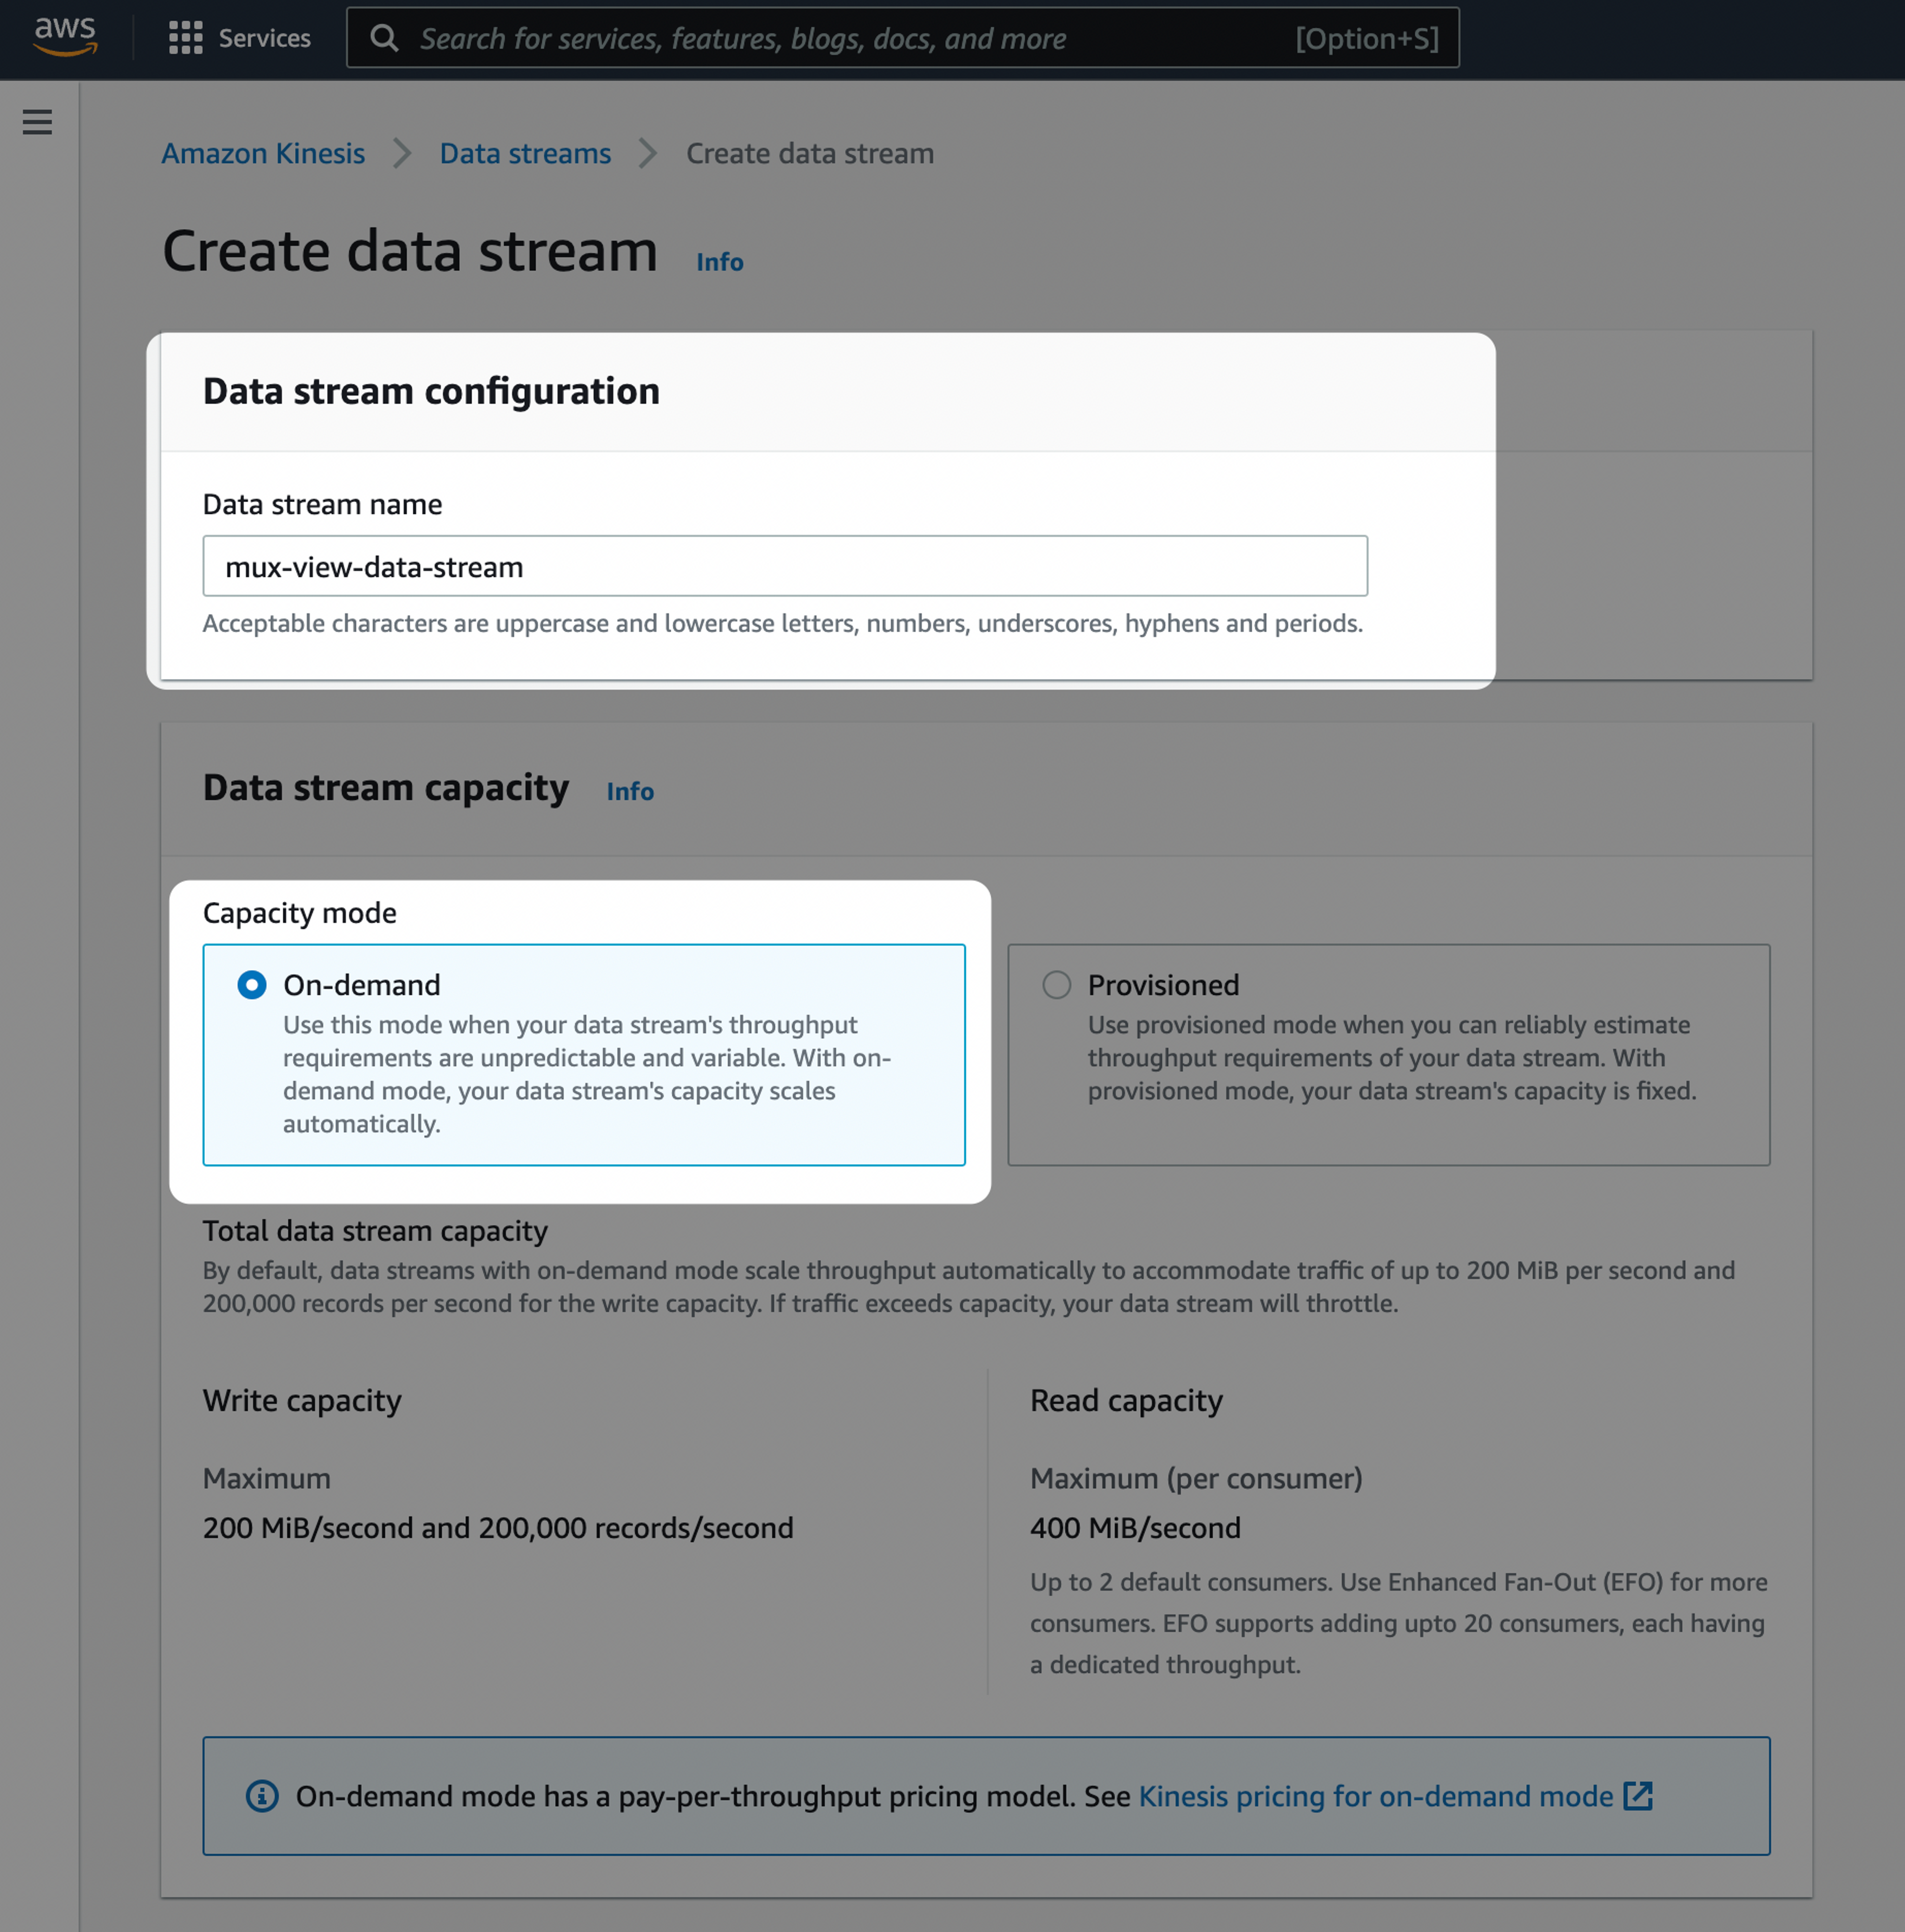
- Enter a name for your data stream (example: mux-view-data-stream).
- Under Capacity mode, select On-demand.**
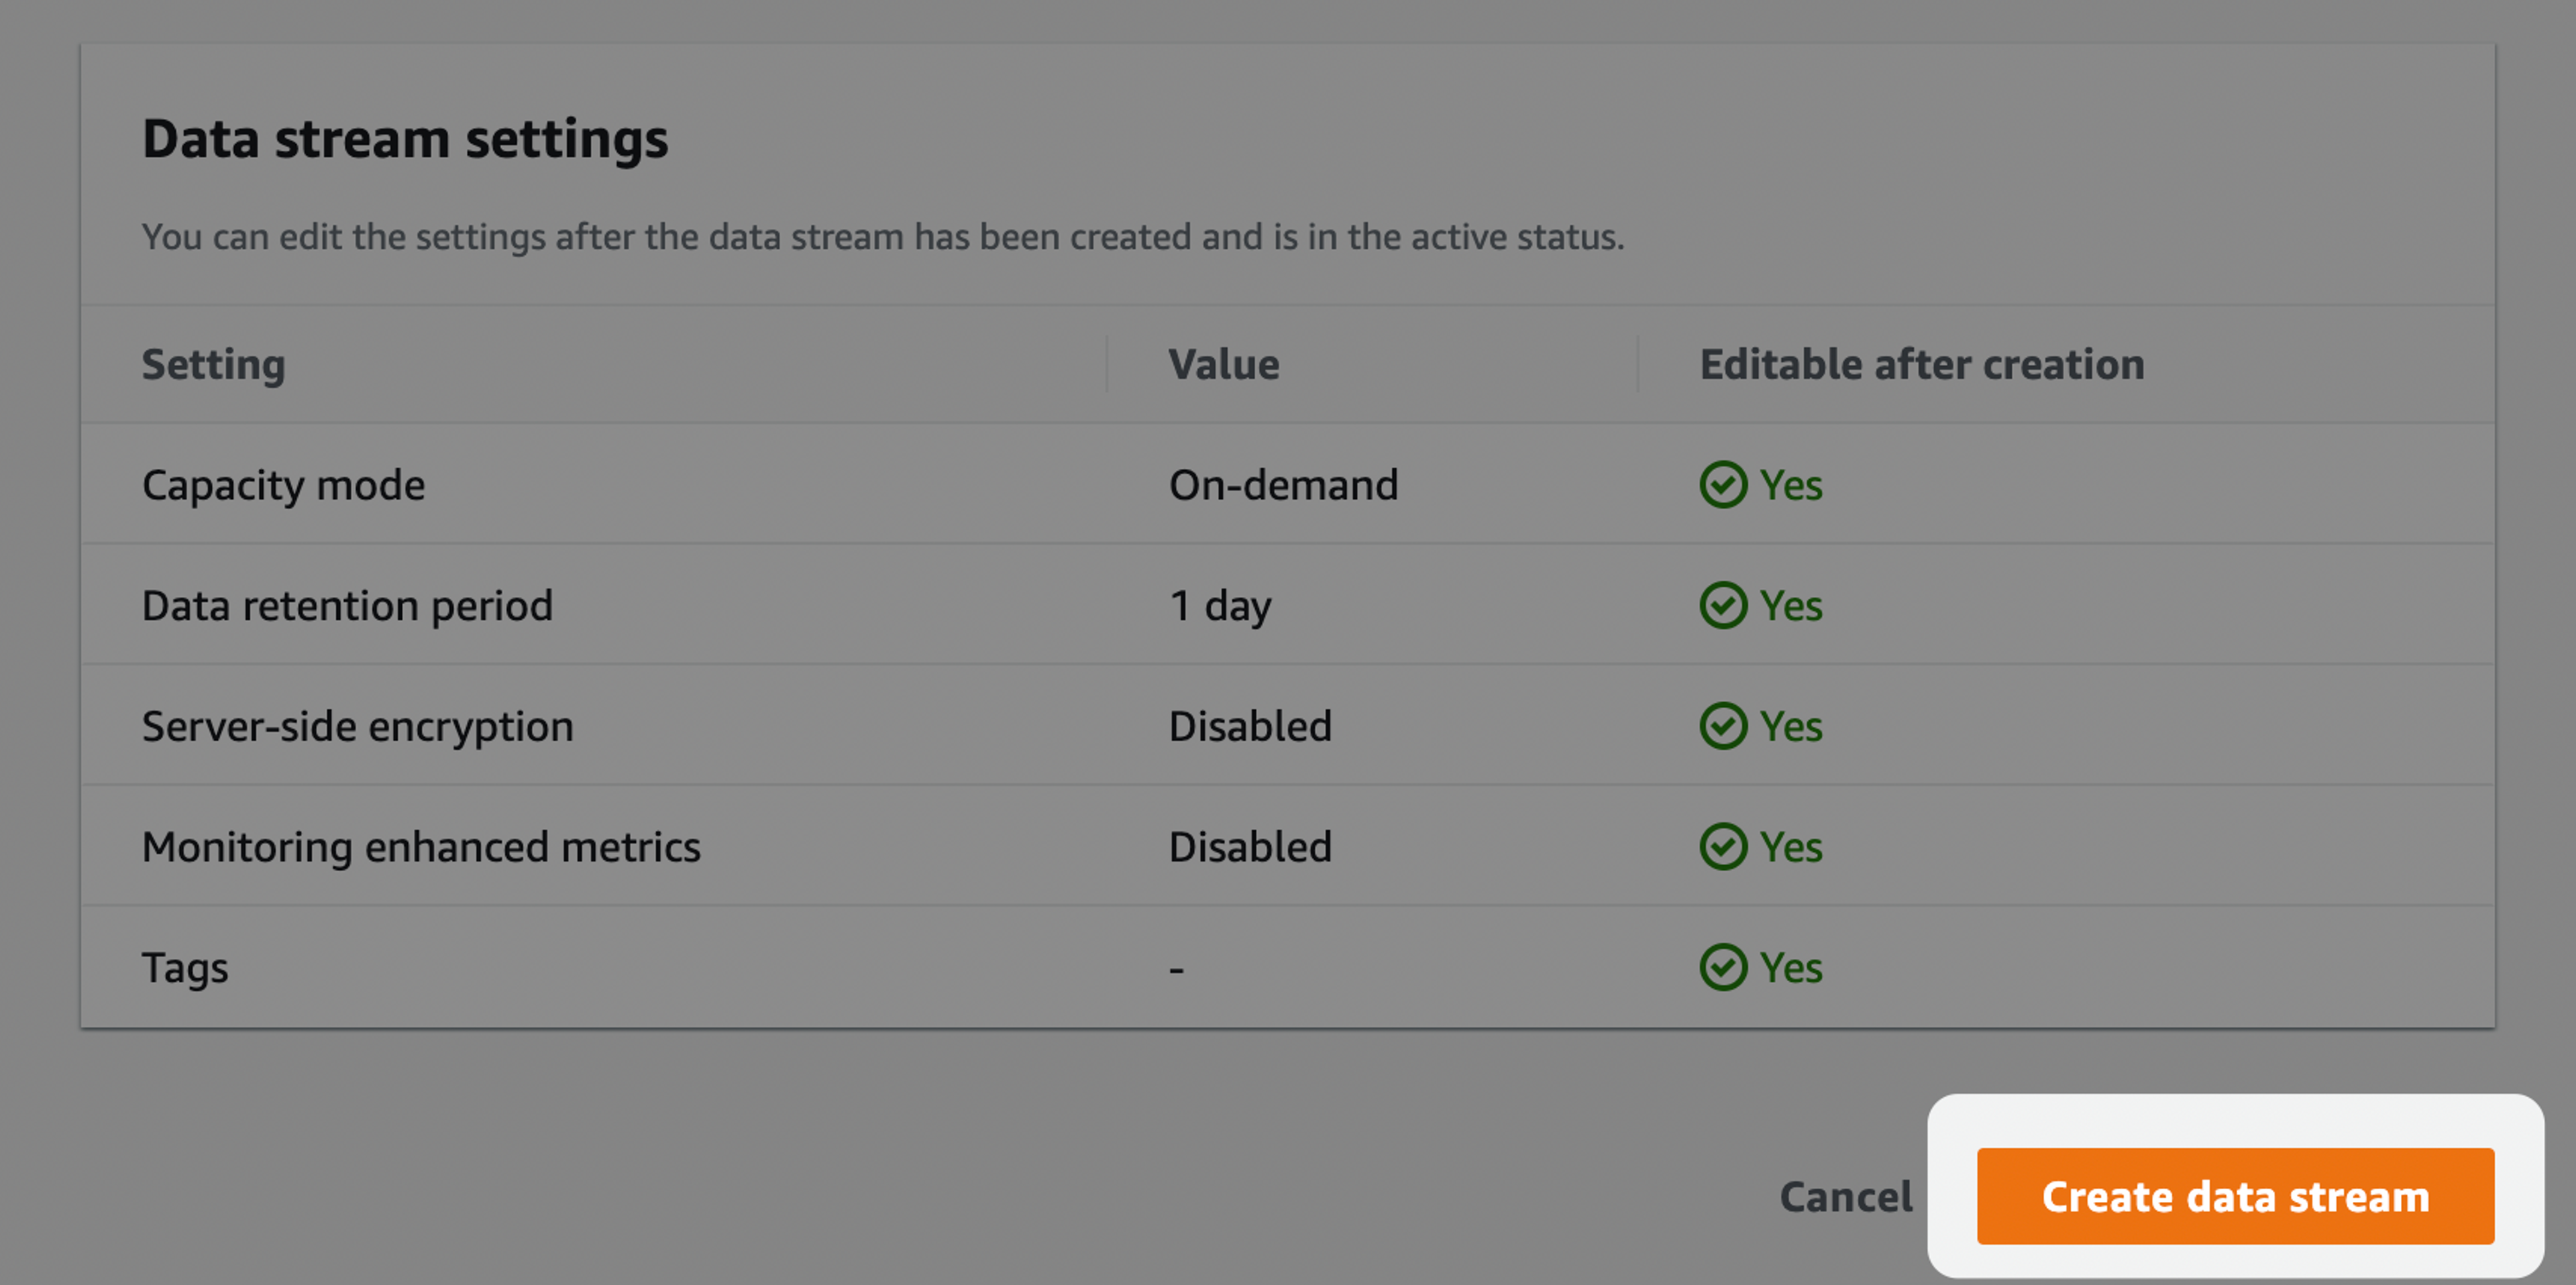
- Click Create data stream.
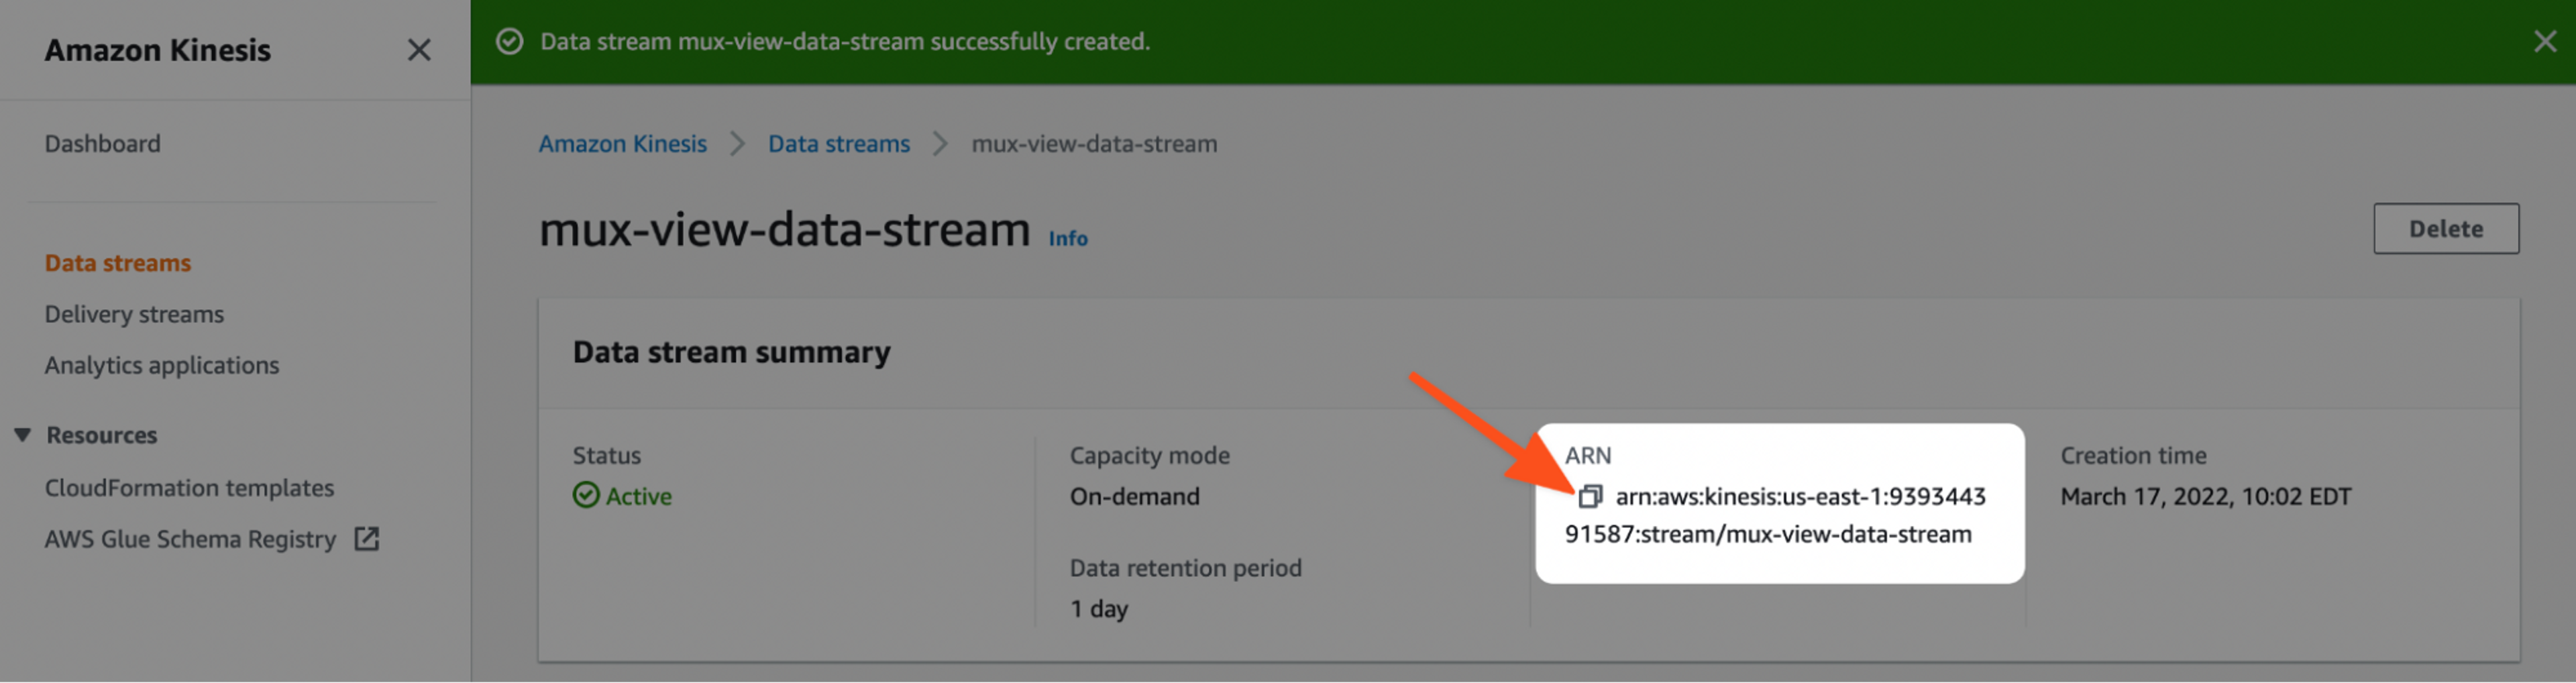
- Under Data stream summary, copy the ARN and paste it somewhere safe – we’ll need to reference this value a little later in Step 3.
Step 3: create an IAM policy to enable Mux access
Now, we need to configure your AWS account with an IAM policy that gives Mux permission to write to your Kinesis stream.
Let's get going on the IAM policy setup.
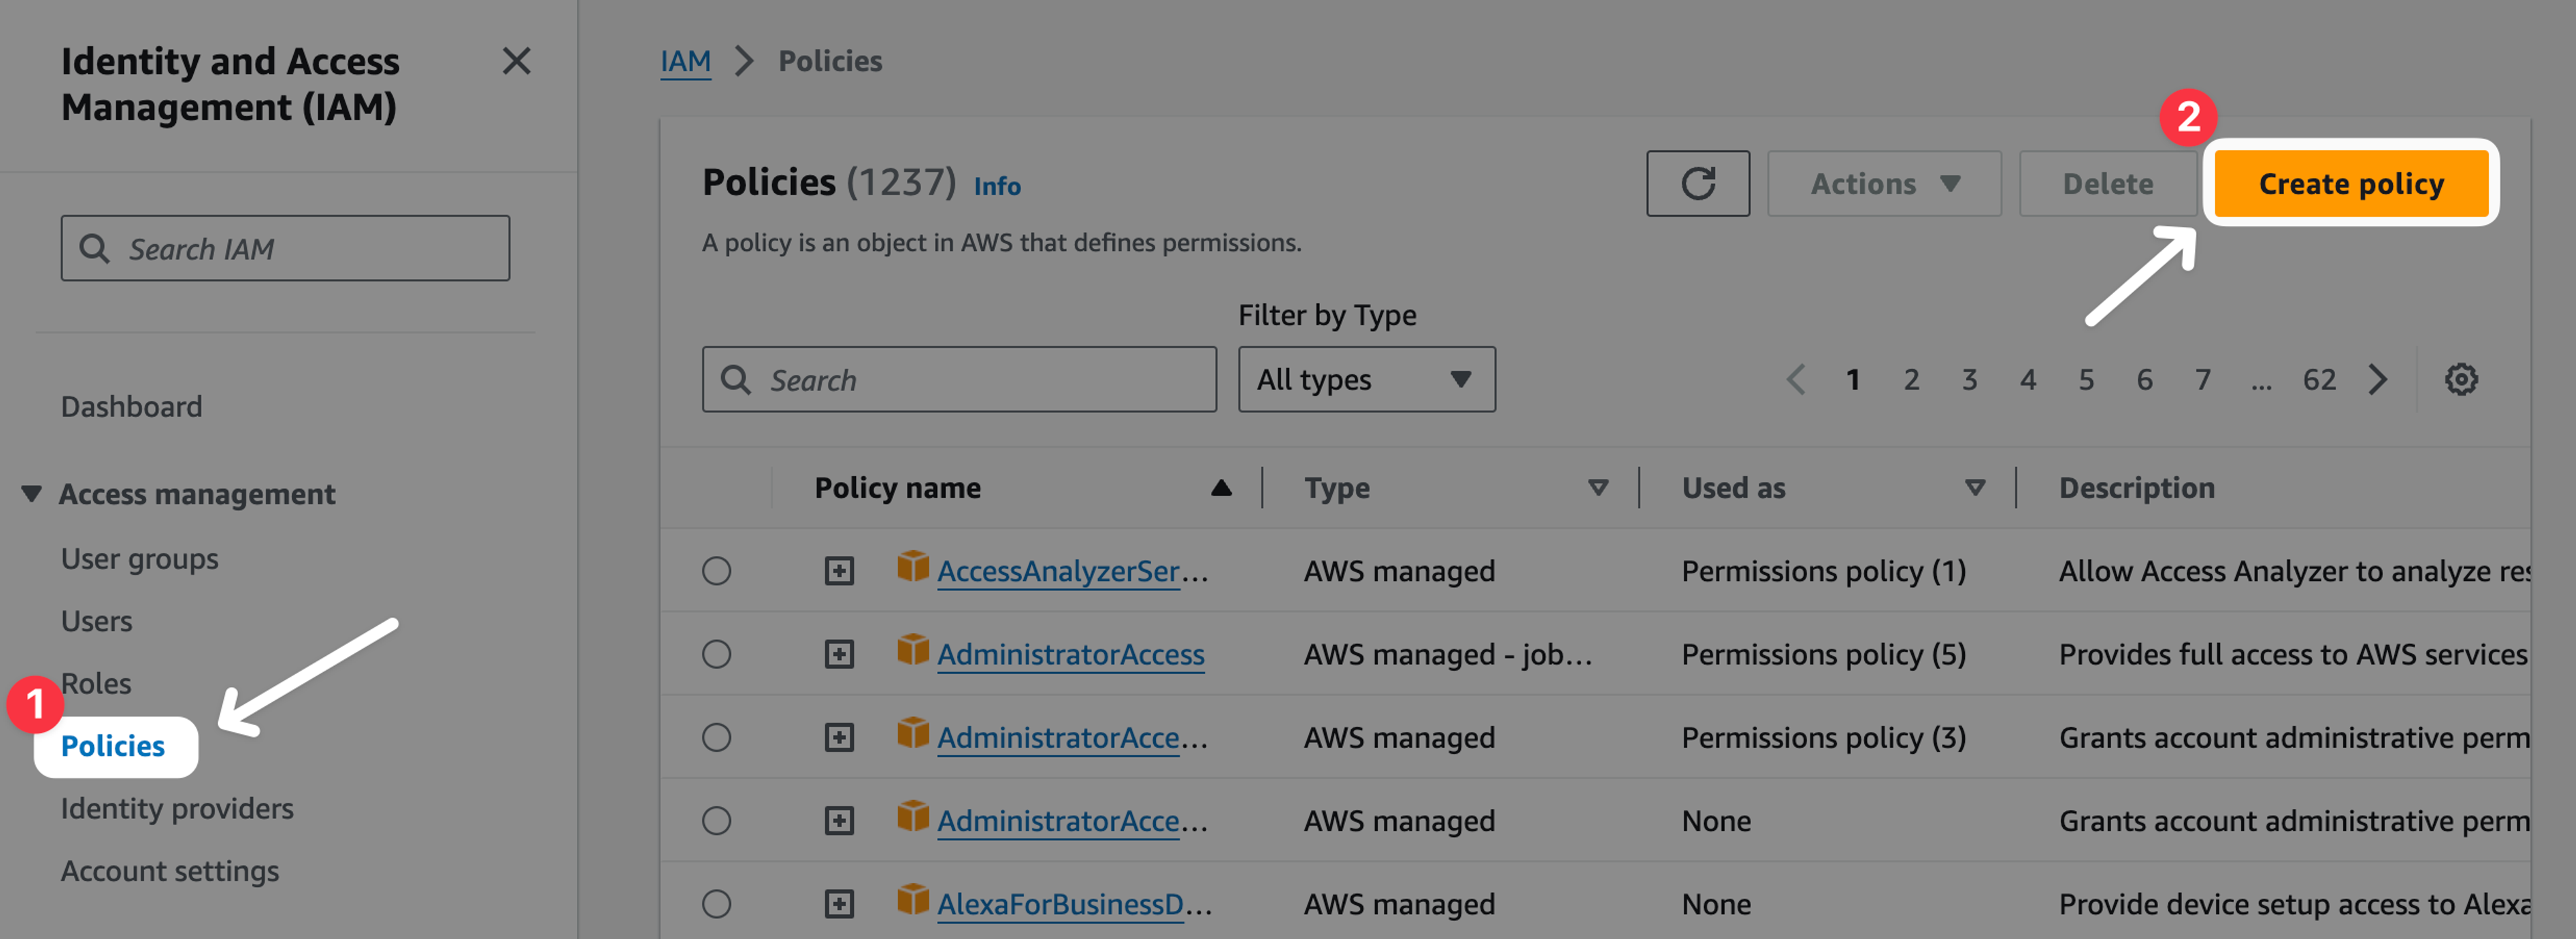
- In the AWS console, visit IAM → Policies (console.aws.amazon.com/iamv2/home#/policies).
- Click the Create policy button.
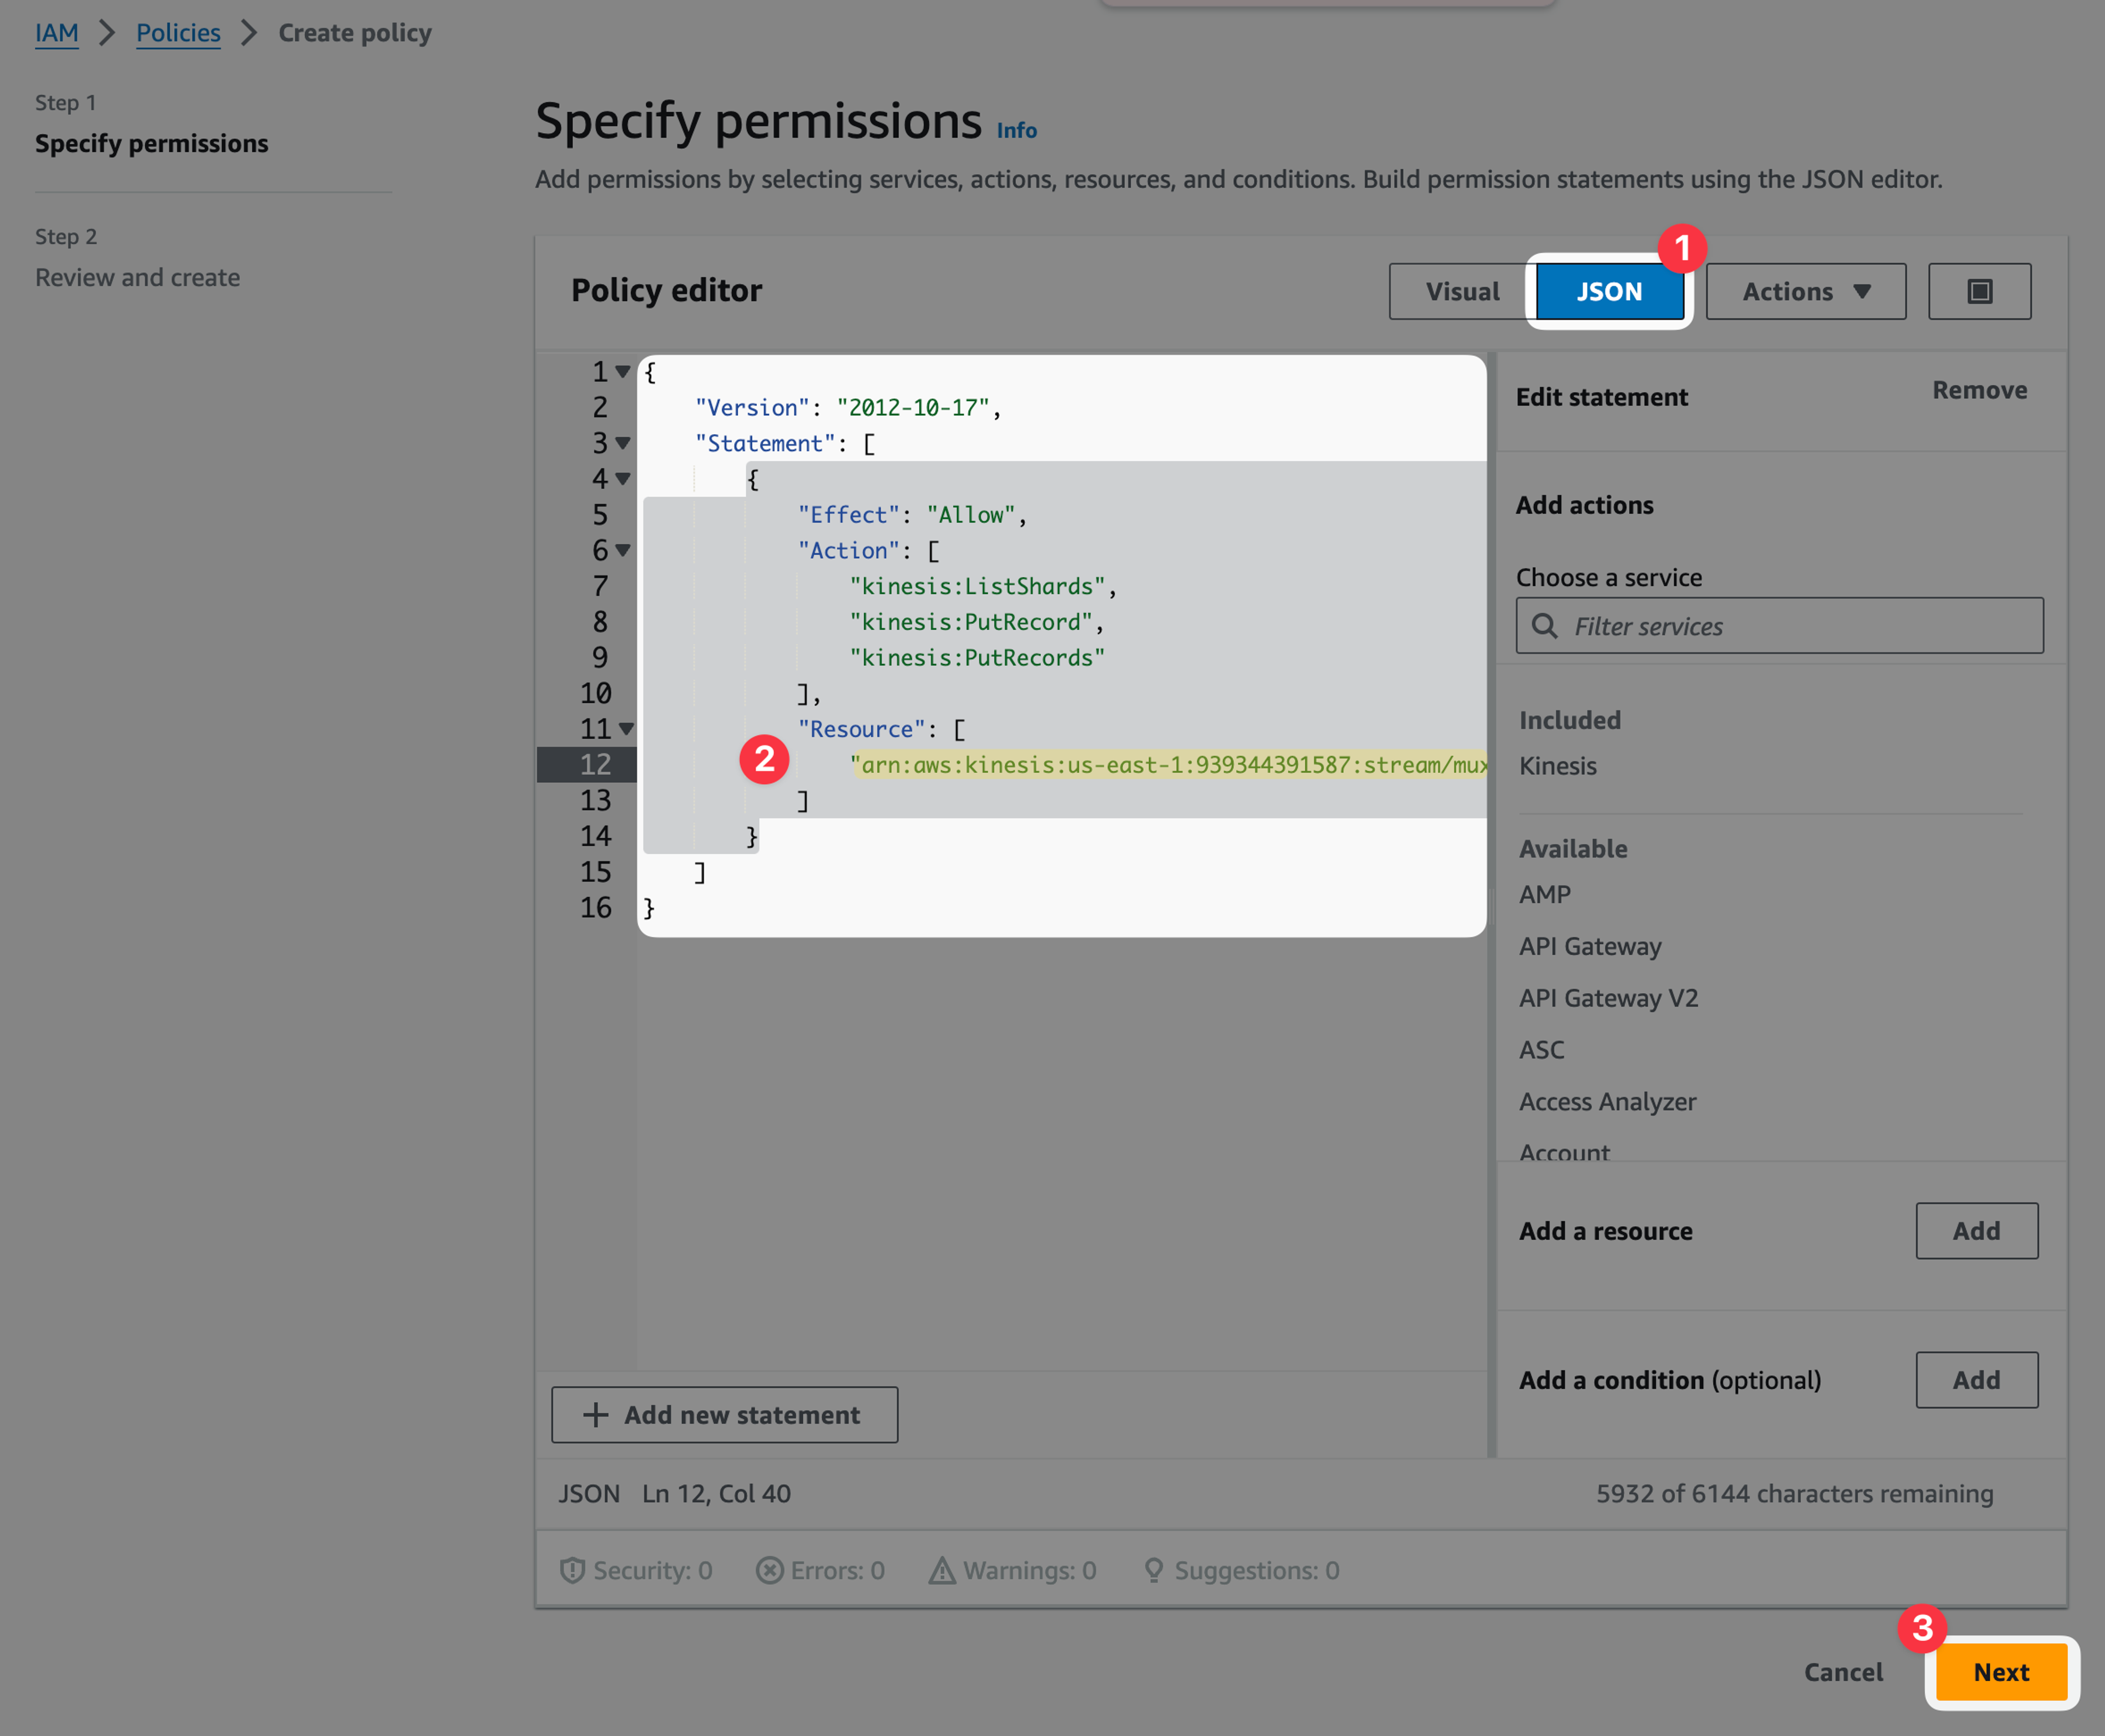
- Click the JSON tab to enter a custom policy.
- Paste in the following policy, replacing the placeholder ARN with your actual stream ARN:
{
    "Version": "2012-10-17",
    "Statement": [
        {
            "Effect": "Allow",
            "Action": [
                "kinesis:ListShards",
                "kinesis:PutRecord",
                "kinesis:PutRecords"
            ],
            "Resource": [
                "arn:aws:kinesis:{region}:{account-id}:stream/{stream-name}"
            ]
        }
    ]
}- Click the Next button to continue.
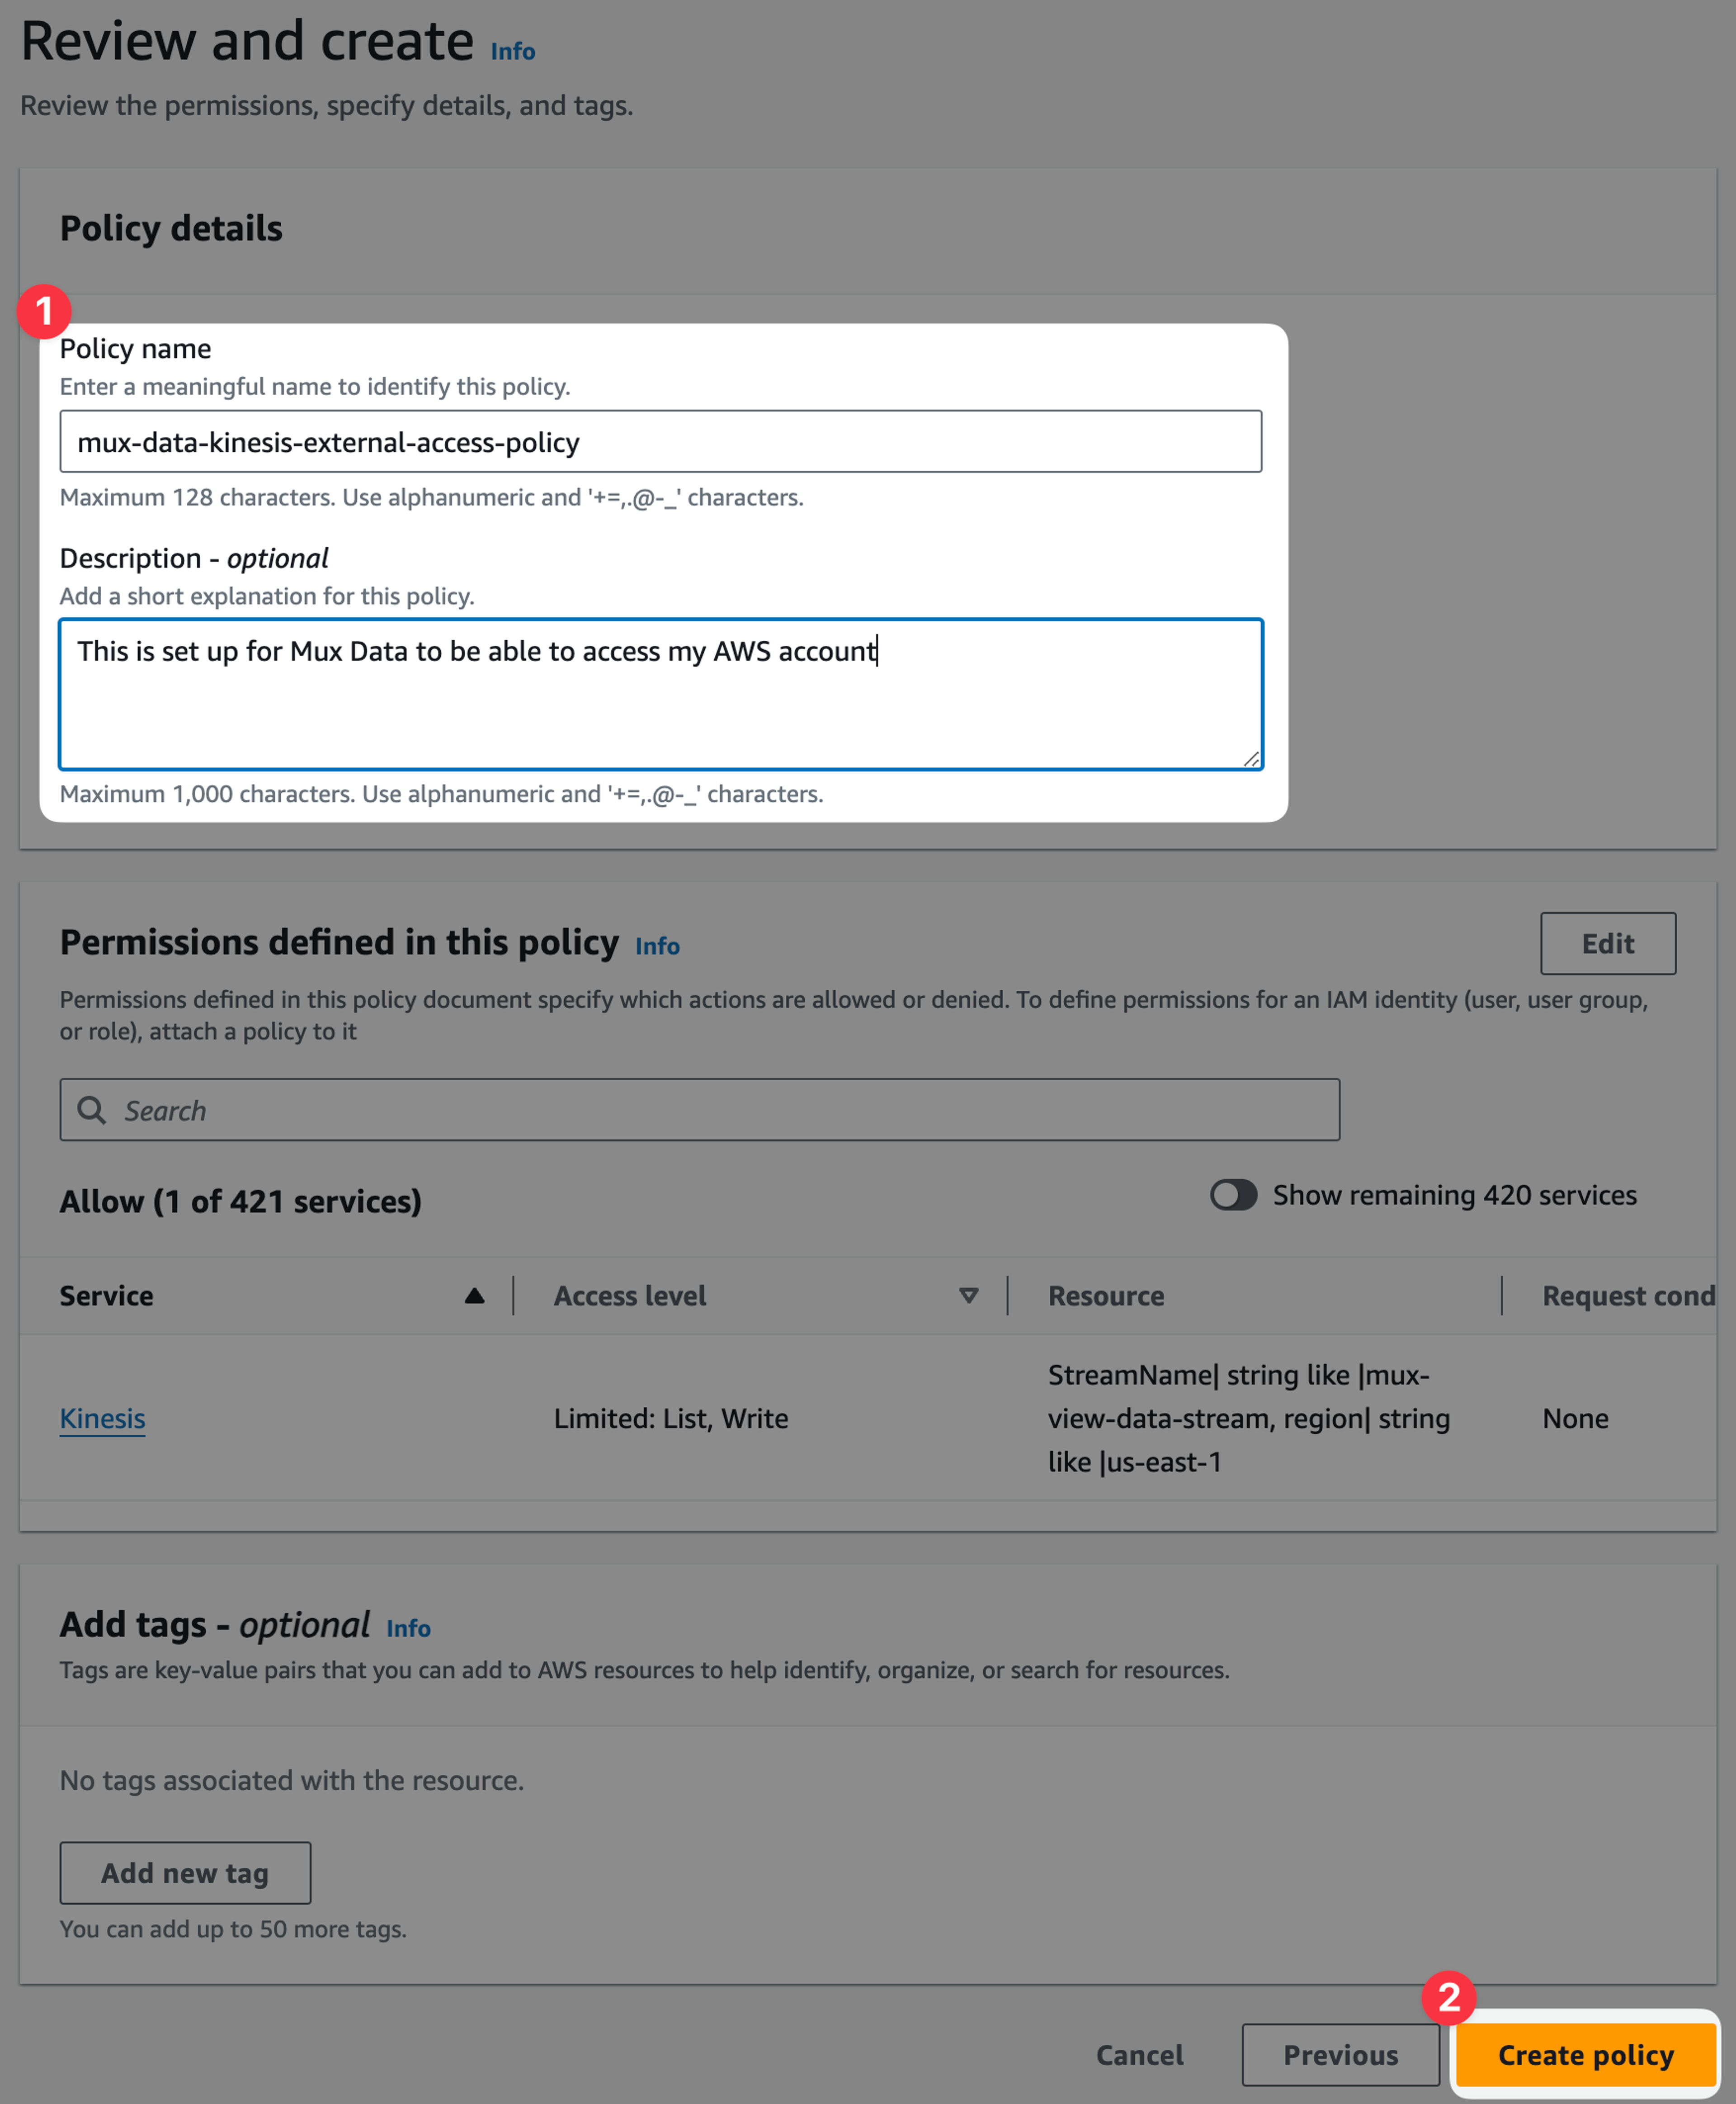
- In the Name field, enter a name for the policy (example: mux-data-kinesis-external-access-policy).
- Use the Description field to write a reminder for why this policy exists (example: “This is set up for Mux Data to be able to access my AWS account”).
- Review the Summary and click the Create policy button to proceed.
Step 4: create an IAM role to enable Mux access
AWS has specific documentation available describing how to create a role that enables access for an external AWS account. There are two notable values to point out in this process:
- Principal: This is the third-party ID for whom you’re allowing access to your AWS account resources (i.e., Mux’s AWS account ID).
- External ID: This is a unique ID that increases account access security (Mux provides this value to you).
Let’s get going on the IAM role setup.
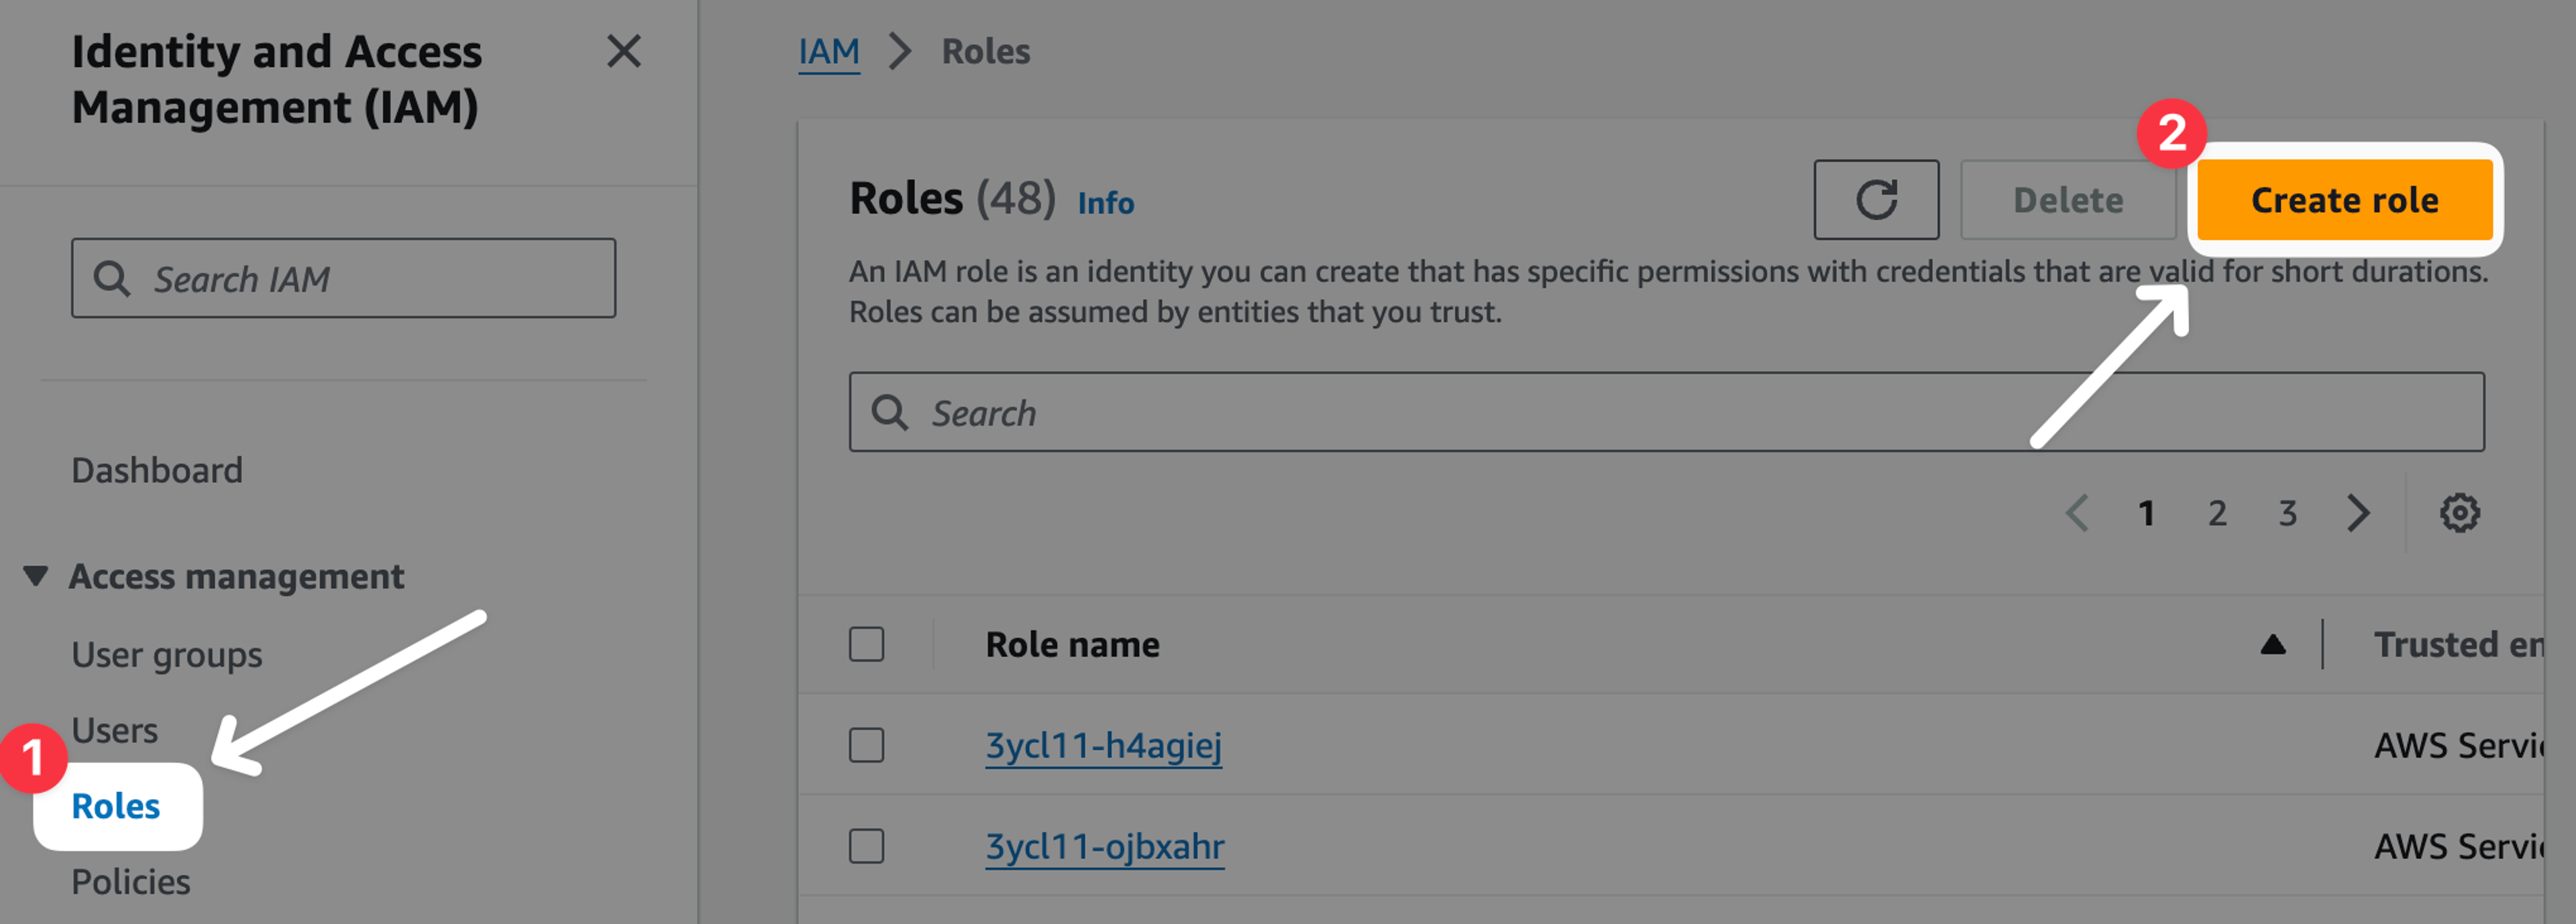
- In the AWS console, visit IAM → Roles (console.aws.amazon.com/iamv2/home#/roles).
- Click the Create role button.
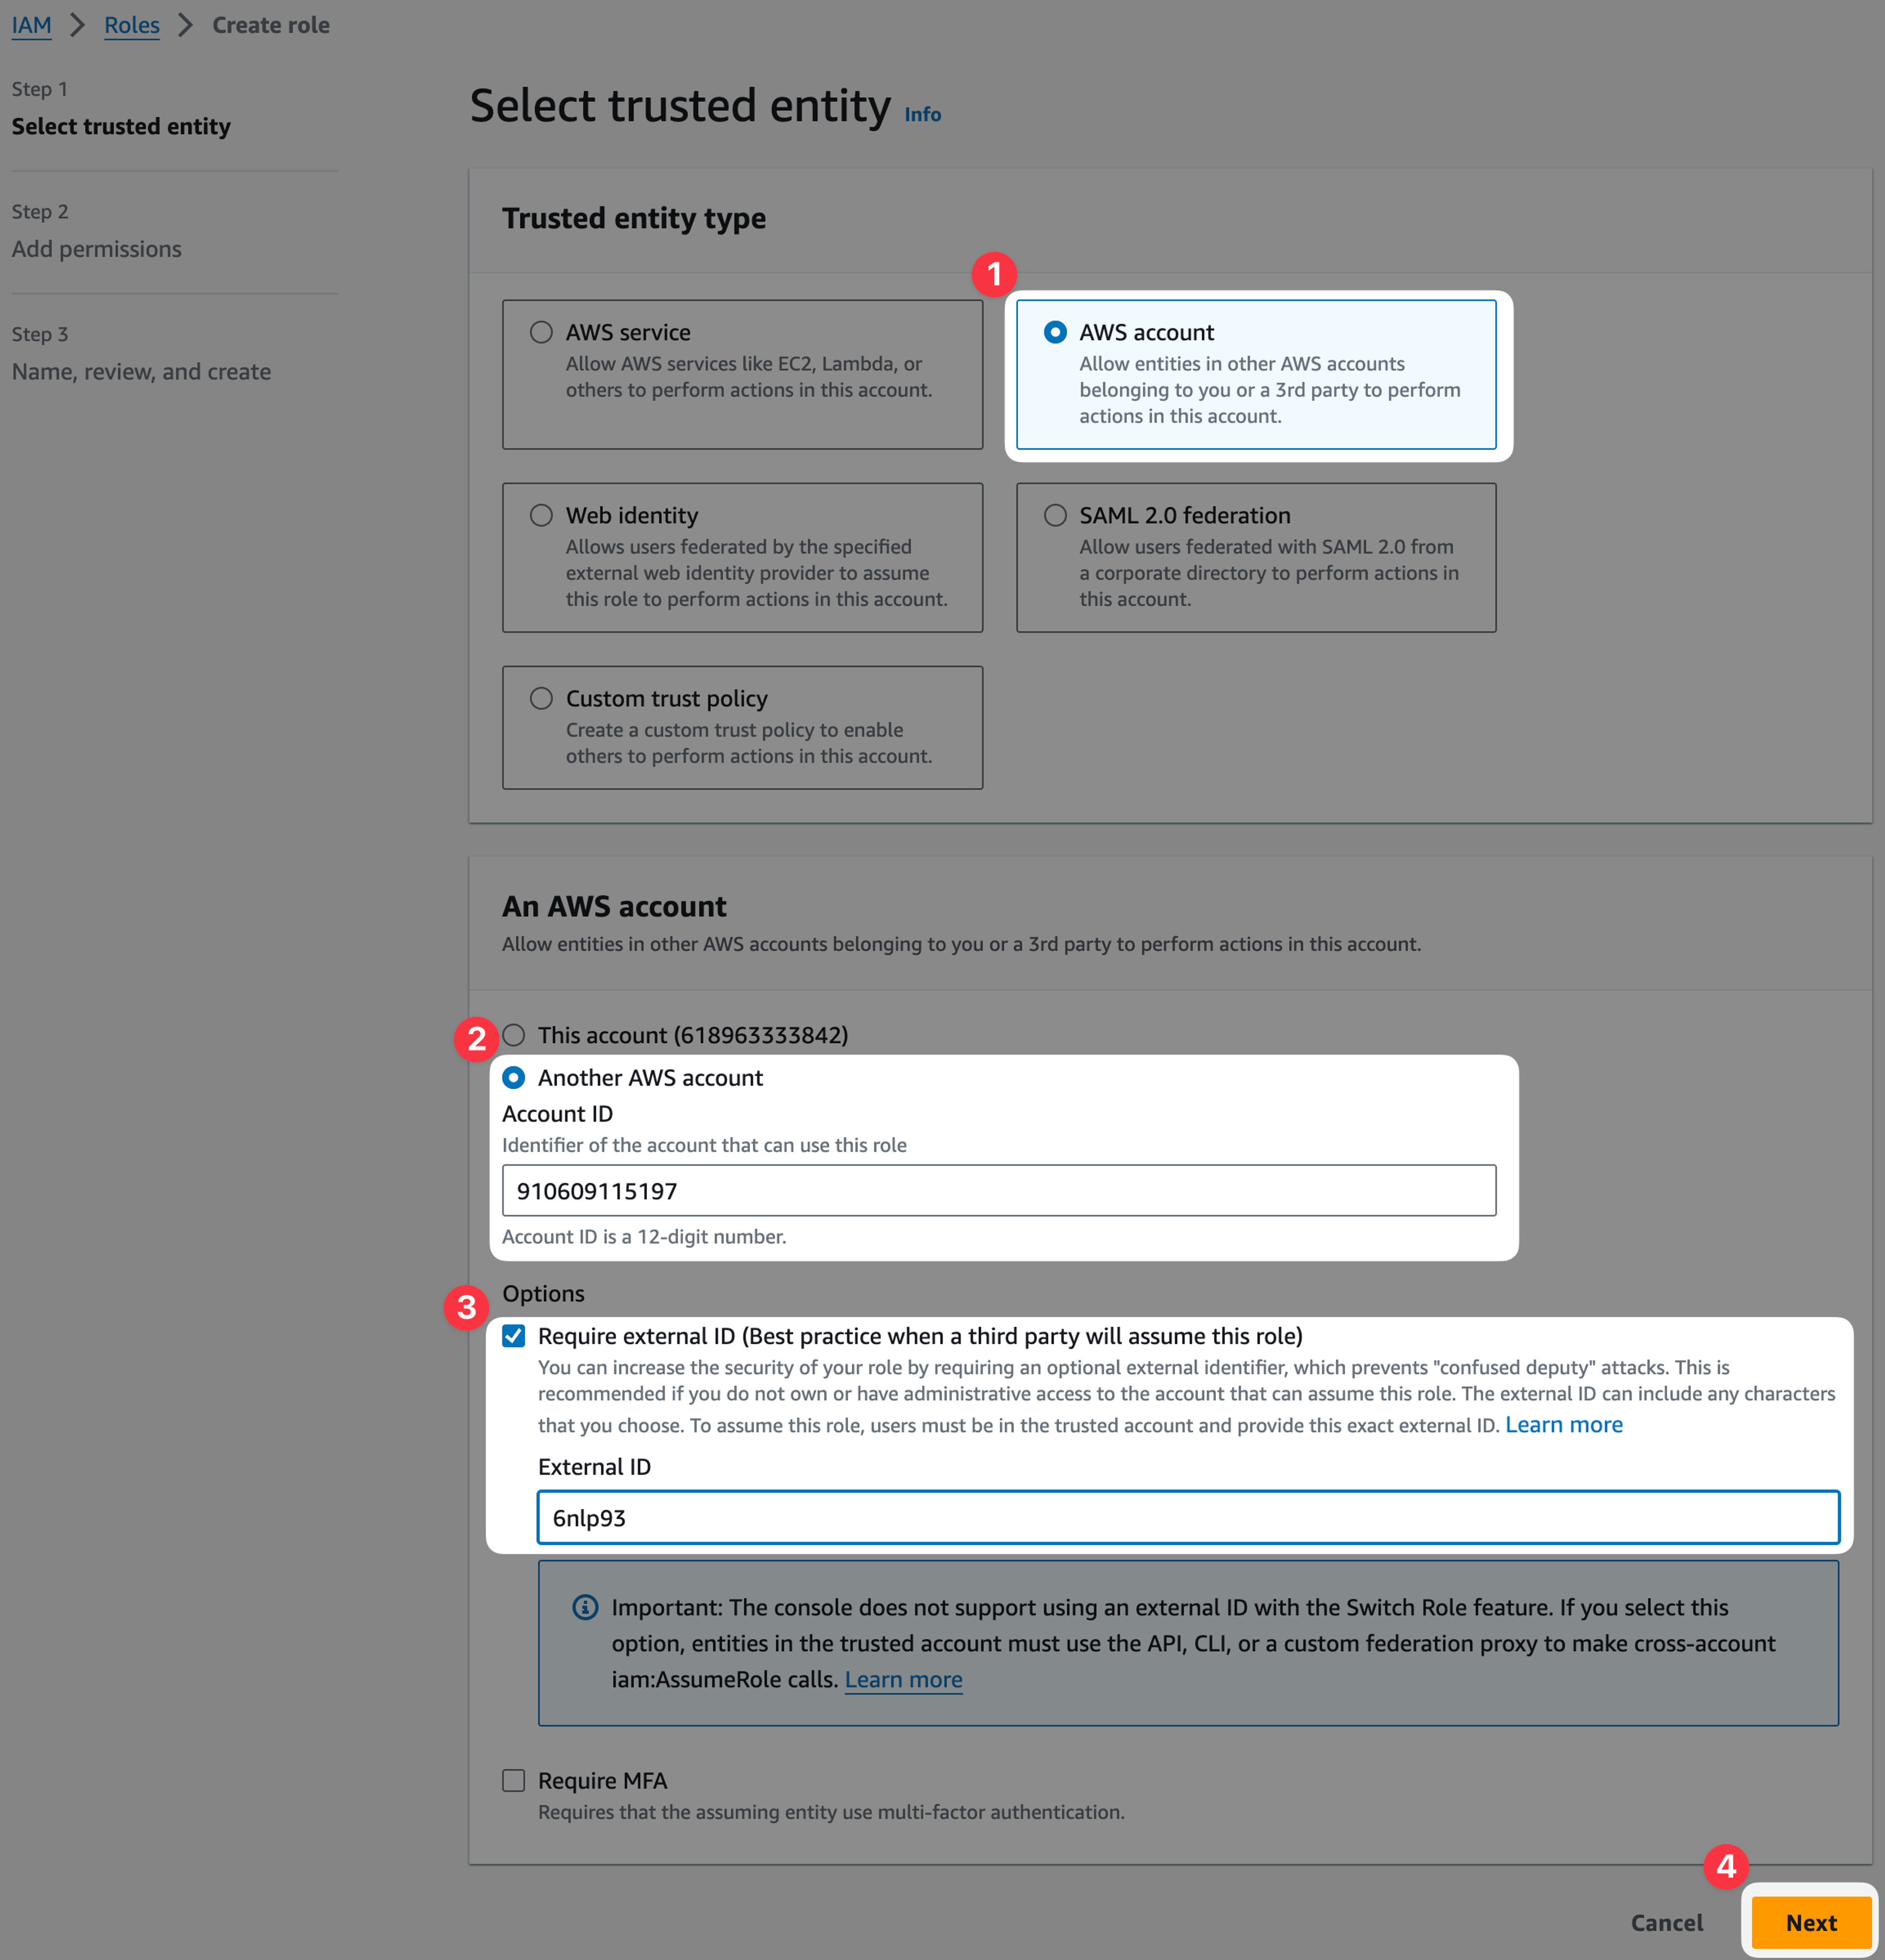
- Under Trusted entity type, choose AWS account.
- Select Another AWS account and enter Mux’s AWS account ID: 910609115197.
- Under Options, make sure Require external ID is checked, and paste in the External ID that Mux provided to you in Step 1.
- Click Next to continue with setup.
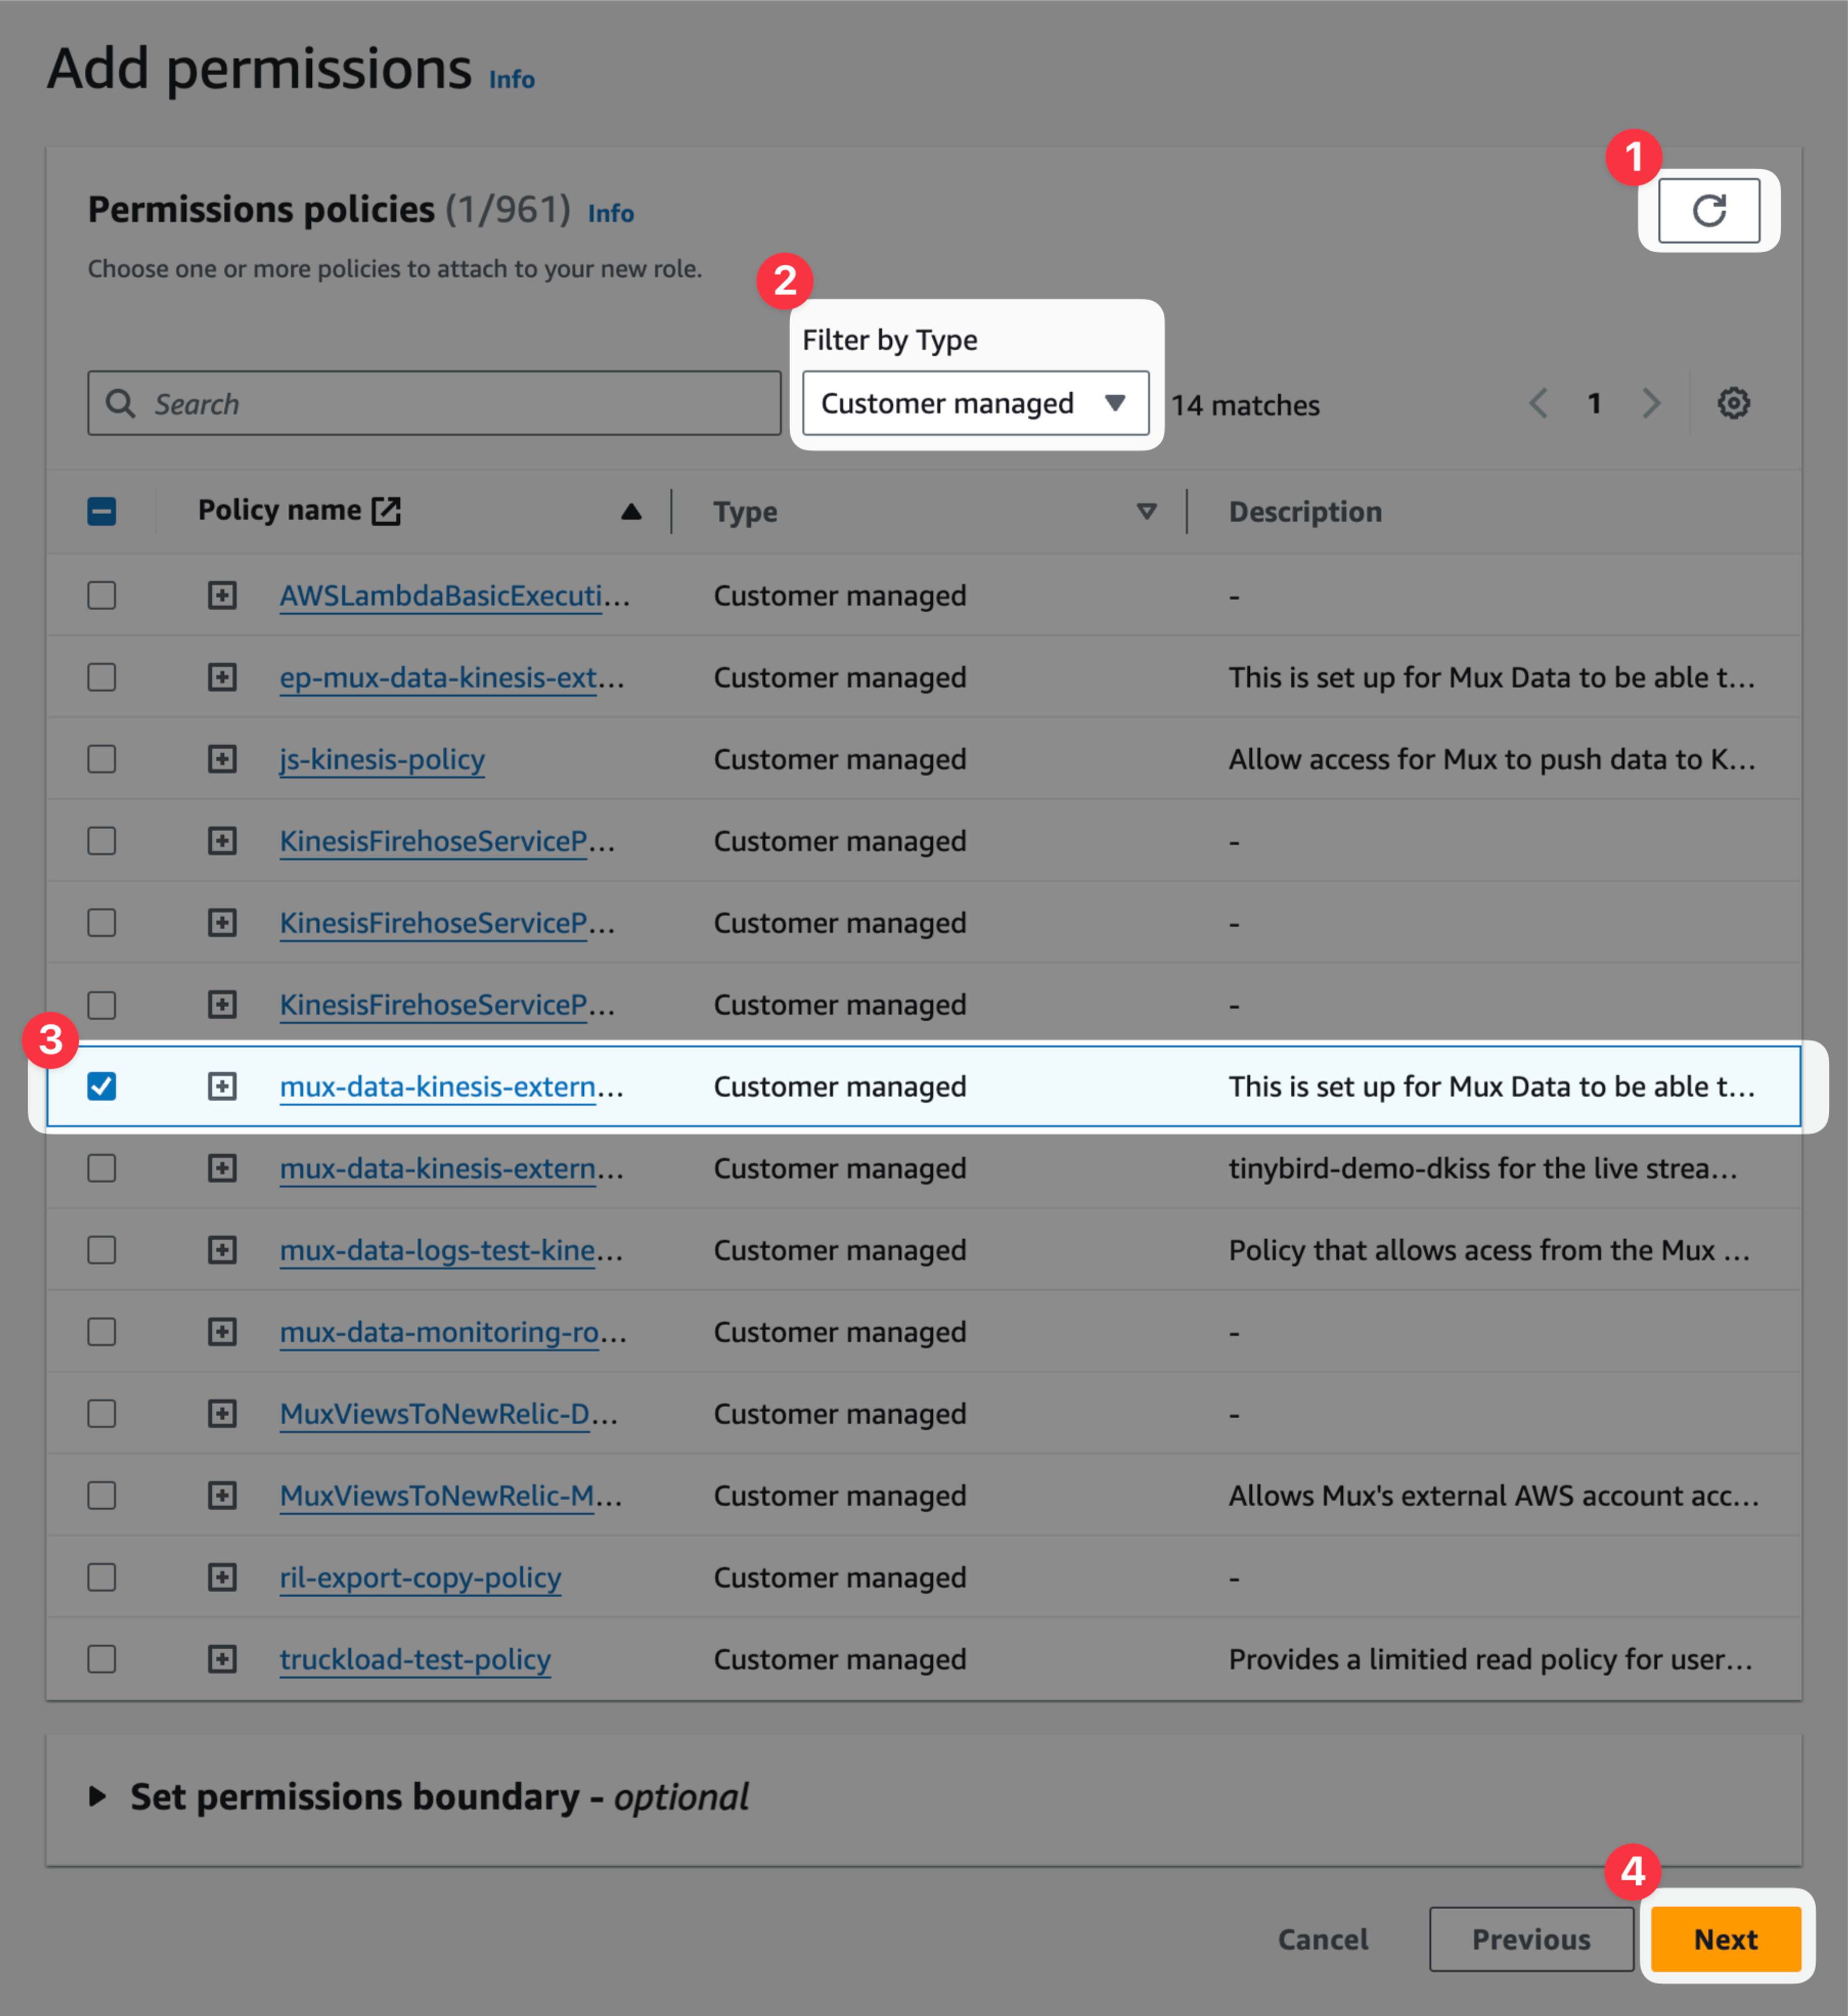
- Reload your policies to ensure your newly created policy will appear.
- In the dropdown labeled Filter by Type, select Customer managed
- Select the checkbox next to your newly created Policy to apply the Policy to the new Role.
- Click the Next button to proceed.
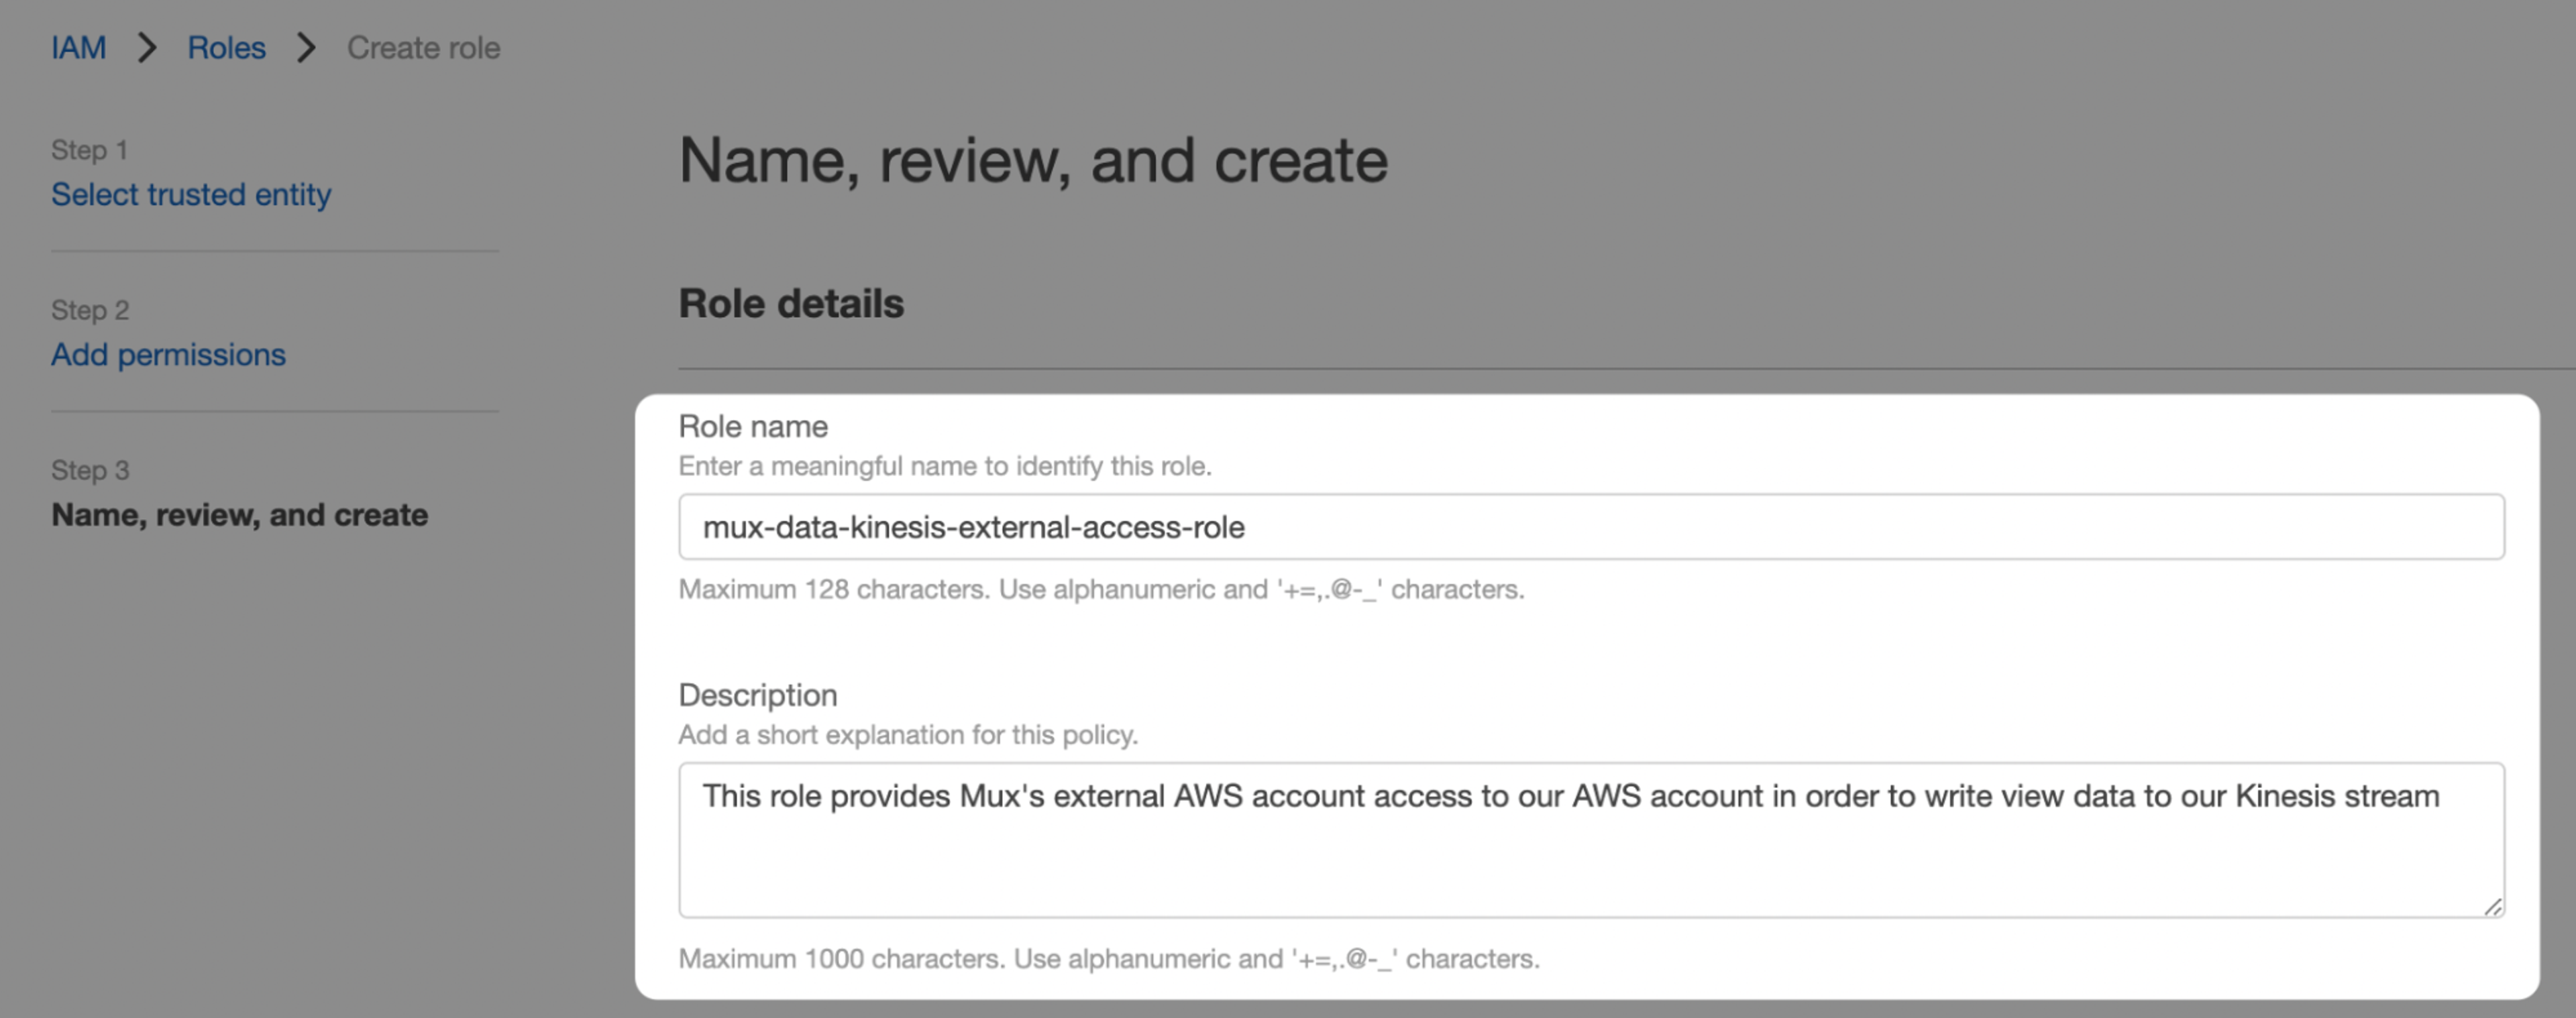
- Under Role name, enter a name for your role (example: mux-data-kinesis-external-access-role).
- In the Description text area, add a reminder describing what the role is used for. (Example: This role provides the Mux external AWS account access to our AWS account in order to write view data to our Kinesis stream.)
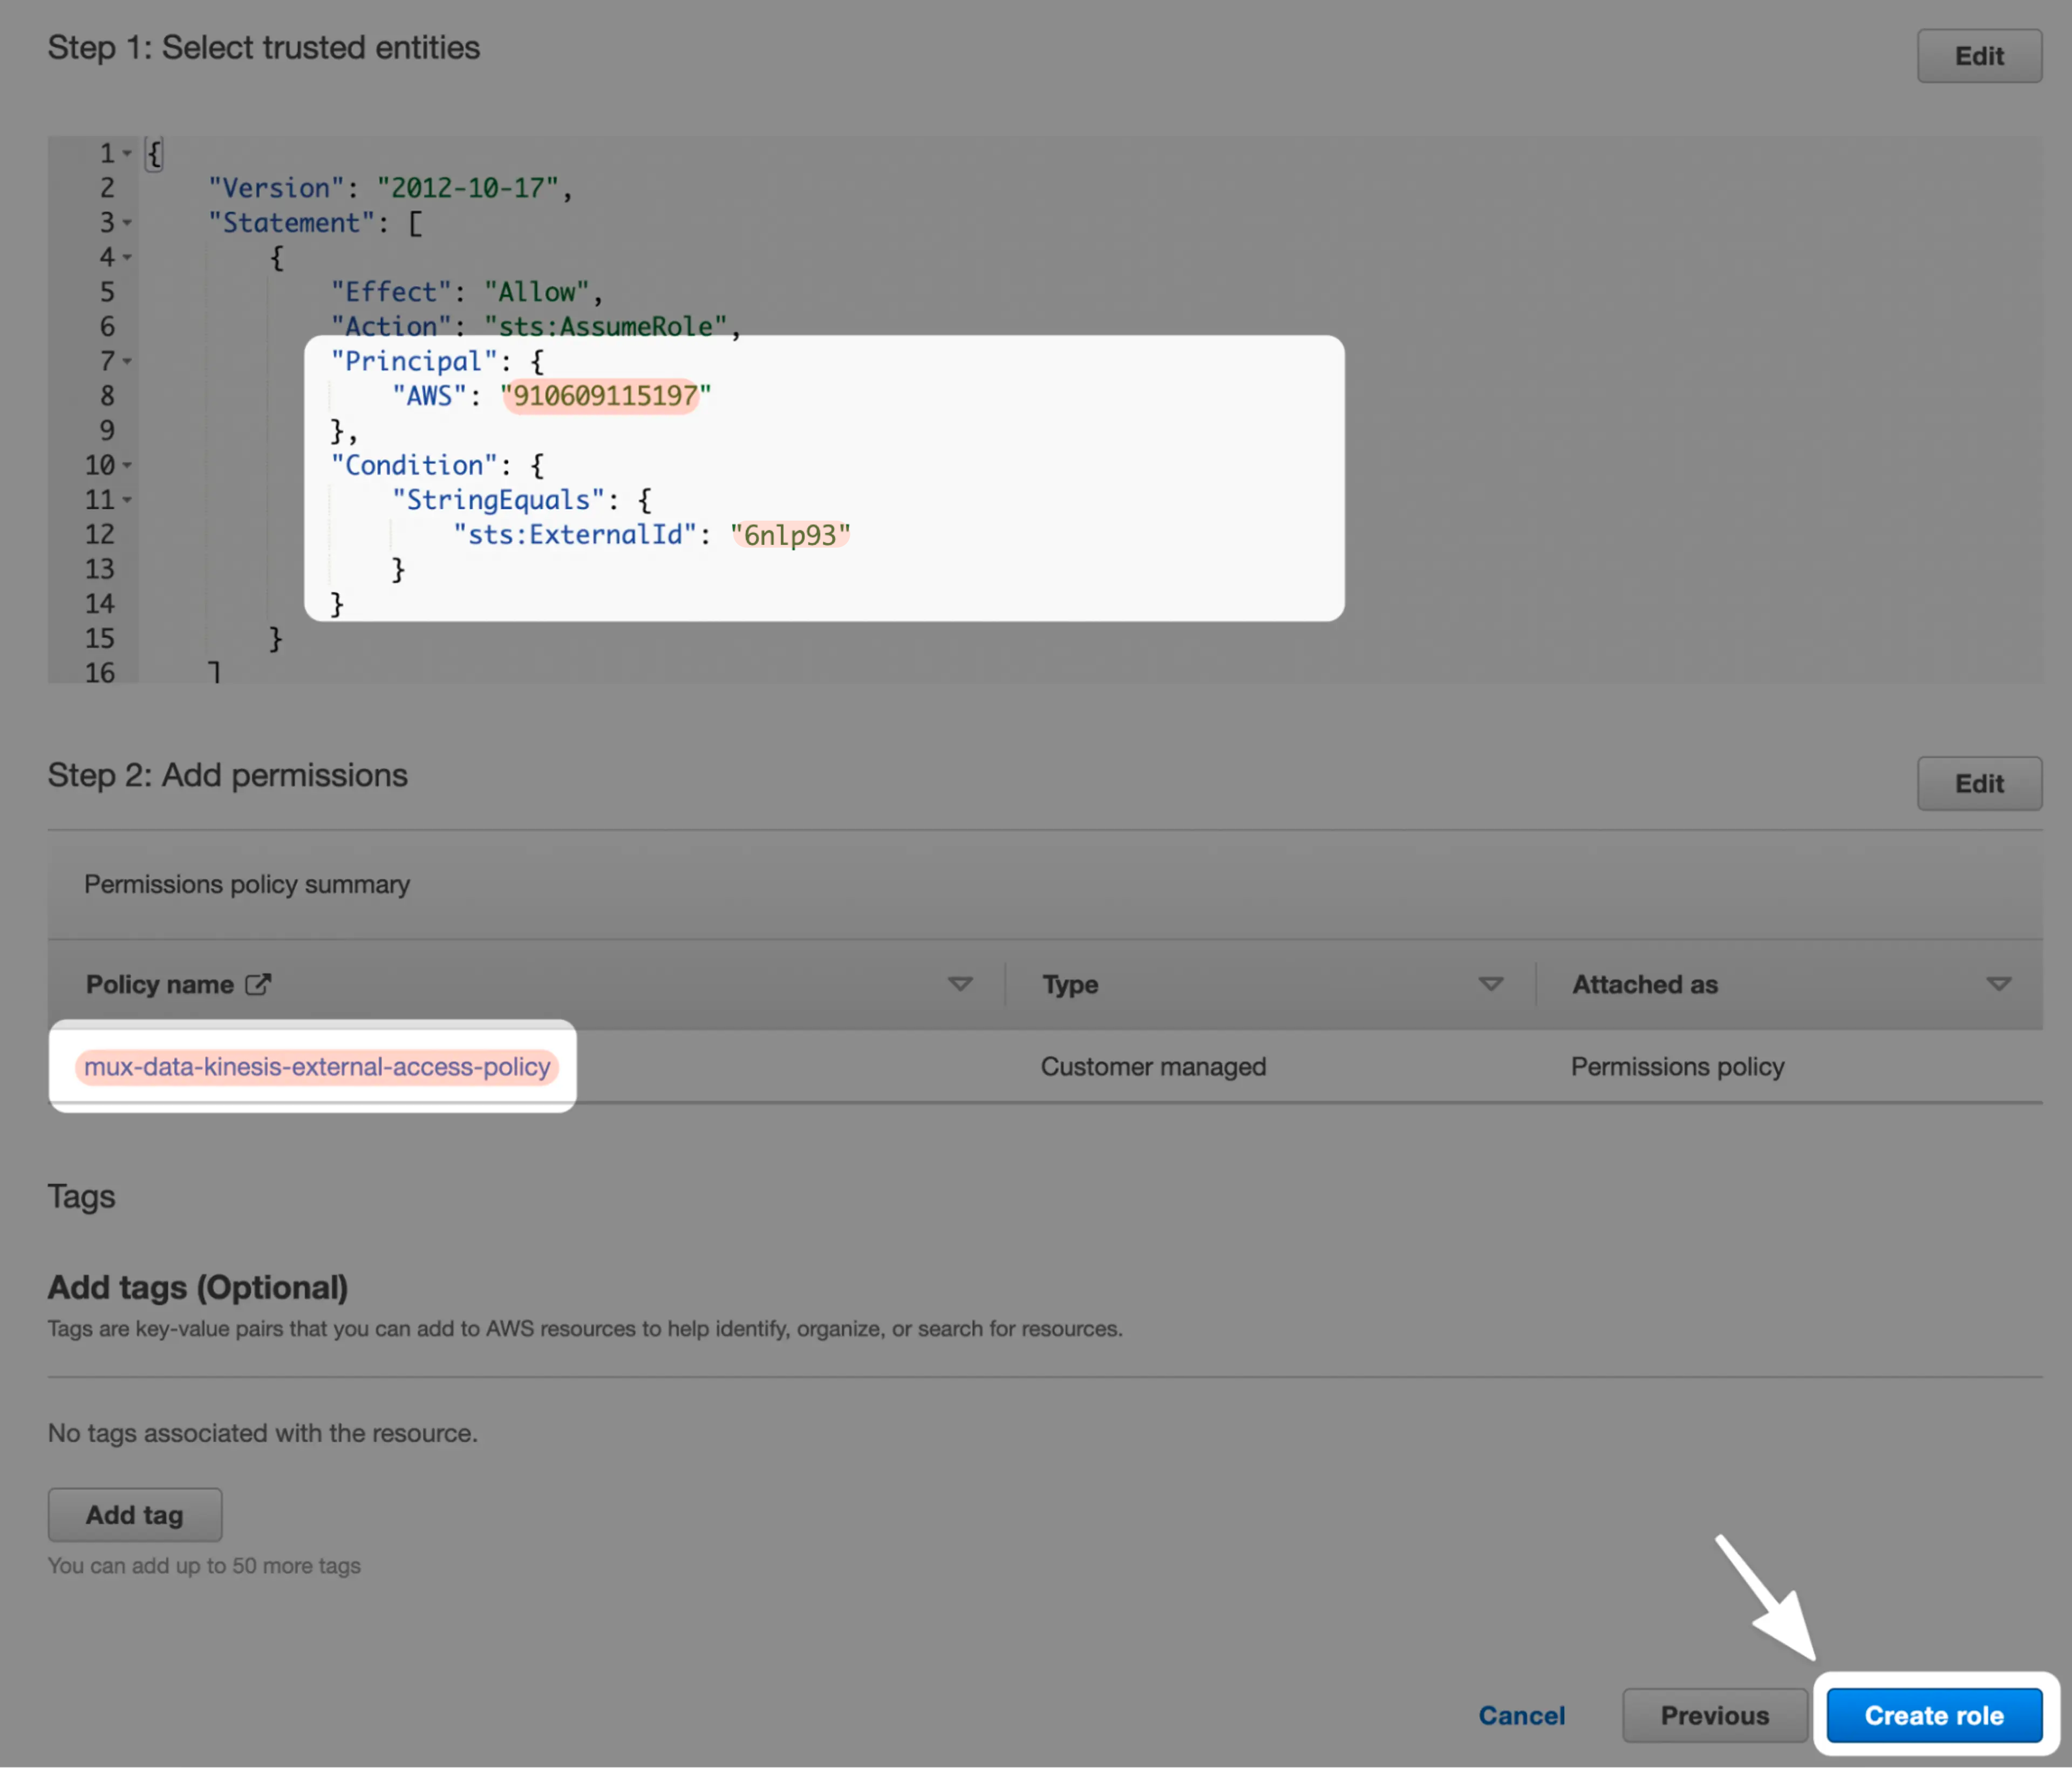
- Review your settings to confirm that the correct Principal, External ID, and AWS IAM Policy have been chosen.
- When you’re ready, click the Create role button.

- Click on the new Role name.
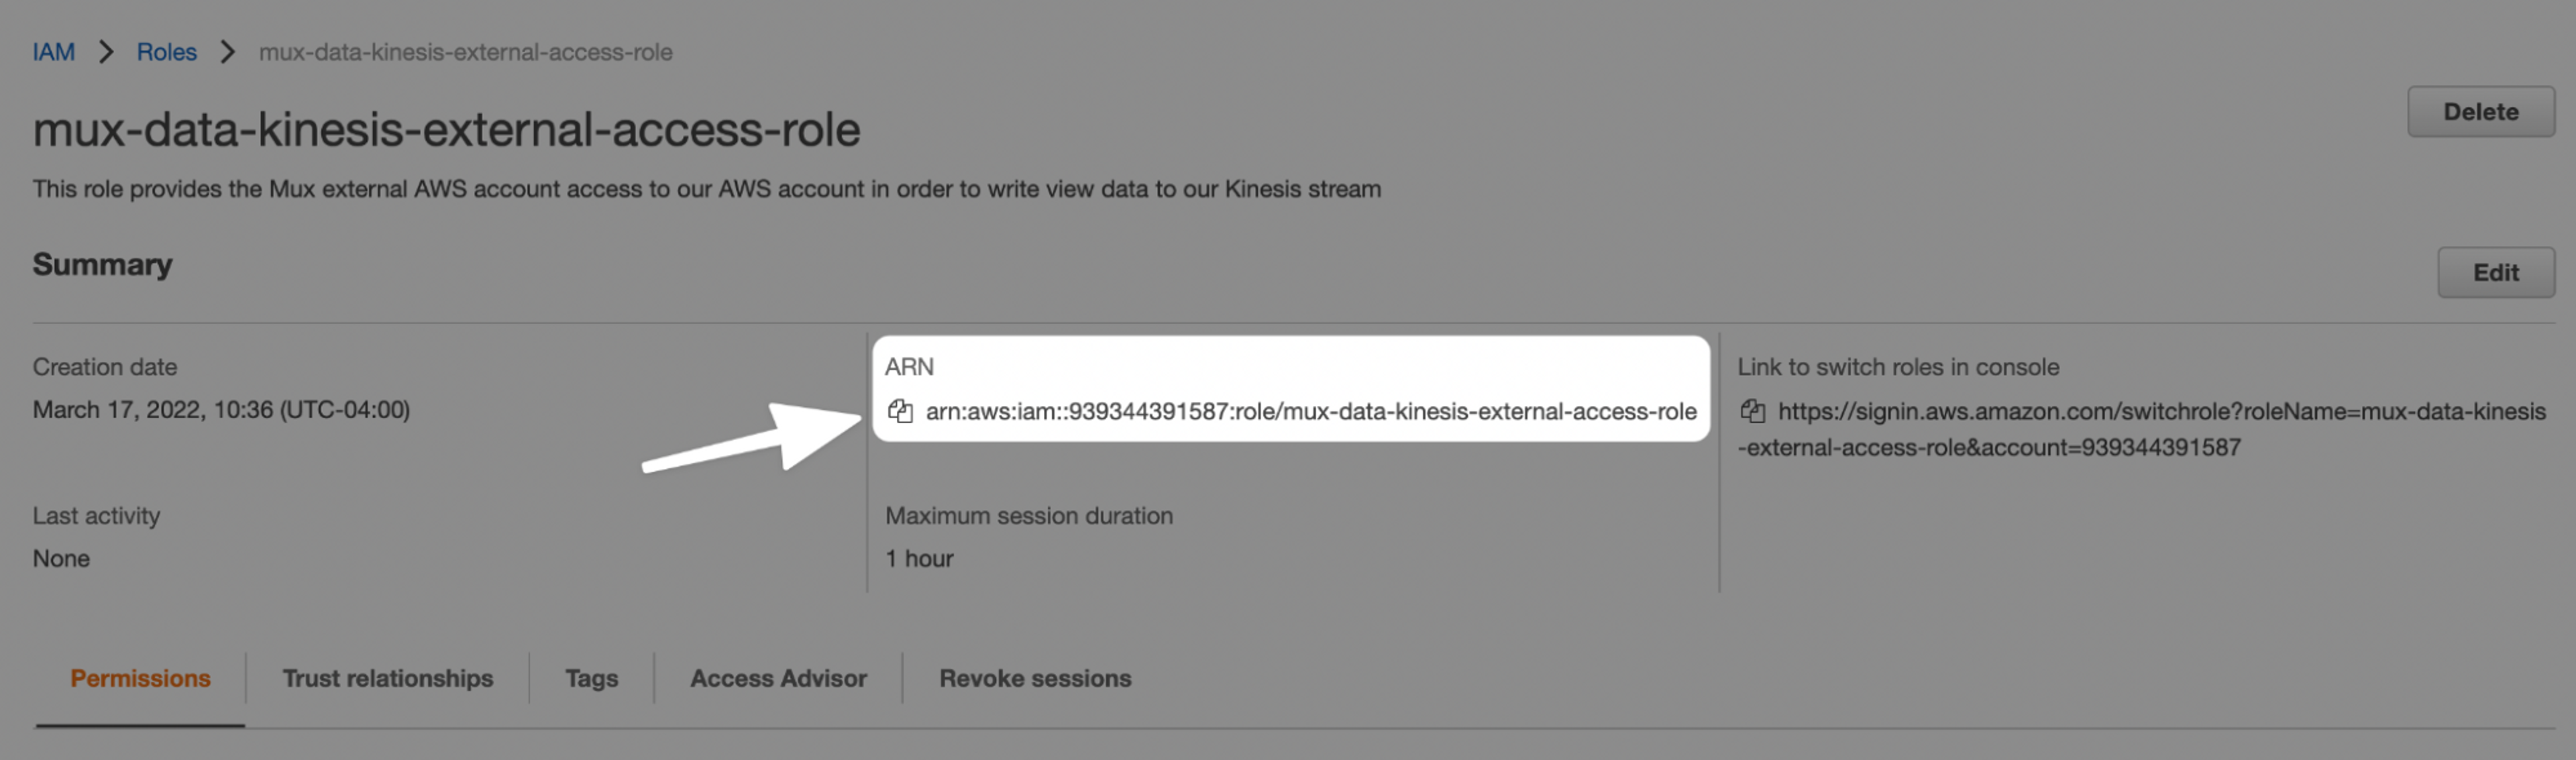
- On the Role details page, under Summary, click to copy the ARN.
Step 5: share your ARNs with Mux
In order to enable view data to be streamed to your AWS account, we need both values for your Stream ARN and Role ARN. Head back to your Mux dashboard, and on the Streaming Exports page, enter your Stream ARN and Role ARN. Lastly, click on the Enable export button to finish up the process.
Once you’ve completed the integration, you’ll be able to see your view data being sent to your Kinesis stream.
Wrapping up
You’re good to go! You now have Amazon Kinesis Data Streams configured to capture your Mux view data in real time. What comes next is up to you — and the possibilities are endless.
Note that while this is a fully functional configuration, AWS can be configured in many ways, some of which may be better suited for your AWS environment and use case. We're happy to support where we can and work alongside your AWS team to find the right solution for you, but we ultimately cannot dictate how you set up your AWS environment.
If you need any assistance or hit any unexpected snags during this process, let us know! Mux has partnered with AWS to ensure we can provide you with the solutions you need for view data stream capture.
Footnotes
*Keep in mind that it’s also possible to set up this entire stack using infrastructure-as-code tooling like CloudFormation or AWS CDK.
**On-demand data streams will automatically adjust the shards as the load changes. While provisioned data streams can also be used, on-demand data streams provide the best experience for scalability and ease of setup.
***Depending on your use case, you may wish to go a step further and enable server-side encryption for your data. AWS has great reference materials for getting server-side encryption set up.