At Mux we’ve seen an increasing demand for access to the raw & enriched video QoS data processed by Mux Data. Moreover, it’s not sufficient for these exports to be available on a daily or even hourly basis; many customers want access to low-latency, real-time data streams with a latency of one minute or less, glass-to-glass. We’ve made this possible for Mux Data Enterprise customers through our real-time metric and event-stream exports.
Mux Data customers are building their own impressive applications that take action on the realtime streams, such as:
- Monitoring the performance of CDNs and networks to enable CDN switching & troubleshooting
- Identifying popular videos as they become viral to increase promotion
- Joining Mux Data metrics with their own internal metrics to speed up troubleshooting and root-cause analysis
The number of uses is limited only by one’s imagination!
However, this presents an obvious challenge for us in managing the numerous streams destined for customer streaming systems.
Mux uses Apache Kafka as our internal streaming platform. Mux customers might use AWS Kinesis, Google Cloud PubSub, Kafka, or some other streaming service. When faced with the problem of bridging data in our Kafka clusters to numerous external streaming services, we chose to “stand on the shoulders of giants” and use battle-tested open-source software to power the streaming export system as much as possible.
Enter, Kafka Connect
The Kafka Connect project is part of the Apache Kafka ecosystem. To quote Confluent:
“Kafka Connect is a tool for scalably and reliably streaming data between Apache Kafka and other data systems. It makes it simple to quickly define connectors that move large data sets into and out of Kafka.”
Anyone looking to stream data between Kafka and other data systems should first look to Kafka Connect.
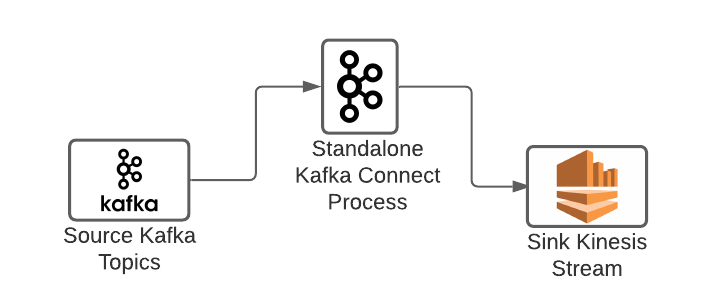
Kafka Connect can run in either a standalone or distributed mode.
The standalone mode uses a maximum of one server, and the connector configuration is not fault-tolerant. This should only be used for testing or development.
Most production deployments of Kafka Connect run in a distributed mode. In this mode, a Kafka Connect connector (analogous to a job), can run across multiple Kafka Connect instances that make up a cluster, allowing for horizontal scalability & fault-tolerance.
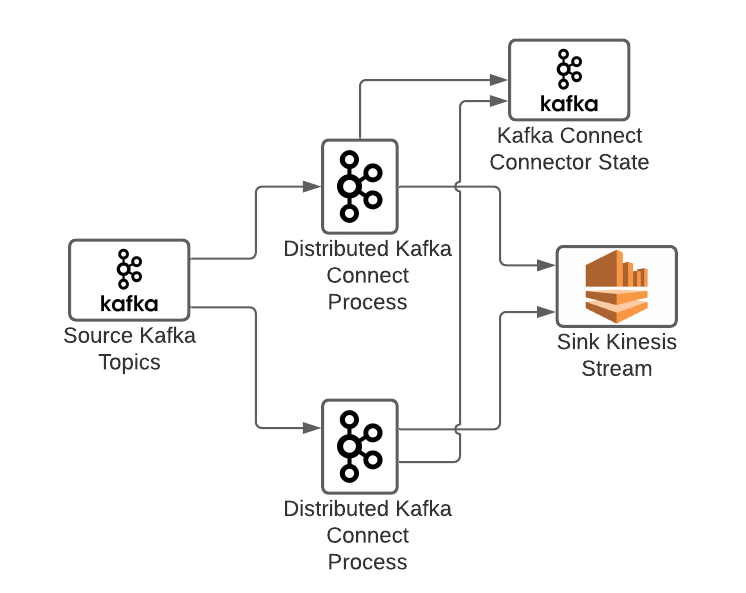
Kafka Connect connector configurations are stored in an Apache Kafka topic, ensuring durability. Connector configurations are managed using the Kafka Connect REST API which can be accessed via any of the Kafka Connect instances in the cluster. A connector configuration describes the source (e.g. Kafka cluster & topic), sink (e.g. external AWS Kinesis stream), and any transformations to be applied along the way.
One of the best parts about Kafka Connect is that sources & sinks must only implement a single Kafka Connect Java Interface, making them extremely easy to write. This permits your source or sink to focus on reading or writing from the remote system. It's possible to write a source or sink for just about any system imaginable! All other concerns like offset management, consumer rebalancing, error-handling, and more are handled by Kafka Connect itself. Simply package your source/sink code in a JAR, include it on the Kafka Connect classpath, and you’re ready to reference it from a connector.
As an engineer working on streaming data systems, I’m certain I’ve written software equivalent to Kafka Connect several times during my career. It’s a tedious and error-prone process. Being able to delegate the majority of the work to a popular, well-supported open-source tool is a tremendous relief.
Mux uses Kafka Connect to manage the realtime event-stream exports to external streaming services. In the 9 months that we’ve been using Kafka Connect in production, it’s been extremely reliable, scalable, and easy to extend & customize.
Getting Started with Kafka Connect
Let’s walk through the process of deploying a Kafka Connect cluster on Kubernetes.
Step 1: Build your Kafka Connect Docker Image
A lot of open-source software is designed to be run as-is, without modifications. I was surprised to learn that this does not apply to Kafka Connect. Expect to add connectors to Kafka Connect.
If you’re deploying Kafka Connect as a Docker container, then this involves adding image layers with source or sink JARs (Java Archives of compiled code) that provide the extra or customized functionality you need.
In our case, we add sink connectors for AWS Kinesis and Google Cloud PubSub. We also add a Prometheus exporter JAR that scrapes the Kafka Connect JMX metrics and exposes them as Prometheus metrics.
Here's a sample Dockerfile that pulls adds these dependencies to the Confluent Kafka Connect base-image:
We compile the JARs, place them in the same directory as the Dockerfile shown above, and run `docker build`. The resulting Docker image is pushed to a Docker image repository where it can be pulled and run.
Step 2: Start up your Kafka Connect Cluster
Nearly all of the infrastructure at Mux runs in Kubernetes clusters. Kafka Connect is no exception. The following Kubernetes manifest shows how you might run the Kafka Connect Docker image in a Kubernetes cluster:
At a minimum, you’ll need to change the Docker `image` URI to point at your new image, and change the `imagePullSecrets` name if you’re storing the image in a private repository.
Credentials for AWS and GCP are stored as Kubernetes secrets. The AWS credentials are set as environment variables on the container, which are automatically recognized and used by the AWS Kinesis sink for authentication. The GCP credentials are stored in a Kubernetes secret that is accessible from a file on the container filesystem; the `GOOGLE_APPLICATION_CREDENTIALS` environment variable is used by the GCP PubSub sink to determine the location of the file containing application credentials.
After deploying the Kafka Connect manifest to Kubernetes, you should see your Kafka Connect pod(s) running as part of a cluster. They’re not doing much at this point, but that’s fine!
Step 3: Run some Connectors!
As mentioned earlier, connectors are administered through the Kafka Connect REST API. You can access this API via any of the Kafka Connect pods. This can be accomplished by sending REST calls to TCP port 8083 on a Kafka Connect pod.
Example: GCP PubSub Sink
In this example, we’re reading from the Kafka topic `demo-event-stream-export` and writing to the GCP PubSub topic `mux-demo-event-stream-export` in the project `external-mux` using the GCP PubSub sink implementation. The connector will run 6 Kafka Connector tasks; each task works as a Kafka consumer, so it makes sense for the number of tasks to not exceed the number of partitions on the source topic (e.g. `demo-event-stream-export`). The connector sink is identified by the `connector.class` setting, which references the GCP sink implementation.
Example: AWS Kinesis Sink
This example shows a connector that writes to a Kinesis sink using the AWS Kinesis sink implementation. Again, it’s reading from the Kafka topic `demo-event-stream-export`. There are Kafka Connect standard configuration keys (e.g. `name`, `topics`, `connector.class`, `tasks.max`) intermingled with the sink configuration keys (e.g. `streamName`, `roleARN`, `ttl`).
This example shows how you can use IAM authentication and external-id’s to authenticate to a restricted role when accessing external resources, such as a Kinesis stream owned by another organization. It also shows how you can use the `kinesisEndpoint` key to use an alternate endpoint, which is a popular way of using a VPC endpoint to avoid having your Kinesis-writes egress through a NAT, which can become quite costly.
Lessons We’ve Learned
Make sure ‘CONNECT_REST_ADVERTISED_HOST_NAME’ is set
The Kafka Connect pods communicate with each other via the REST API. This requires them to advertise themselves using a hostname or address that’s accessible by all of the other Kafka Connect pods.
In Kubernetes deployments you should probably set the ‘CONNECT_REST_ADVERTISED_HOST_NAME’ environment variable to the pod IP. This is done in the Kubernetes deployment example above.
Failure to set this correctly will yield errors any time you try to modify the connector configurations. Other Kafka Connect community blog posts have addressed this specific issue, it’s a painful one.
Set the ‘errors.retry.timeout’ value on your sinks
Kafka Connect sinks can be configured to retry failed writes for a configurable duration with exponential backoff. However, the default behavior in Kafka Connect is to not retry writes on a worker task and immediately mark the worker task as failed. Once a task is failed, its source topic partition claims are reassigned to other tasks where they’ll be retried. This can lead to an imbalance of load across Kafka Connect pods. The only way to resolve this is by restarting the individual failed tasks.
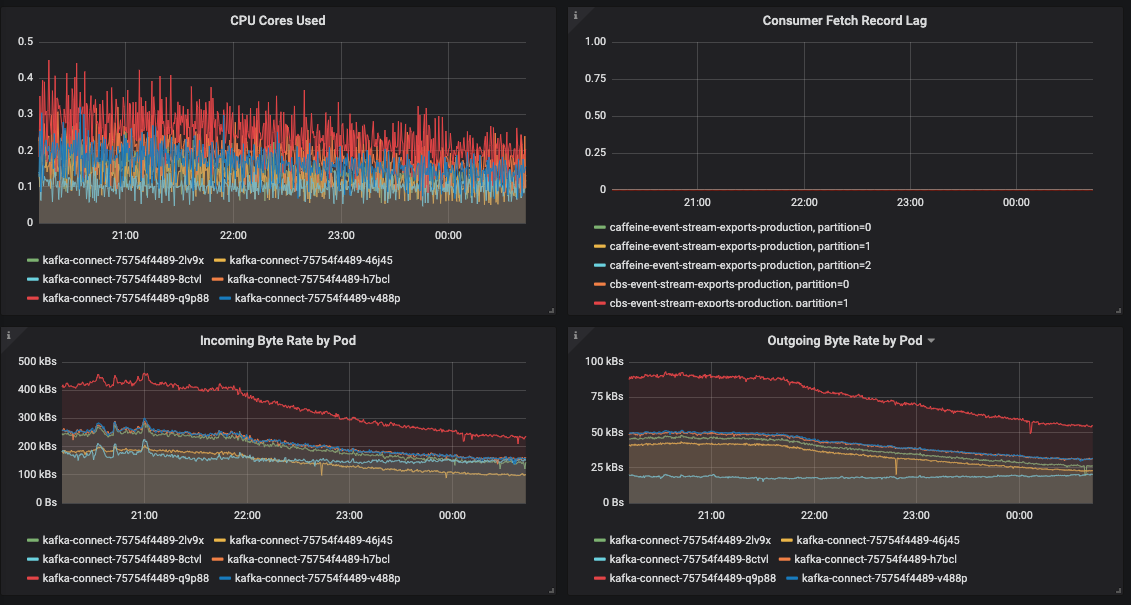
Here's an example of an imbalance of network & CPU load across Kafka Connect instances due to task failures. Nothing is wrong, per se, but the uneven load leads to inefficiency that could later result in lag:
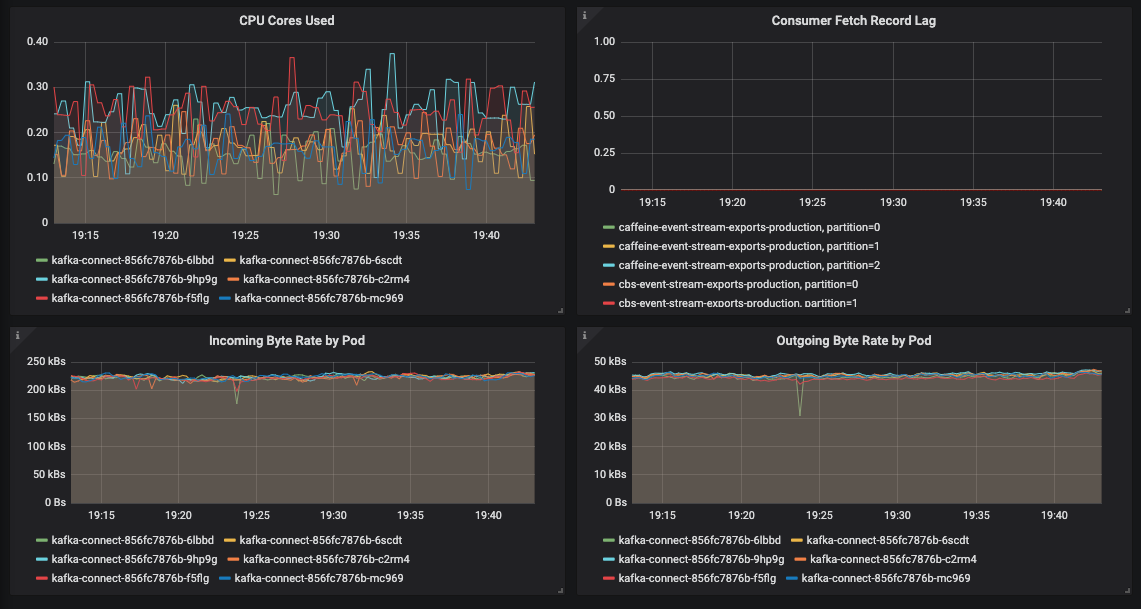
Ideally, the load should be even across all Kafka Connect instances:
For this reason, it’s highly recommended that you set the ‘errors.retry.timeout’ setting on each sink. In the case of AWS Kinesis sinks, it’s common to get spurious write-failures that immediately succeed upon retry. Setting the ‘errors.retry.timeout’ ensures that you’ll get the benefit of a retry while keeping the workload balanced. You should also monitor task failures as an early indicator of load imbalances.
Autoscaling is tricky
We try to autoscale all of the services we run at Mux, adding or removing servers based on some observed set of metrics. For instance, when CPU or memory utilization rises above some predetermined threshold, the cluster should add enough servers to bring the load back down below the threshold.
In our experience, Kafka Connect resource utilization has typically been constrained by CPU usage. Adding a server will cause a cluster to rebalance which, on its own, will temporarily drive up CPU utilization.
If the autoscaling service (e.g. Kubernetes Horizontal Pod Autoscaler, or HPA) is not configured to support a cooldown or delay, then the addition of servers could cause the HPA to think that even more servers are needed to deal with the temporary spike in CPU utilization. This can lead to massive overprovisioning and thrashing in response to a moderate increase in load. In our experience, this is a general problem for Kafka consumers that are subject to stop-the-world Kafka consumer rebalances.
One approach to this problem is to configure the autoscaler to use a stabilization-window during which no scaling decisions are made. Support for stabilization windows is present in the HPA in Kubernetes 1.18 or greater.
Monitoring
We use Grafana to visualize Prometheus metrics for all services at Mux. The JMX Exporter plugin that we bundle with Kafka Connect is responsible for exposing Kafka Connect JMX metrics for scraping with Prometheus. We’ve created a Grafana Dashboard to present significant metrics in a single-page dashboard.
Some of the useful metrics are:
- CPU utilization
- Memory utilization
- Topic consumer lag
- Records consumed by connector
- Sink batch average put-time (e.g. time to write)
- Task errors
- Task failures
We have alerts on the following metrics:
- CPU utilization
- Memory utilization
- Kafka consumer fetch-record lag
- Task failures
Conclusion
Kafka Connect has been an extremely useful tool for distributing Mux Data streams to customer stream-processing systems. The simplicity of deployment and the broad array of community-supported open-source integrations is unmatched!
If you’re a Mux Data Enterprise customer, we encourage you to contact us to set up a data stream that can be used to react to viewer activity and trends in realtime!