Can you imagine a world without bookmarks?
Not the kind that lives in your browser’s toolbar: I’m talking about the old-fashioned, 25-cent gifts you used to shop for at the book fair back in elementary school.
Those simple slices of paper really do a big job in helping you find the page you’d most recently read. Without their help, you’d constantly be scanning through your book’s pages, taking up precious reading time trying to find that one paragraph that talks about that one thing that you vaguely remember. Woof!
Video is no different; when a viewer begins watching a video, leaves the page, and comes back a while later, having the option to pick up where they left off makes for a nice user experience. While HTML5 video players don’t natively offer recallable playback, it doesn’t take too much to implement this kind of functionality into your project.
In this article, we’ll share one approach for achieving just that. Let’s get started!
Hold that thought
Ah, now where did we last leave off? (See what I did there?)
In this example, let’s write a custom web component to render out the user interface. We’ll then wire up the logic required to store and recall the timecode, along with modifying the UI when the user interacts with the video.
We’ll start by creating a very basic HTML template that contains our demo video along with a DOM element for our custom media-resume-overlay component.
<html>
  <head>
    <meta name="viewport" content="width=device-width" />
    <title>Resume button using video element</title>
    <script src="https://unpkg.com/@mux-elements/mux-video"></script>
    <script type="module" src="./media-resume-button.js"></script>
  </head>
  <body>
    <h1>Resume Button Demo</h1>

    <div style="position: relative">
      <mux-video
        id="video-player"
        playback-id="OYWW4ZbsI93B00vrQkMCc7nhNJ9Hb011qyjGjZElC01Zz8"
        metadata-video-title="Mux Test Asset"
        stream-type="on-demand"
        controls
      ></mux-video>
      <media-resume-overlay
        playback-id="OYWW4ZbsI93B00vrQkMCc7nhNJ9Hb011qyjGjZElC01Zz8"
      >
      </media-resume-overlay>
    </div>
  </body>
</html>
The <mux-video> element is a Mux-flavored video tag that makes it easy for us to serve a demo video hosted on Mux with the correct playback ID. If this is your first introduction to mux-video, check out the GitHub repo for more deets and to give it a whirl on your side of the fence!
We’re also including a media-resume-overlay element and setting the same playback ID value as an attribute on the element.
Next, we’ll create the web component template HTML that will be used when rendering the web component:
// in media-resume-overlay.js
const template = document.createElement("template");

template.innerHTML = `
  <style>
  :host {
    position: absolute;
    top: 0;
    bottom: 0;
    left: 0;
    right: 0;
    width: 500px;
    height: 300px;
  }

  button {
    font-family: monospace;
    padding: 0.5rem;
    cursor: pointer;
  }

  #restart-resume {
    height: 100%;
    width: 100%;
    background-color: rgba(0, 0, 0, 0.7);
    display: flex;
    align-items: center;
    justify-content: center;
    gap: 5px;
  }
  </style>

  <div id="restart-resume">
    <button type="button" id="restart">< Restart</button>
    <button type="button" id="resume">Resume ></button>
  </div>
`;
This is all pretty straightforward: We’re defining a few custom styles that will apply to the root element, and we’re rendering out two buttons that we’ll use to control the player timecode.

This component doesn’t actually do anything just yet, so let’s go ahead and change that now.
Building our web component
To create the web component, let’s create a new class that extends from the window.HTMLElement implementation.
// later, still in media-resume-overlay.js
class MediaResumeOverlay extends window.HTMLElement {

  constructor() {
    super();
    this.attachShadow({ mode: 'open' });
    this.shadowRoot.appendChild(template.content.cloneNode(true));

    this.player = document.getElementById("video-player");
    this.playbackId = this.getAttribute("playback-id");

    this.lastKnownTime = window.localStorage.getItem(this.playbackId) || 0;

    this.resumeBtn = this.shadowRoot.querySelector("#resume");
    this.restartBtn = this.shadowRoot.querySelector("#restart");
  }

  connectedCallback() {
    const player = this.player;
    player.currentTime = this.lastKnownTime;

    if (this.lastKnownTime === 0) {
      this.style.display = 'none';
    }

    player.addEventListener('timeupdate', (e) => {
      window.localStorage.setItem(this.playbackId, e.target.currentTime);
    });

    player.addEventListener('ended', () => {
      window.localStorage.removeItem(this.playbackId);
      this.style.display = 'none';
    });

    player.addEventListener('pause', () => {
      this.style.display = 'block';
    });

    this.resumeBtn.addEventListener('click', () => {
      this.style.display = 'none';
      player.currentTime = window.localStorage.getItem(this.playbackId) || 0;
      player.play();
    });

    this.restartBtn.addEventListener('click', () => {
      this.style.display = 'none';
      player.currentTime = 0;
      player.play();
    })
  }
}

customElements.define("media-resume-overlay", MediaResumeOverlay);What all is going on here?
In the class constructor, we’re adding the template contents to the shadowRoot by cloning the node we created earlier. We’re then grabbing the video element and storing it to the this.player property, and taking its playback-id attribute to store it in the this.playbackId property.
To hydrate the initial playhead time, we’ll check local storage for any values that exist under the given playbackId key and save it to the this.lastKnownTime property. If no value is found, we’ll assume the playhead time is 0 — the very beginning of the video.
For the last part of our class setup, we’ll query the shadow root contents for the Resume and Restart buttons from our template and save them both to class properties.
this.resumeBtn = this.shadowRoot.querySelector("#resume");
this.restartBtn = this.shadowRoot.querySelector("#restart");
On to the connected callback
The connectedCallback is called as soon as the web component is mounted to the shadow DOM.
const player = this.player;
    player.currentTime = this.lastKnownTime;

    if (this.lastKnownTime === 0) {
      this.style.display = 'none';
    }

    player.addEventListener('timeupdate', (e) => {
      window.localStorage.setItem(this.playbackId, e.target.currentTime);
    });

    player.addEventListener('ended', () => {
      window.localStorage.removeItem(this.playbackId);
    });

    player.addEventListener('pause', () => {
      this.style.display = 'block';
    });

    this.resumeBtn.addEventListener('click', () => {
      this.style.display = 'none';
      player.currentTime = window.localStorage.getItem(this.playbackId) || 0;
      player.play();
    });

    this.restartBtn.addEventListener('click', () => {
      this.style.display = 'none';
      player.currentTime = 0;
      player.play();
    })
First, let’s get a reference to the player we stored in the class property earlier. We can immediately set the player’s currentTime value to the lastKnownTime that we determined in the constructor.
If the lastKnownTime value is 0, we don’t need to show the viewer any kind of resume button, because they haven’t started watching the video to begin with. In that instance, we’ll set the web component’s style to display: none;.
Now, there are several instances where we want to set, get, and remove the last known playback time within localstorage.
- We’ll set the latest time value to localstorage any time the video playback progresses.
- We’ll get the latest time value from localstorage whenever the resume button is clicked.
- We’ll remove the time value from localstorage whenever the video playback reaches the end of the video.
The player.addEventListener callbacks enable us to perform these actions by responding to the correlated events occurring within the player.
Last, depending on the state of the video playback progress and the user’s interactions with our web component, we’ll want to modify the appearance of the web component.
- We’ll ensure the overlay is visible when the video loads and previous playback progress is detected.
- We’ll ensure the overlay is visible when the video is paused.
- We’ll hide the overlay when the viewer clicks on the restart or resume buttons.
Great! Let’s see it in action:
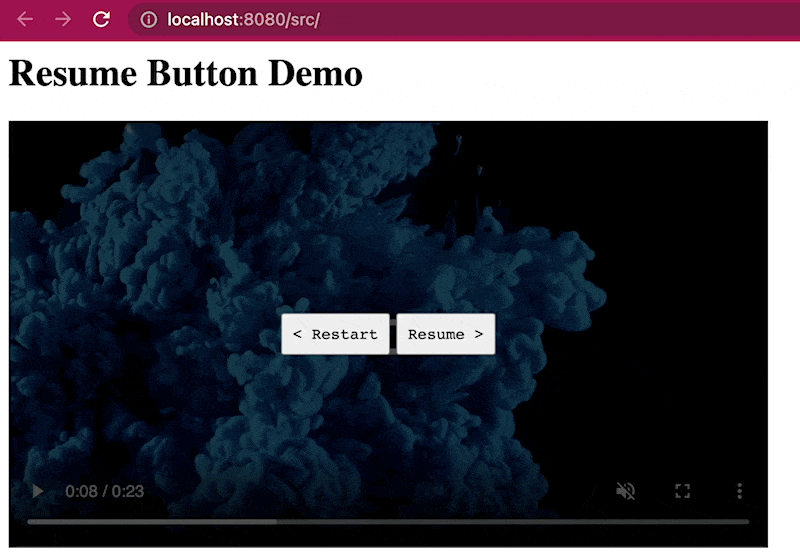
Keep in mind that this approach will only work if the viewer is returning to the page from the same browser and device. If you’d like to take this further, it’s possible to persist the playhead time to a database and recall it based on a user’s logged-in token.
Carry on, carry on
Improvements like this may feel small, but collectively, they all add up to a better quality of experience for your viewers. Shout out to Tim Bobker here at Mux, who has been working on this concept over the past few months!
If you have any questions about this approach, feel free to send me a note on Twitter, @davekiss. If you’re feeling extra generous, you can also send me some of your old book fair paraphernalia via snail mail.